
GET_EXERCISE_OBSERVATION 的 widget。
对于许多 intent,最佳的响应就是向用户提供简单的回答、简要的确认或快速的互动体验。您可以在 Google 助理中显示 Android 应用 widget 来执行这些类型的 intent。
本指南介绍了如何使用 widget 来执行 Google 助理用户查询,以及如何利用与应用有关的 Action 的 Widgets Extension 库来改善 Google 助理的 widget 体验。
优点
widget 是可以嵌入到 Android surface(如启动器或锁定屏幕)上的微型应用视图。借助与应用有关的 Action,您可以通过让 widget 能够在 Google 助理中显示来提高其使用率:
- 发现:主动显示 widget 来响应用户的自然语言查询。
- 互动:在免触摸上下文中显示 widget,例如当 Google 助理在锁定屏幕和 Android Auto 上提供个人信息相关结果时。
- 保留:允许用户将 Google 助理中显示的 widget 固定到其启动器上。固定功能需要用到 Widgets Extension 库。
Google 助理如何显示 widget
用户可以通过两种方式在 Google 助理上调用 widget:
- 通过名称明确请求 widget。
- 向 Google 助理说出查询来触发为 widget 执行方式配置的内置 intent (BII) 或自定义 intent。
显式调用
如需显式调用任何已安装应用的 widget,用户可以向 Google 助理发出诸如以下的请求:
- “Hey Google, show ExampleApp widget.”
- “Widgets from ExampleApp”
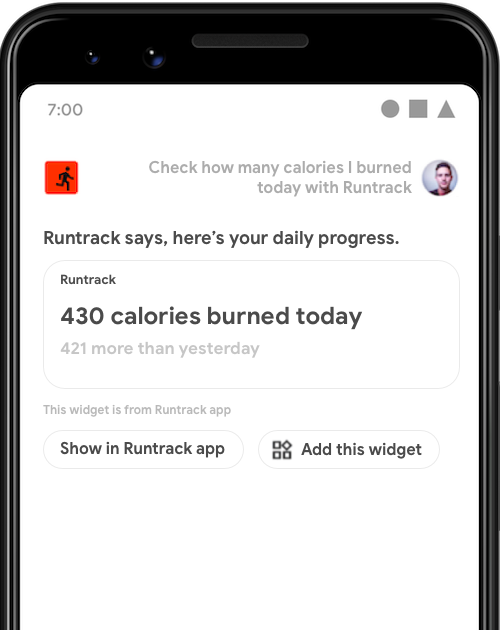
Google 助理会显示这些 widget 并提供大致的介绍:“ExampleApp says, here's a widget”。虽然 Google 助理原生就会以这种方式返回请求的 widget,而无需应用开发者做任何工作,但这种调用方法要求用户明确知道要请求的 widget。如需简化 widget 发现过程,请使用下一部分中详细介绍的 intent 执行方式。
intent 执行方式
通过使用 widget 来执行用户在 Google 助理上进行的自然语言查询,使 widget 更容易被找到。例如,您可以在用户通过询问“Ok Google, how many miles have I run this week on ExampleApp?”在健身应用中触发 GET_EXERCISE_OBSERVATION BII 时,返回 widget。除了简化发现过程之外,将与应用有关的 Action 和 widget 集成还有以下优势:
- 参数访问:Google 助理会将从用户查询中提取的 intent 参数提供给您的 widget,从而实现贴合用户需求的响应。
- 自定义 TTS 简介:您可以提供文字转语音 (TTS) 字符串,以供 Google 助理在显示 widget 时读出。
- widget 固定:Google 助理会在 widget 旁边显示添加此 widget 按钮,以便用户轻松将 widget 固定到其启动器。
实现 widget 执行方式
如需为您的 intent 实现 widget 执行方式,请按以下步骤操作:
- 按照创建简单 widget 中所述的步骤实现 Android widget。
- 在应用的
shortcuts.xml资源文件中,向包含执行方式详细信息和 BII<parameter>标记的 capability 中添加<app-widget>元素。请更新您的 widget 以处理这些参数。 - 添加所需的 Widgets Extension 库,以允许 Google 助理将 BII 名称和参数传递给 widget。此外,该库还支持自定义 TTS 简介和 widget 固定功能。
以下部分介绍 shortcuts.xml 的 <app-widget> 架构。
widget 架构
<app-widget> 元素在 shortcuts.xml 中的 <capability> 元素内定义为执行方式。必须提供以下属性,但注明为“可选”的属性除外:
| “Shortcuts.xml”标记 | 包含于 | 属性 |
|---|---|---|
<app-widget> |
<capability> |
|
<parameter> |
<app-widget> |
|
<extra> |
<app-widget> |
|
widget 架构说明
<app-widget>
顶层 widget 执行方式元素。
属性:
android:identifier:此执行方式的标识符。此值在<capability>中定义的<app-widget>和<intent>执行方式元素之间必须具有唯一性。android:targetClass:用于处理 intent 的AppWidgetProvider的完整类名。
<parameter>
将 BII 参数映射到 intent <parameter> 值。您可以为每个 <app-widget> 元素定义零个或多个参数。在执行过程中,Google 助理通过以键值对的形式更新 widget 实例的 extra 来传递参数,格式如下:
- 键:为参数定义的
android:key。 - 值:BII 从用户的语音输入中提取的值。
您可以通过对关联的 AppWidgetManager 对象调用 getAppWidgetOptions() 来访问这些 extra,此调用会返回包含触发 BII 的名称及其参数的 Bundle。如需了解详情,请参阅提取参数值。
如需详细了解 BII 参数匹配,请参阅参数数据和匹配。
<extra>
可选标记,用于声明为此 widget 使用了自定义 TTS 简介。此标记需要以下属性值:
android:name:"hasTts"android:value:"true"
示例代码
shortcuts.xml 文件中的以下示例演示了 GET_EXERCISE_OBSERVATION BII capability 的 widget 执行方式配置:
<capability android:name="actions.intent.GET_EXERCISE_OBSERVATION">
  <app-widget
    android:identifier="GET_EXERCISE_OBSERVATION_1"
    android:targetClass="com.exampleapp.providers.exampleAppWidgetProvider"
    android:targetPackage="com.exampleapp">
    <parameter
      android:name="exerciseObservation.aboutExercise.name"
      android:key="exercisename">
    </parameter>
    <extra android:name="hasTts" android:value="true"/>
  </app-widget>
</capability>
您可以为每个 capability 指定多个 <app-widget> 元素或结合使用 <app-widget> 和 <intent> 元素。这种做法可让您根据用户提供的不同参数组合来提供自定义体验。例如,如果用户没有在其查询中指定下车点,您就可以将用户引导到应用中显示上车点和下车点设置选项的 activity。如需详细了解如何定义回退 intent,请参阅回退 intent 部分。
提取参数值
在以下示例 AppWidgetProvider 类中,使用私有函数 updateAppWidget() 从 widget 选项 Bundle 中提取 BII 名称和参数:
Kotlin
package com.example.exampleapp

//... Other module imports
import com.google.assistant.appactions.widgets.AppActionsWidgetExtension

/**
 * Implementation of App Widget functionality.
 */
class MyAppWidget : AppWidgetProvider() {
    override fun onUpdate(
        context: Context,
        appWidgetManager: AppWidgetManager,
        appWidgetIds: IntArray
    ) {
        // There might be multiple widgets active, so update all of them
        for (appWidgetId in appWidgetIds) {
            updateAppWidget(context, appWidgetManager, appWidgetId)
        }
    }

    private fun updateAppWidget(
        context: Context,
        appWidgetManager: AppWidgetManager,
        appWidgetId: Int
    ) {
        val widgetText: CharSequence = context.getString(R.string.appwidget_text)

        // Construct the RemoteViews object
        val views = RemoteViews(context.packageName, R.layout.my_app_widget)
        views.setTextViewText(R.id.appwidget_text, widgetText)

        // Extract the name and parameters of the BII from the widget options
        val optionsBundle = appWidgetManager.getAppWidgetOptions(appWidgetId)
        val bii = optionsBundle.getString(AppActionsWidgetExtension.EXTRA_APP_ACTIONS_BII) // "actions.intent.CREATE_TAXI_RESERVATION"
        val params = optionsBundle.getBundle(AppActionsWidgetExtension.EXTRA_APP_ACTIONS_PARAMS)
        if (params != null && params.containsKey("dropoff")) {
            val dropoffLocation = params.getString("dropoff")
            // Build your RemoteViews with the extracted BII parameter
            // ...
        }
        appWidgetManager.updateAppWidget(appWidgetId, views)
    }
}
Java
package com.example.exampleapp;

//... Other module imports
import com.google.assistant.appactions.widgets.AppActionsWidgetExtension;

/**
 * Implementation of App Widget functionality.
 */
public class MyAppWidget extends AppWidgetProvider {

    @Override
    public void onUpdate(Context context, AppWidgetManager appWidgetManager, int[] appWidgetIds) {
        // There might be multiple widgets active, so update all of them
        for (int appWidgetId : appWidgetIds) {
            updateAppWidget(context, appWidgetManager, appWidgetId);
        }
    }

    private static void updateAppWidget(Context context, AppWidgetManager appWidgetManager, int appWidgetId) {

        CharSequence widgetText = context.getString(R.string.appwidget_text);

        // Construct the RemoteViews object
        RemoteViews views = new RemoteViews(context.getPackageName(), R.layout.my_app_widget);
        views.setTextViewText(R.id.appwidget_text, widgetText);

        // Extract the name and parameters of the BII from the widget options
        Bundle optionsBundle = appWidgetManager.getAppWidgetOptions(appWidgetId);
        String bii =
                optionsBundle.getString(AppActionsWidgetExtension.EXTRA_APP_ACTIONS_BII); // "actions.intent.CREATE_TAXI_RESERVATION"
        Bundle params =
                optionsBundle.getBundle(AppActionsWidgetExtension.EXTRA_APP_ACTIONS_PARAMS);

        if (params != null && params.containsKey(("dropoff"))){
            String dropoffLocation = params.getString("dropoff");
            // Build your RemoteViews with the extracted BII parameter
            // ...
        }

        appWidgetManager.updateAppWidget(appWidgetId, views);
    }
}
Widgets Extension 库
与应用有关的 Action 的 Widgets Extension 库可增强您的 widget,以实现语音优先的 Google 助理体验。此库可让 widget 接收触发的 BII 中的重要执行方式信息,包括 BII 名称和从用户查询中提取的所有 intent 参数。
借助此 Maven 库,您可以为每个 widget 提供自定义文字转语音 (TTS) 简介,以便 Google 助理向用户读出正在视觉呈现的内容的摘要。该库还支持实现启动器固定功能,以便用户能够轻松将 Google 助理中显示的 widget 保存到其启动器屏幕。
首先,将该库添加到应用模块的 build.gradle 文件的依赖项部分:
dependencies {
    //...
    implementation "com.google.assistant.appactions:widgets:0.0.1"
}
自定义简介
导入 Widgets Extension 库后,就可以为 widget 提供自定义 TTS 简介。如需将定义添加到 widget 的 AppWidgetProvider,请在 IDE 中打开该类并导入 Widgets Extension 库:
Kotlin
import com.google.assistant.appactions.widgets.AppActionsWidgetExtension
Java
import com.google.assistant.appactions.widgets.AppActionsWidgetExtension;
Kotlin
package com.example.exampleapp

//... Other module imports
import com.google.assistant.appactions.widgets.AppActionsWidgetExtension

/**
 * Implementation of App Widget functionality.
 */
object MyAppWidget : AppWidgetProvider() {
    fun updateAppWidget(
        context: Context?,
        appWidgetManager: AppWidgetManager,
        appWidgetId: Int
    ) {
        val appActionsWidgetExtension = AppActionsWidgetExtension.newBuilder(appWidgetManager)
            .setResponseSpeech("Hello world") // TTS to be played back to the user
            .setResponseText("Hello world!") // Response text to be displayed in Assistant
            .build()

        // Update widget with TTS
        appActionsWidgetExtension.updateWidget(appWidgetId)

        // Update widget UI
        appWidgetManager.updateAppWidget(appWidgetId, views)
    }
}
Java
package com.example.exampleapp;

//... Other module imports
import com.google.assistant.appactions.widgets.AppActionsWidgetExtension;

/**
 * Implementation of App Widget functionality.
 */
public class MyAppWidget extends AppWidgetProvider {

  static void updateAppWidget(Context context, AppWidgetManager appWidgetManager,
    int appWidgetId) {

    AppActionsWidgetExtension appActionsWidgetExtension = AppActionsWidgetExtension.newBuilder(appWidgetManager)
      .setResponseSpeech("Hello world")  // TTS to be played back to the user
      .setResponseText("Hello world!")  // Response text to be displayed in Assistant
      .build();

      // Update widget with TTS
      appActionsWidgetExtension.updateWidget(appWidgetId);

      // Update widget UI
      appWidgetManager.updateAppWidget(appWidgetId, views);
    }

}
文字转语音 (TTS) 样式建议
使用以下样式建议来优化 TTS 的自定义 widget 简介,以及所显示的提示。
| 建议 | 建议 | 不建议 |
|---|---|---|
缩写词在 TTS 提示中使用缩写词。未使用英文缩写词的消息听起来很尖锐、机械,而不像是自然的对话。说“cannot”(没法)和“do not”(不要)之类的字词会让人感觉过于严肃和严厉。 |
ResponseSpeech (TTS)Sorry, I can’t find a reservation.(抱歉,我没法找到预订。) ResponseTextSorry, I can’t find a reservation.(抱歉,我没法找到预订。) |
ResponseSpeech (TTS)Sorry, I cannot find a reservation.(抱歉,我没法找到预订。) ResponseTextSorry, I cannot find a reservation.(抱歉,我没法找到预订。) |
逗号在包含三项或更多项的列表中使用逗号来提高清晰度。如果未使用逗号,列表中的各项内容可能让人听错,或者作为一个整体读出。例如,在“水仙花、雏菊和向日葵”中,“雏菊”和“向日葵”听起来像是一体的。在“水仙花、雏菊,和向日葵”中,这三者显然是分开的。 |
ResponseSpeech (TTS)最受欢迎的品种包括黄玫瑰、水仙、雏菊,和向日葵。 ResponseText最受欢迎的品种包括黄玫瑰、水仙、雏菊和向日葵。 |
ResponseSpeech (TTS)最受欢迎的品种包括黄玫瑰、水仙、雏菊,和向日葵。 ResponseText最受欢迎的品种包括黄玫瑰、水仙、雏菊和向日葵。 |
数字使用数字代替文本,让可视内容更一目了然。 |
ResponseSpeech (TTS)您的血压为 100/80。 ResponseText您的血压为 100/80。 |
ResponseSpeech (TTS)您的血压为 100/80。 ResponseText您的血压为一百/八十。 |
符号使用专门的符号而非文字,让可视内容更一目了然。 |
ResponseSpeech (TTS)您上一次购物花了 $24.65。 ResponseText您上一次购物花了 $24.65。 |
ResponseSpeech (TTS)您上一次购物花了二十四美元六十五美分。 ResponseText您上一次购物花了二十四美元六十五美分。 |
避免正式体正式体会让回复内容显得很有距离感。避免正式体,保持友好和谐的对话环境。 |
ResponseSpeech (TTS)您的订单已送达。 ResponseText您的订单已送达。 |
ResponseSpeech (TTS)我有新的消息要告诉您。您的订单已送达。 ResponseText我有新的消息要告诉您。 您的订单已送达。 |
避免使用感叹号这可能会让人感觉是在大声呼喊。 |
ResponseSpeech (TTS)您今天跑了 1.5 英里。 ResponseText您今天跑了 1.5 英里。 |
ResponseSpeech (TTS)您今天跑了 1.5 英里! ResponseText您今天跑了 1.5 英里! |
时间请使用数字“5:15”,而不是“5-15”或“5 小时 15 分”。 对于 12 小时制,请使用“上午”或“下午”。 |
ResponseSpeech (TTS)您的包裹应在上午 8:15 前送达。 ResponseText您的包裹应在上午 8:15 前送达。 |
ResponseSpeech (TTS)您的包裹应在今天早上8 点过 15 分钟之前送达。 ResponseText您的包裹应在今天早上8 点过 15 分钟之前送达。 |
不要让内容呈现出独白风格信息丰富,但回复要简洁。请勿在没有明确用户利益的情况下深入研究细节。 |
ResponseSpeech (TTS)您设备上个月的耗电时间为 159 小时。 ResponseText您设备上个月的耗电时间为 159 小时。 |
ResponseSpeech (TTS)节能对于保护植物和环境非常重要。您设备上个月的耗电时间为 159 小时。您设备这个月的耗电时间为 58 小时。 ResponseText节能对于保护植物和环境非常重要。您设备上个月的耗电时间为 159 小时。您设备这个月的耗电时间为 58 小时。 |
使用简短字词简单易懂的语言最具吸引力,适合各种背景的用户。 |
ResponseSpeech (TTS)您的上一次血糖读数为 126。 ResponseText您的上一次血糖读数为 126 mg/dL。 |
ResponseSpeech (TTS)倒数第二次的血糖水平为 126。 ResponseText倒数第二次的血糖水平为 126。 |
启动器固定
借助 widget Extension 库,可以在 Google 助理中与 widget 一起显示添加此 widget 按钮。如需启用固定功能,请将以下接收器定义添加到 AndroidManifest.xml:
<application>
  <receiver android:name="com.google.assistant.appactions.widgets.pinappwidget.PinAppWidgetBroadcastReceiver"
    android:exported="false">
    <intent-filter>
      <action android:name="com.google.assistant.appactions.widgets.COMPLETE_PIN_APP_WIDGET" />
    </intent-filter>
  </receiver>
  <service
    android:name=
    "com.google.assistant.appactions.widgets.pinappwidget.PinAppWidgetService"
    android:enabled="true"
    android:exported="true">
    <intent-filter>
      <action
        android:name="com.google.assistant.appactions.widgets.PIN_APP_WIDGET" />
    </intent-filter>
  </service>
</application>
目录可用性
支持内嵌目录或网站目录的 BII 可以将这两种目录扩展到您的 widget 执行方式。
内嵌目录
示例 shortcuts.xml 文件中的以下代码演示了为内嵌目录和 widget 执行方式配置的 START_EXERCISE BII capability:
<capability
  android:name="actions.intent.START_EXERCISE">
  <app-widget
    android:identifier="START_EXERCISE_1"
    android:targetClass="com.example.exampleapp.StartExerciseAppWidgetProvider">
    <parameter
      android:name="exercise.name"
      android:key="exerciseName"
      app:shortcutMatchRequired="true">
    </parameter>
  </app-widget>
</capability>

<shortcut android:shortcutId="RunningShortcut">
  <intent
    android:action="android.intent.action.VIEW"
    android:targetClass="com.example.exampleapp.StartExcerciseActivity" />
  <capability-binding
    android:capability="actions.intent.START_EXERCISE"
    android:parameter="exercise.name"
    android:value="running;runs" />
</shortcut>
在上述示例中,当用户通过向 Google 助理发出“Start running with ExampleApp”请求来触发此 capability 时,<app-widget> 执行方式的选项 bundle 就会包含以下键值对:
- 键 =
“exerciseName” - 值 =
“RunningShortcut”
网站目录
示例 shortcuts.xml 文件中的以下代码显示了为网站目录和 widget 执行方式启用的 capability:
<shortcuts>
  <capability
    android:name="actions.intent.START_EXERCISE">
    <app-widget
      android:identifier="START_EXERCISE_1"
      android:targetClass="com.example.exampleapp.CreateTaxiAppWidgetProvider">
      <parameter
        android:name="exercise.name"
        android:key="exerciseName"
        android:mimeType="text/*">
        <data android:pathPattern="https://exampleapp.com/exercise/.*" />
      </parameter>
    </app-widget>
  </capability>
</shortcuts>
测试与应用有关的 Action
与应用有关的 Action 测试工具是适用于 Android Studio 的 Google 助理插件的一项功能,可用于在实体设备或虚拟设备上测试 widget。如要使用该测试工具,请按以下步骤操作:
- 连接运行您的应用的测试设备。
- 在 Android Studio 中,依次点击 Tools > App Actions > App Actions Test Tool。
- 点击 Create preview。
- 使用 Android Studio,在测试设备上运行您的应用。
- 使用测试设备上的 Google 助理应用测试与应用有关的 Action。例如,您可以这样说:“Hey Google, how many miles have I run this week on ExampleApp?”。
- 观察应用的行为,或使用 Android Studio 调试程序来验证是否取得了所需的操作结果。
质量指南
本部分重点介绍将与应用有关的 Action 与 widget 集成的关键要求和最佳实践。
widget 中的内容
- (必需)不得在 widget 中展示广告。
- 让 widget 内容完全专注于执行 intent。不要试图用一个 widget 执行多个 intent,也不要添加不相关的内容。
处理身份验证
- (必需)如果需要对用户进行身份验证才能完成用户流,则应返回一个 widget,用于说明用户需要在应用中继续操作。与应用有关的 Action 不支持 Google 助理中的内嵌用户身份验证。
- 如果用户允许您的应用使用 widget 显示数据,您可以在运行时为未经授权的用户返回错误 widget。
回退 intent
(必需)在
shortcuts.xml中,除 widget 执行方式外,还应始终为给定 capability 提供一个回退<intent>。回退 intent 是不含必需的<parameter>值的<intent>元素。这样一来,当用户查询中不包含该 capability 中定义的其他执行方式元素所需的参数时,Google 助理仍可执行操作。对此有一个例外,那就是该 capability 没有必需的参数,在这种情况下,只要有 widget 执行方式就够了。
使用回退 intent 在您的应用中打开相关屏幕,而不是主屏幕。
示例 shortcuts.xml 文件中的以下代码展示了一个 <capability>,其回退 <intent> 支持主要 <app-widget> 执行方式:
<shortcuts>
  <capability
    android:name="actions.intent.CREATE_TAXI_RESERVATION">
    <!-- Widget with required parameter, specified using the "android:required" attribute. -->
    <app-widget
      android:identifier="CREATE_TAXI_RESERVATION_1"
      android:targetClass="com.example.myapplication.CreateTaxiAppWidgetProvider">
      <parameter
        android:name="taxiReservation.dropoffLocation.name"
        android:key="dropoff"
        android:required="true">
      </parameter>
    </app-widget>
    <!-- Fallback intent with no parameters required to successfully execute. -->
    <intent
      android:identifier="CREATE_TAXI_RESERVATION_3"
      android:action="myapplication.intent.CREATE_TAXI_RESERVATION_1"
      android:targetClass="com.example.myapplication.TaxiReservationActivity">
    </intent>
  </capability>
</shortcuts>
Google Play 数据披露
本部分列出了最新版 Widgets Extension 库会收集的最终用户数据。
此 SDK 会发送开发者提供的文字转语音 (TTS) 响应,这些响应将由 Google 助理使用 Google 助理的语音技术向用户读出。Google 不会存储这些信息。
与应用有关的 Action 也可能会出于以下目的收集客户端应用元数据:
- 监控不同 SDK 版本的采用率。
- 量化 SDK 功能在不同应用中的使用情况。