
ปุ่มตำแหน่งของ Android เป็นองค์ประกอบ UI ของระบบที่ปรับแต่งได้ ซึ่งออกแบบมาเพื่อลดความซับซ้อนของวิธีที่คุณขอสิทธิ์เข้าถึงตำแหน่งที่แน่นอนระดับเซสชัน การเริ่มคำขอตำแหน่งผ่านการดำเนินการโดยตรงของผู้ใช้จะช่วยปรับปรุงความเป็นส่วนตัวของผู้ใช้และลดความยุ่งยากของกล่องโต้ตอบสิทธิ์ที่ซ้ำๆ ซึ่งมักพบในการให้สิทธิ์ "เฉพาะครั้งนี้" แบบชั่วคราว
หากแอปกำหนดเป้าหมายเป็น Android 17 (ระดับ API 37) ขึ้นไปและมีเพียงฟีเจอร์ที่ต้องใช้สิทธิ์เข้าถึงตำแหน่งตามเซสชันเพื่อให้ทำงานได้ นโยบายของ Google Play กำหนดให้คุณต้องใช้ปุ่มตำแหน่ง ดูรายละเอียดเพิ่มเติมได้ที่ นโยบายปุ่มตำแหน่ง

กรณีที่ควรใช้ปุ่มตำแหน่ง
ใช้ปุ่มตำแหน่งสำหรับฟีเจอร์ที่ต้องใช้สิทธิ์เข้าถึงตำแหน่งที่แน่นอนแบบจำกัดขอบเขตเซสชันเพียงชั่วคราว ซึ่งเหมาะอย่างยิ่งสำหรับแอปพลิเคชันที่ไม่ต้องใช้สิทธิ์เข้าถึงตำแหน่งแบบต่อเนื่องและมีเป้าหมายเพื่อลดการแจ้งเตือนสิทธิ์ "เฉพาะครั้งนี้" ที่ซ้ำๆ
กรณีการใช้งานทั่วไป ได้แก่
- ฟังก์ชัน "ค้นหาใกล้ฉัน": ค้นหาโรงแรม ร้านค้า หรือร้านอาหารที่อยู่ใกล้เคียง
- การแชร์ตำแหน่ง: แชร์ตำแหน่งปัจจุบันกับเพื่อนหรือครอบครัวเพียงครั้งเดียว
- โซเชียลมีเดีย: การเช็คอินหรือการแท็กตำแหน่ง
- อีคอมเมิร์ซ: การป้อนที่อยู่สำหรับการจัดส่งโดยอัตโนมัติ
ปรับแต่ง UI
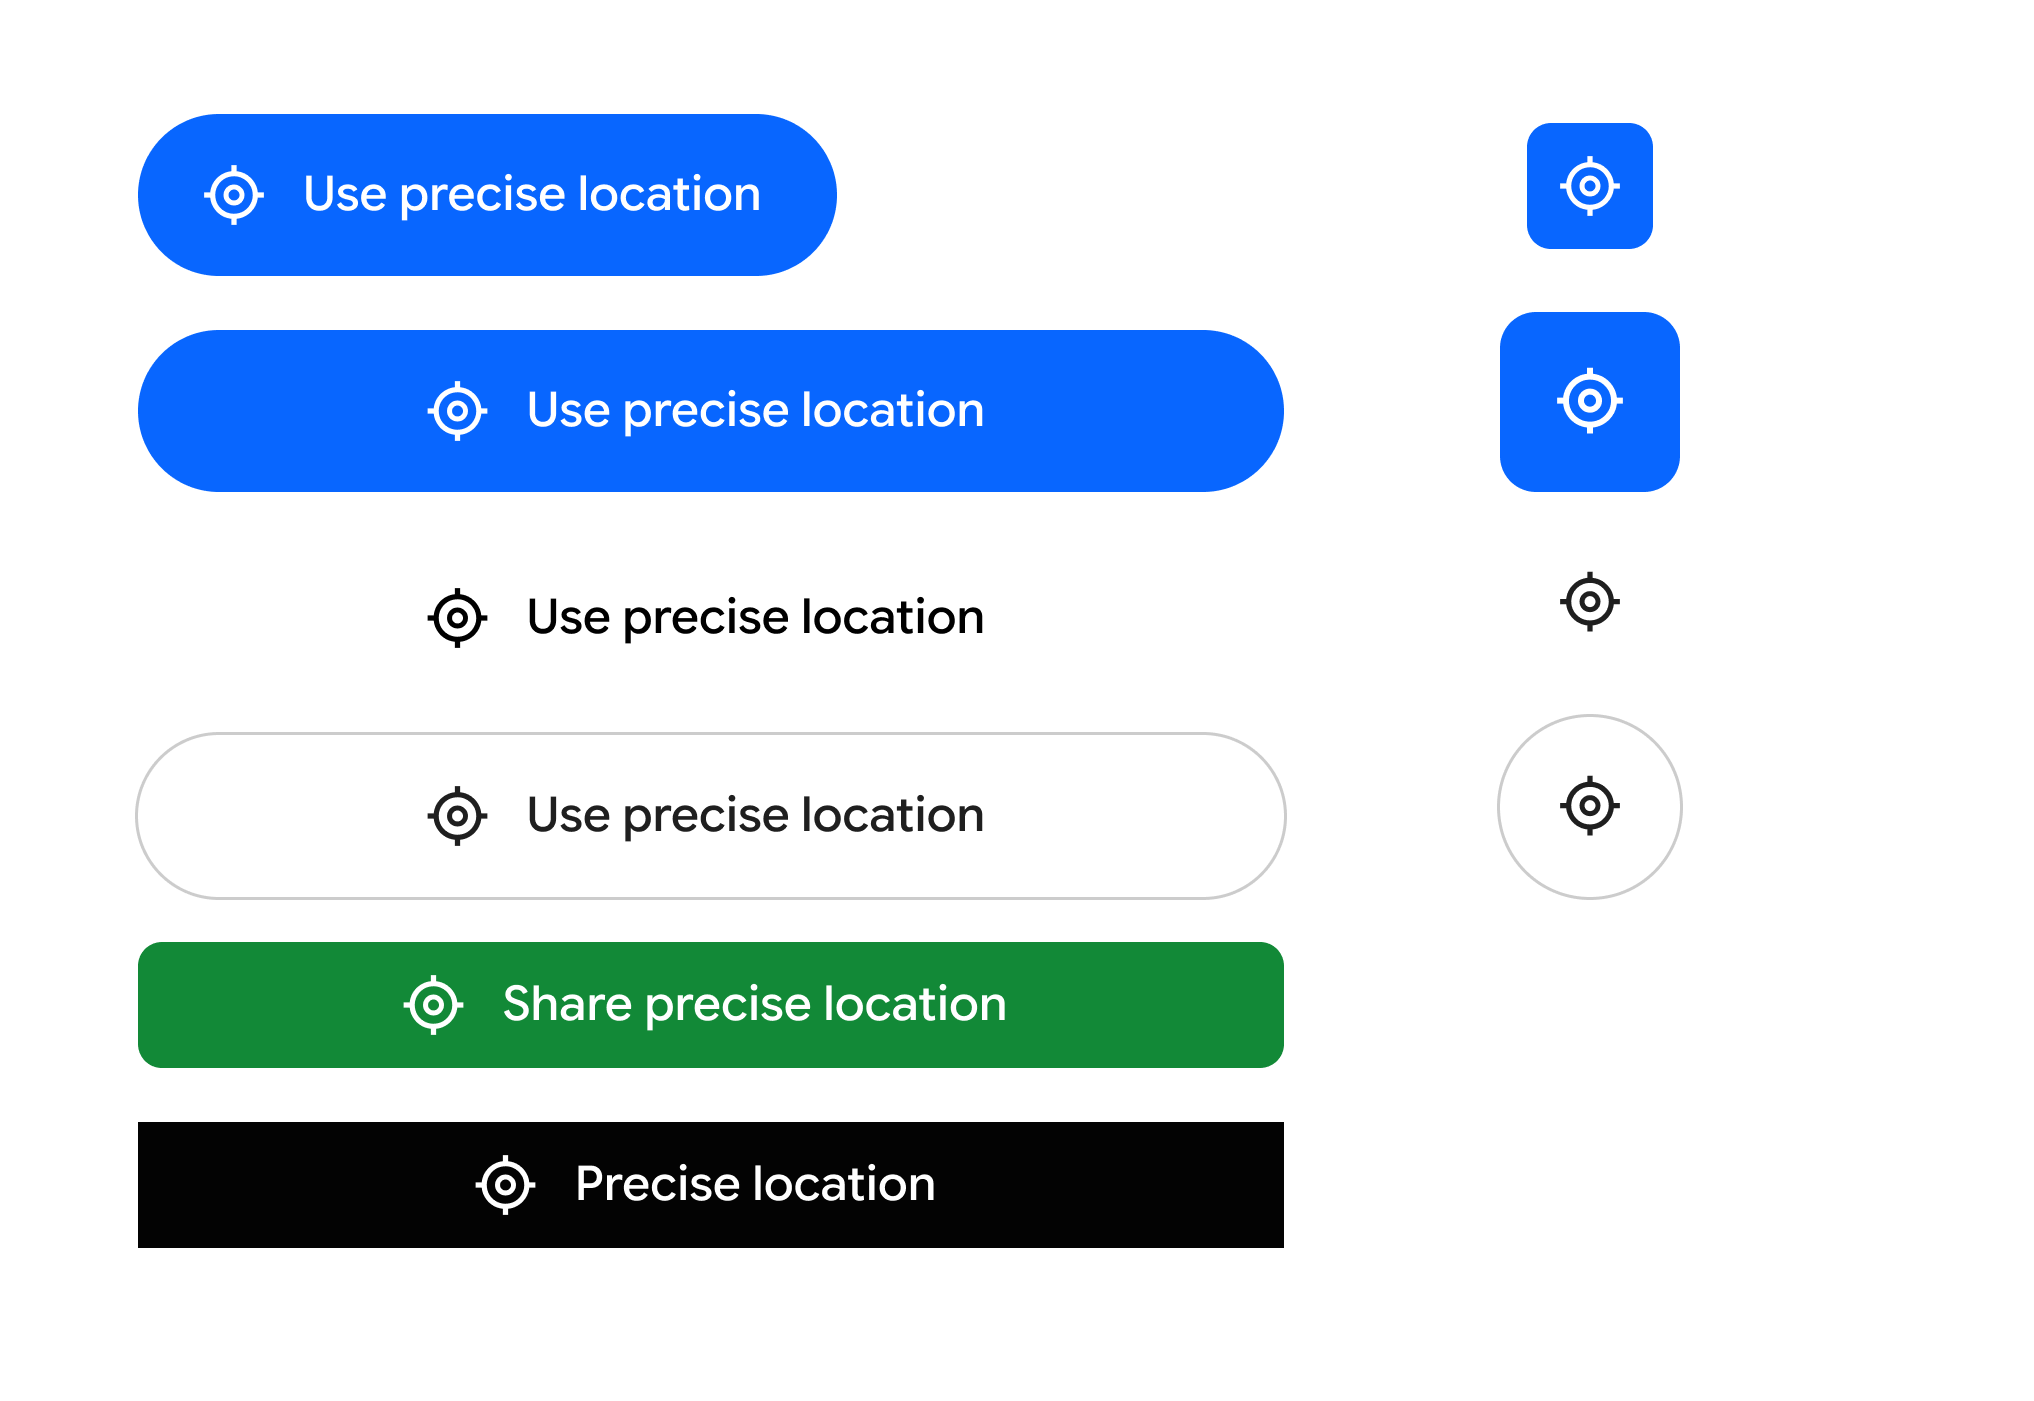
คุณสามารถแก้ไของค์ประกอบภาพต่อไปนี้เพื่อให้ปุ่มเข้ากับความสวยงามของแอปในขณะที่ยังคงจดจำได้
- โทนสีพื้นหลังและไอคอน
- สไตล์ ขนาด และรูปร่างของเส้นขอบ
- ป้ายกำกับข้อความจากรายการที่กำหนดไว้ล่วงหน้า (เช่น "ใช้ตำแหน่งที่แน่นอน" "แชร์ตำแหน่งที่แน่นอน")
ใช้ปุ่มตำแหน่ง
หากต้องการผสานรวมปุ่มตำแหน่ง ให้ใช้ ไลบรารี Jetpack ไลบรารีนี้ช่วยลดความซับซ้อนในการตั้งค่า จัดการการแสดงผลที่ปลอดภัยในแพลตฟอร์มใหม่กว่า และมีฟังก์ชันสำรองสำหรับแอปที่กำหนดเป้าหมายเป็น Android 16 และต่ำกว่า
ขั้นตอนที่ 1: ประกาศสิทธิ์ในไฟล์ Manifest ของ Android
คุณต้องประกาศสิทธิ์เข้าถึงตำแหน่งมาตรฐานพร้อมกับสิทธิ์ USE_LOCATION_BUTTON เฉพาะที่บริการแสดงผลระยะไกลของระบบกำหนด
<?xml version="1.0" encoding="utf-8"?> <!-- Copyright 2026 The Android Open Source Project Licensed under the Apache License, Version 2.0 (the "License"); you may not use this file except in compliance with the License. You may obtain a copy of the License at https://www.apache.org/licenses/LICENSE-2.0 Unless required by applicable law or agreed to in writing, software distributed under the License is distributed on an "AS IS" BASIS, WITHOUT WARRANTIES OR CONDITIONS OF ANY KIND, either express or implied. See the License for the specific language governing permissions and limitations under the License. --> <manifest xmlns:android="http://schemas.android.com/apk/res/android"> <!-- 1. Standard Coarse and Fine Location Permissions --> <uses-permission android:name="android.permission.ACCESS_COARSE_LOCATION" /> <uses-permission android:name="android.permission.ACCESS_FINE_LOCATION" /> <!-- Optional: If your app is only using the location button to access location, you should add the "onlyForLocationButton" flag shown below to your ACCESS_FINE_LOCATION declaration. <uses-permission android:name="android.permission.ACCESS_FINE_LOCATION" android:usesPermissionFlags="onlyForLocationButton"/> Note: Adding this flag restricts your app from accessing the precise location permission via the broader permission, and that users will be required to use the location button in order to share precise location with the app. This is designed to improve user privacy & trust when granting location access. --> <!-- 2. CRITICAL: Required system permission for rendering the LocationButton --> <uses-permission android:name="android.permission.USE_LOCATION_BUTTON" /> <application android:icon="@mipmap/ic_launcher" android:label="LocationButtonSample" android:theme="@style/Theme.PinPoint"> <activity android:name=".MainActivity" android:exported="true"> <intent-filter> <action android:name="android.intent.action.MAIN" /> <category android:name="android.intent.category.LAUNCHER" /> </intent-filter> </activity> </application> </manifest>
ขั้นตอนที่ 2: ใช้ฟังก์ชันที่ใช้ร่วมกันได้ของ Kotlin
ต่อไปนี้เป็นตัวอย่างการใช้งานปุ่มตำแหน่ง ซึ่งรวมถึงตัวอย่างการใช้ตัวเลือกการปรับแต่งที่มีอยู่ซึ่งสามารถใช้เพื่อให้ UI เข้ากับส่วนอื่นๆ ของแอป
import androidx.compose.foundation.layout.PaddingValues import androidx.compose.foundation.layout.height import androidx.compose.foundation.layout.width import androidx.compose.runtime.Composable import androidx.compose.ui.graphics.Color import androidx.compose.ui.unit.dp import androidx.core.locationbutton.compose.LocationButton import androidx.core.locationbutton.compose.LocationButtonTextType @Composable fun LocationPermissionScreen(onPermissionGranted: () -> Unit, onPermissionDenied: () -> Unit) { // Renders the secure system-trusted Location Button composable LocationButton( // Callback triggered when the user taps the secure button and makes a decision on the permission dialog onPermissionResult = { isGranted -> if (isGranted) { onPermissionGranted() } else { onPermissionDenied() } }, /* ============================================================================ * VISUAL CUSTOMIZATIONS * Un-comment any of the parameters below to customize the button's aesthetics. * If omitted, the button falls back to secure, high-contrast system defaults. * ============================================================================ */ /* // LABEL TEXT TYPE: // Predefined system strings rendered inside the secure process. // Options: PreciseLocation, UsePreciseLocation, SharePreciseLocation, // NearMyPreciseLocation, or None (for an icon-only button). textType = LocationButtonTextType.UsePreciseLocation, // COLOR PALETTE: // Customize the container background, text label, and icon tint colors. backgroundColor = Color(0xFF00796B), // e.g., Material Teal textColor = Color.White, iconTint = Color(0xFFFFC107), // e.g., Amber icon tint // CORNER RADIUS & SHAPE: // Define the resting corner radius and the morphed radius when pressed. cornerRadius = 24.dp, // Rounded capsule shape pressedCornerRadius = 12.dp, // Morphs to sharper corners on tap // OUTLINE STROKE (BORDERS): // Add a contrasting outline stroke around the button bounds. strokeColor = Color(0xFF004D40), strokeWidth = 2.dp, // INTERACTIVE TOUCH PADDING: // Defines the secure clickable touch target boundary. // Coerced securely by the system between 4.dp and 8.dp. clickablePadding = PaddingValues(6.dp) */ ) }
ขั้นตอนที่ 3: จัดการความเข้ากันได้กับรุ่นก่อนหน้า
ไลบรารี Jetpack จะจัดการความเข้ากันได้กับรุ่นก่อนหน้าใน Android เวอร์ชันต่ำกว่าโดยอัตโนมัติ ในอุปกรณ์ที่ใช้ Android 16 หรือต่ำกว่า ไลบรารีจะกลับไปใช้คอมโพเนนต์ที่แสดงผลในเครื่องซึ่งจะคงเลย์เอาต์ภาพที่ปรับแต่งไว้ แต่จะกลับไปทริกเกอร์การแจ้งเตือนสิทธิ์เข้าถึงตำแหน่งมาตรฐาน
การใช้แนวทางนี้จะช่วยให้คุณได้รับประโยชน์จากการใช้ปุ่มตำแหน่งโดยไม่ต้องดูแลโซลูชันคู่ขนานสำหรับอุปกรณ์ที่ใช้ Android 16 หรือต่ำกว่า