
使用标准视图的应用可以兼容自动填充框架,而无需特殊配置。您还可以优化应用与该框架的协作方式。
设置自动填充环境
本部分介绍了如何为应用设置基本的自动填充功能。
配置自动填充服务
您必须在设备上配置自动填充服务,才能让应用使用自动填充框架。尽管大多数搭载 Android 8.0(API 级别 26)及更高版本的手机和平板电脑都配备自动填充服务,但建议您在测试应用时使用测试服务,例如 Android 自动填充框架示例中的自动填充服务。使用模拟器时,请明确设置自动填充服务,因为模拟器可能未附带默认服务。
从示例应用中安装了测试自动填充服务后,请依次前往设置 > 系统 > 语言和输入法 > 高级 > 输入帮助 > 自动填充服务,从而启用自动填充服务。
如需详细了解如何配置模拟器以测试自动填充服务,请参阅在应用中测试自动填充服务。
为视图使用 activity 上下文
自动填充服务需要 Activity Context 才能正常运行。实例化视图时,请使用 Activity 作为 context,以便可以正确自动填充。
针对自动填充提供提示
自动填充服务会使用启发法确定每个视图的类型。不过,如果您的应用依赖于这些启发法,则自动填充行为可能会在您更新应用时产生意外变化。为了确保自动填充服务正确识别应用的设备类型,请提供自动填充提示。
您可以使用 android:autofillHints 属性来设置自动填充提示。以下示例针对 EditText 设置了 "password" 提示:
<EditText
    android:layout_width="match_parent"
    android:layout_height="wrap_content"
    android:autofillHints="password" />
您还可以通过使用 setAutofillHints() 方法以编程方式设置提示,如下例所示:
Kotlin
val password = findViewById<EditText>(R.id.password)
password.setAutofillHints(View.AUTOFILL_HINT_PASSWORD)
Java
EditText password = findViewById(R.id.password);
password.setAutofillHints(View.AUTOFILL_HINT_PASSWORD);
添加预定义的提示常量
自动填充框架不会验证提示;这些提示会传递给自动填充服务,而不会进行更改或验证。虽然您可以使用任何值,View 类和 AndroidX HintConstants 类含有官方支持的提示常量列表。
通过组合使用这些常量,您可以为常见的自动填充场景构建布局:
账号凭据
在登录表单上,您可以添加账号凭据提示,例如 AUTOFILL_HINT_USERNAME 和 AUTOFILL_HINT_PASSWORD。
创建新账号或用户更改用户名和密码时,您可以使用 AUTOFILL_HINT_NEW_USERNAME 和 AUTOFILL_HINT_NEW_PASSWORD。
信用卡信息
请求信用卡信息时,您可以使用 AUTOFILL_HINT_CREDIT_CARD_NUMBER 和 AUTOFILL_HINT_CREDIT_CARD_SECURITY_CODE 等提示。
对于信用卡失效日期,请执行以下操作之一:
- 如果您对失效日期使用一个视图,请使用
AUTOFILL_HINT_CREDIT_CARD_EXPIRATION_DATE。 - 如果您对失效日期的每个部分使用不同的视图,则您可以对各个视图使用
AUTOFILL_HINT_CREDIT_CARD_EXPIRATION_DAY、AUTOFILL_HINT_CREDIT_CARD_EXPIRATION_MONTH和AUTOFILL_HINT_CREDIT_CARD_EXPIRATION_YEAR。
实际地址
对于实际地址表单字段,您可以使用如下提示:
- 如需在一个视图中自动填充地址,请使用
AUTOFILL_HINT_POSTAL_ADDRESS。 - 若要对地址的不同部分使用不同的视图,则可以使用下列提示:
用户名
请求获取用户姓名时,您可以使用如下提示:
- 若要在一个视图中自动填充用户的全名,请使用
AUTOFILL_HINT_PERSON_NAME。 - 如果对名称的不同部分使用不同的视图,则可以使用以下任一提示:
电话号码
对于手机号码,您可以使用以下提示:
- 如需在一个视图中请求获取完整的手机号码,请使用
AUTOFILL_HINT_PHONE_NUMBER。 - 如果对手机号码的不同部分使用不同的视图,则可以使用以下任一提示:
动态密码 (OTP)
若要在一个视图中自动填充动态密码,您可以使用 AUTOFILL_HINT_SMS_OTP。
如果使用多个视图,其中每个视图映射到动态密码的一个数字,则可以使用 generateSmsOtpHintForCharacterPosition() 方法按字符生成提示。
关联网站和移动应用数据
Google 自动填充等自动填充服务可以在应用与网站相关联后,在浏览器和 Android 设备之间共享用户登录数据。如果用户在这两种平台上选择相同的自动填充服务,并登录了您的 Web 应用,那么在登录相应的 Android 应用时即可自动填充登录凭据。
如需将您的 Android 应用与网站关联,请在网站中托管一个具有 delegate_permission/common.get_login_creds 关系的 Digital Asset Link。然后,在应用的 AndroidManifest.xml 文件中声明关联性。如需查看有关如何将网站与 Android 应用相关联的详细说明,请参阅跨应用和网站启用自动登录。
完成自动填充工作流程
本部分介绍了一些具体场景,在这些场景中,您可以采取措施来为使用您应用的用户改进自动填充功能。
确定是否已启用自动填充功能
用户可以依次前往设置 > 系统 > 语言和输入法 > 高级 > 输入帮助 > 自动填充服务,从而启用或停用自动填充服务,以及更改自动填充服务。您的应用无法替换用户的自动填充设置,但您可在应用中或在应用的特定视图中实现其他自动填充功能(如果用户可以使用自动填充功能)。
例如,如果针对用户启用了自动填充功能,则 TextView 会在溢出菜单中显示一个自动填充条目。如需检查是否针对用户启用了自动填充功能,请调用 AutofillManager 对象的 isEnabled() 方法。
为确保您提供的注册和登录体验针对未使用自动填充功能的用户进行了优化,请实现一键登录。
强制执行自动填充请求
有时,您需要强制执行自动填充请求才能响应用户操作。例如,当用户轻触并按住视图时,TextView 会提供一个自动填充菜单项。以下代码示例展示了如何强制执行自动填充请求:
Kotlin
fun eventHandler(view: View) {
    val afm = requireContext().getSystemService(AutofillManager::class.java)
    afm?.requestAutofill(view)
}
Java
public void eventHandler(View view) {
    AutofillManager afm = context.getSystemService(AutofillManager.class);
    if (afm != null) {
        afm.requestAutofill(view);
    }
}
您还可以使用 cancel() 方法取消当前的自动填充上下文。如果您有一个能清除登录页面上的字段的按钮,这样做可能就很有用。
针对选择器控件中的数据使用正确的自动填充类型
选择器提供了一个界面,让用户能够更改存储了日期或时间数据的字段的值,因此有助于实现自动填充。例如,在信用卡表单中,日期选择器可让用户输入或更改其信用卡的失效日期。不过,当选择器不可见时,您必须使用另一视图(例如 EditText)才能显示数据。
EditText 对象本身需要 AUTOFILL_TYPE_TEXT 类型的自动填充数据。如果您使用的是其他类型的数据,请创建一个继承自 EditText 的自定义视图,并实现处理相应数据类型所需的方法。例如,如果使用的是日期字段,那么实现的方法应具有可正确处理 AUTOFILL_TYPE_DATE 类型值的逻辑。
指定好自动填充数据类型后,自动填充服务便能为视图中显示的数据创建相应的表示法。如需了解详情,请参阅使用具有自动填充功能的选择器。
完成自动填充上下文
自动填充框架通过在自动填充上下文完成后显示“保存以便用于自动填充?”对话框来保存用户输入,以供将来使用。通常情况下,自动填充上下文会在 activity 结束后完成。不过,在某些情况下,您需要明确通知框架;例如,您针对登录屏幕和内容屏幕了使用相同的 activity,但 fragment 不同时。在这些情况下,您可以通过调用 AutofillManager.commit() 显式完成上下文。
自定义视图支持
自定义视图可以通过使用自动填充 API 来指定向自动填充框架提供的元数据。某些视图可作为虚拟子级的容器,例如包含 OpenGL 渲染界面的视图。这些视图必须使用 API 来指定应用中所用信息的结构,然后才能使用自动填充框架。
如果您的应用使用自定义视图,请考虑以下情形:
- 自定义视图提供标准视图结构或默认视图结构。
- 自定义视图具有虚拟结构,或者自动填充框架不可用的视图结构。
具有标准视图结构的自定义视图
自定义视图可以定义自动填充功能发挥作用所需的元数据。 请确保您的自定义视图适当地管理元数据,以便与自动填充框架协作。您的自定义视图必须执行以下操作:
- 处理框架向您的应用发送的自动填充值。
- 向框架提供自动填充类型和值。
触发自动填充后,自动填充框架会对您的视图调用 autofill(),并发送您的视图必须使用的值。请实现 autofill() 来指定自定义视图处理自动填充值的方式。
您的视图必须通过分别替换 getAutofillType() 和 getAutofillValue() 方法来指定自动填充的类型和值。
最后,如果用户无法为当前状态下的视图提供值(例如,如果视图已停用),则自动填充功能不得填充视图。
在这些情况下,getAutofillType() 必须返回 AUTOFILL_TYPE_NONE,getAutofillValue() 必须返回 null,而 autofill() 不得执行任何操作。
对于以下情况,则需要执行额外的步骤,自动填充功能才能在框架内正常运行:
- 自定义视图可修改。
- 自定义视图包含敏感数据。
自定义视图可修改
如果该视图可修改,请通过对 AutofillManager 对象调用 notifyValueChanged() 将相关更改告知自动填充框架。
自定义视图包含敏感数据
如果某个视图包含 PII(即个人身份信息,例如电子邮件地址、信用卡号和密码),则必须被标记为敏感数据。
通常情况下,内容来自静态资源的视图不包含敏感数据,而内容为动态设置的视图可能包含敏感数据。例如,包含“输入您的用户名”的标签不包含敏感数据,而包含“您好,李明”的标签则包含敏感数据。
默认情况下,自动填充框架会假定所有数据都是敏感数据。 您可以标记不敏感数据。
若要标记某个视图是否包含敏感数据,请实现 onProvideAutofillStructure() 并对 ViewStructure 对象调用 setDataIsSensitive()。
以下代码示例展示了如何将视图结构中的数据标记为不敏感:
Kotlin
override fun onProvideAutofillStructure(structure: ViewStructure, flags: Int) {
    super.onProvideAutofillStructure(structure, flags)

    structure.setDataIsSensitive(false)
}
Java
@Override
public void onProvideAutofillStructure(ViewStructure structure, int flags) {
    super.onProvideAutofillStructure(structure, flags);

    structure.setDataIsSensitive(false);
}
如果某个视图仅接受预定义值,您可以使用 setAutofillOptions() 方法设置可用于自动填充此视图的选项。尤其是,自动填充类型为 AUTOFILL_TYPE_LIST 的视图必须使用此方法,因为如果自动填充服务知道可用于填充视图的选项,就可以更好地发挥作用。
使用适配器(例如 Spinner)的视图与此情况类似。例如,提供可在信用卡失效日期字段中使用的动态创建年份(根据当前年份)的旋转图标可以实现 Adapter 接口的 getAutofillOptions() 方法,以提供年份列表。
使用 ArrayAdapter 的视图也可以提供值列表。ArrayAdapter 会自动为静态资源设置自动填充选项。
如果您会动态地提供值,请替换 getAutofillOptions()。
具有虚拟结构的自定义视图
自动填充框架需要有一个视图结构,然后才能在应用的界面中修改和保存信息。在以下情况下,框架无法使用视图结构:
在这些情况下,您可以通过实现 onProvideAutofillVirtualStructure() 并执行以下步骤来指定视图结构:
- 通过调用
addChildCount()增加视图结构的子级数。 - 通过调用
newChild()添加一个子级。 - 通过调用
setAutofillId()为子级设置自动填充 ID。 - 设置相关属性(例如,自动填充值和类型)。
- 如果虚拟子级中的数据是敏感数据,请将
true传递给setDataIsSensitive();否则,传递false。
以下代码段展示了如何在虚拟结构中创建新的子级:
Kotlin
override fun onProvideAutofillVirtualStructure(structure: ViewStructure, flags: Int) {

    super.onProvideAutofillVirtualStructure(structure, flags)

    // Create a new child in the virtual structure.
    structure.addChildCount(1)
    val child = structure.newChild(childIndex)

    // Set the autofill ID for the child.
    child.setAutofillId(structure.autofillId!!, childVirtualId)

    // Populate the child by providing properties such as value and type.
    child.setAutofillValue(childAutofillValue)
    child.setAutofillType(childAutofillType)

    // Some children can provide a list of values, such as when the child is
    // a spinner.
    val childAutofillOptions = arrayOf<CharSequence>("option1", "option2")
    child.setAutofillOptions(childAutofillOptions)

    // Just like other types of views, mark the data as sensitive when
    // appropriate.
    val sensitive = !contentIsSetFromResources()
    child.setDataIsSensitive(sensitive)
}
Java
@Override
public void onProvideAutofillVirtualStructure(ViewStructure structure, int flags) {

    super.onProvideAutofillVirtualStructure(structure, flags);

    // Create a new child in the virtual structure.
    structure.addChildCount(1);
    ViewStructure child =
            structure.newChild(childIndex);

    // Set the autofill ID for the child.
    child.setAutofillId(structure.getAutofillId(), childVirtualId);

    // Populate the child by providing properties such as value and type.
    child.setAutofillValue(childAutofillValue);
    child.setAutofillType(childAutofillType);

    // Some children can provide a list of values, such as when the child is
    // a spinner.
    CharSequence childAutofillOptions[] = { "option1", "option2" };
    child.setAutofillOptions(childAutofillOptions);

    // Just like other types of views, mark the data as sensitive when
    // appropriate.
    boolean sensitive = !contentIsSetFromResources();
    child.setDataIsSensitive(sensitive);
}
当虚拟结构中的元素发生变化时,请通过执行以下任务来通知框架:
- 如果子级内的焦点发生变化,请对
AutofillManager对象调用notifyViewEntered()和notifyViewExited()。 - 如果子级的值发生变化,请对
AutofillManager对象调用notifyValueChanged()。 - 如果视图层次结构因用户完成了工作流程中的某个步骤(例如,用户使用登录表单登录之后)而不再可用,请对
AutofillManager对象调用commit()。 - 如果视图层次结构因用户取消了工作流程中的某个步骤(例如,用户点按用于清除登录表单的按钮之后)而不再有效,请对
AutofillManager对象调用cancel()。
对自动填充事件使用回调
如果您的应用提供了自己的自动填充视图,您需要采用一种机制来告知应用启用或停用视图,以响应界面自动填充功能的变化。自动填充框架以 AutofillCallback 形式提供此机制。
此类提供 onAutofillEvent(View, int) 方法,应用会在与视图关联的自动填充状态发生变化后调用此方法。
此方法还有一个过载版本,其中包含应用可用于虚拟视图的 childId 参数。可用状态在回调中定义为常量。
您可以使用 AutofillManager 类的 registerCallback() 方法注册回调。以下代码示例展示了如何为自动填充事件声明回调:
Kotlin
val afm = context.getSystemService(AutofillManager::class.java)

afm?.registerCallback(object : AutofillManager.AutofillCallback() {
    // For virtual structures, override
    // onAutofillEvent(View view, int childId, int event) instead.
    override fun onAutofillEvent(view: View, event: Int) {
        super.onAutofillEvent(view, event)
        when (event) {
            EVENT_INPUT_HIDDEN -> {
                // The autofill affordance associated with the view was hidden.
            }
            EVENT_INPUT_SHOWN -> {
                // The autofill affordance associated with the view was shown.
            }
            EVENT_INPUT_UNAVAILABLE -> {
                // Autofill isn't available.
            }
        }

    }
})
Java
AutofillManager afm = getContext().getSystemService(AutofillManager.class);

afm.registerCallback(new AutofillManager.AutofillCallback() {
    // For virtual structures, override
    // onAutofillEvent(View view, int childId, int event) instead.
    @Override
    public void onAutofillEvent(@NonNull View view, int event) {
        super.onAutofillEvent(view, event);
        switch (event) {
            case EVENT_INPUT_HIDDEN:
                // The autofill affordance associated with the view was hidden.
                break;
            case EVENT_INPUT_SHOWN:
                // The autofill affordance associated with the view was shown.
                break;
            case EVENT_INPUT_UNAVAILABLE:
                // Autofill isn't available.
                break;
        }
    }
});
在需要移除回调时,请使用 unregisterCallback() 方法。
自定义自动填充功能突出显示的可绘制对象
自动填充了某个视图之后,平台会在该视图上渲染一个 Drawable 来表明已自动填充视图内容。默认情况下,此可绘制对象是半透明颜色的实心矩形,其颜色比用于绘制背景的主题背景颜色稍微暗一些。该可绘制对象无需进行更改,但可通过替换应用或 activity 使用的主题的 android:autofilledHighlight 项进行自定义,如以下示例所示:
res/values/styles.xml
<resources>
    <style name="MyAutofilledHighlight" parent="...">
        <item name="android:autofilledHighlight">@drawable/my_drawable</item>
    </style>
</resources>
res/drawable/my_drawable.xml
<shape xmlns:android="http://schemas.android.com/apk/res/android">
    <solid android:color="#4DFF0000" />
</shape>
AndroidManifest.xml
<application ...
    android:theme="@style/MyAutofilledHighlight">
<!-- or -->
<activity ...
    android:theme="@style/MyAutofilledHighlight">
针对自动填充进行身份验证
自动填充服务可以要求用户先进行身份验证,然后该服务才能完成应用中的字段;在这种情况下,Android 系统会在 activity 的堆栈中启动该服务的身份验证 activity。
您无需更新应用即可支持身份验证,因为身份验证在该服务内进行。不过,您必须确保在 activity 重启时保留 activity 的视图结构,例如通过在 onCreate()(而非 onStart() 或 onResume())中创建视图结构进行此操作。
您可以通过使用 AutofillFramework 示例中的 HeuristicsService 并将其配置为需要填充响应身份验证,从而验证您的应用在自动填充服务要求身份验证时的行为。您也可以使用 BadViewStructureCreationSignInActivity 示例来模拟此问题。
为回收的视图分配自动填充 ID
回收视图的容器(例如 RecyclerView 类)对于需要根据大型数据集显示滚动元素列表的应用来说比较有用。当此类容器滚动时,系统会重复使用布局中的视图,但这些视图之后会包含新的内容。
如果被回收视图的初始内容已填充,自动填充服务会保留使用其自动填充 ID 的视图的逻辑意义。当系统重复使用布局中的视图,而视图的逻辑 ID 保持不变时,将会导致错误的自动填充用户数据与自动填充 ID 相关联,就会出现问题。
如需在搭载 Android 9(API 级别 28)及更高版本的设备上解决此问题,请使用以下方法明确管理 RecyclerView 使用的视图的自动填充 ID:
getNextAutofillId()方法可获取对 activity 而言唯一的新自动填充 ID。setAutofillId()方法可在 activity 中设置此视图的唯一逻辑自动填充 ID。
解决已知问题
本部分介绍了自动填充框架内已知问题的解决方案。
Android 8.0 和 8.1 上的自动填充导致应用崩溃
在 Android 8.0(API 级别 26)和 8.1(API 级别 27)中,自动填充功能可能会导致应用在某些情况下崩溃。为解决潜在问题,请使用 importantForAutofill=no 标记不需要自动填充的所有视图。此外,您也可以使用 importantForAutofill=noExcludeDescendants 标记整个 activity。
调整过大小的对话框不会自动填充
在 Android 8.1(API 级别 27)及更低版本中,如果对已显示的对话框中的视图调整大小,则该视图不会自动填充。此类视图不会包含在 Android 系统发送至自动填充服务的 AssistStructure 对象中。因此,该服务不会填充这些视图。
如需解决此问题,请将对话框窗口参数的 token 属性替换为那个创建了对话框的 activity 的 token 属性。确认自动填充服务已启用后,将窗口参数保存到继承自 Dialog 的类的 onWindowAttributesChanged() 方法中。然后,使用 onAttachedToWindow() 方法中父级 activity 的 token 属性替换已存参数的 token 属性。
以下代码段展示了实现该解决方案的类:
Kotlin
class MyDialog(context: Context) : Dialog(context) {

    // Used to store the dialog window parameters.
    private var token: IBinder? = null

    private val isDialogResizedWorkaroundRequired: Boolean
        get() {
            if (Build.VERSION.SDK_INT != Build.VERSION_CODES.O || Build.VERSION.SDK_INT != Build.VERSION_CODES.O_MR1) {
                return false
            }
            val autofillManager = if (Build.VERSION.SDK_INT >= Build.VERSION_CODES.M) {
                context.getSystemService(AutofillManager::class.java)
            } else {
                null
            }
            return autofillManager?.isEnabled ?: false
        }

    override fun onWindowAttributesChanged(params: WindowManager.LayoutParams) {
        if (params.token == null && token != null) {
            params.token = token
        }

        super.onWindowAttributesChanged(params)
    }

    override fun onAttachedToWindow() {
        if (isDialogResizedWorkaroundRequired) {
            token = ownerActivity!!.window.attributes.token
        }

        super.onAttachedToWindow()
    }

}
Java
public class MyDialog extends Dialog {

    public MyDialog(Context context) {
        super(context);
    }

    // Used to store the dialog window parameters.
    private IBinder token;

    @Override
    public void onWindowAttributesChanged(WindowManager.LayoutParams params) {
        if (params.token == null && token != null) {
            params.token = token;
        }

        super.onWindowAttributesChanged(params);
    }

    @Override
    public void onAttachedToWindow() {
        if (isDialogResizedWorkaroundRequired()) {
            token = getOwnerActivity().getWindow().getAttributes().token;
        }

        super.onAttachedToWindow();
    }

    private boolean isDialogResizedWorkaroundRequired() {
        if (Build.VERSION.SDK_INT != Build.VERSION_CODES.O
                || Build.VERSION.SDK_INT != Build.VERSION_CODES.O_MR1) {
            return false;
        }
        AutofillManager autofillManager =
                null;
        if (android.os.Build.VERSION.SDK_INT >= android.os.Build.VERSION_CODES.M) {
            autofillManager = getContext().getSystemService(AutofillManager.class);
        }
        return autofillManager != null && autofillManager.isEnabled();
    }

}
为避免不必要的操作,以下代码段展示了如何检查设备是否支持自动填充功能、是否已针对当前用户启用了自动填充功能,以及是否需要此解决方案:
Kotlin
// AutofillExtensions.kt

fun Context.isDialogResizedWorkaroundRequired(): Boolean {
    // After the issue is resolved on Android, check whether the
    // workaround is still required for the current device.
    return isAutofillAvailable()
}

fun Context.isAutofillAvailable(): Boolean {
    if (Build.VERSION.SDK_INT < Build.VERSION_CODES.O) {
        // The autofill framework is available on Android 8.0
        // or higher.
        return false
    }

    val afm = getSystemService(AutofillManager::class.java)
    // Return true if autofill is supported by the device and enabled
    // for the current user.
    return afm != null && afm.isEnabled
}
Java
public class AutofillHelper {

    public static boolean isDialogResizedWorkaroundRequired(Context context) {
        // After the issue is resolved on Android, check whether the
        // workaround is still required for the current device.
        return isAutofillAvailable(context);
    }

    public static boolean isAutofillAvailable(Context context) {
        if (Build.VERSION.SDK_INT < Build.VERSION_CODES.O) {
            // The autofill framework is available on Android 8.0
            // or higher.
            return false;
        }

        AutofillManager afm = context.getSystemService(AutofillManager.class);
        // Return true if autofill is supported by the device and enabled
        // for the current user.
        return afm != null && afm.isEnabled();
    }
}
在应用中测试自动填充服务
针对自动填充服务优化应用后,请测试应用是否能按预期提供自动填充服务。
您可以使用搭载 Android 8.0(API 级别 26)或更高版本的模拟器或物理设备来测试应用。如需详细了解如何创建模拟器,请参阅创建和管理虚拟设备。
安装自动填充服务
在应用中测试自动填充服务之前,您需要先安装一个提供自动填充服务的其他应用。您可以使用第三方应用来达到此目的,但使用示例自动填充服务会更加方便,因为这样您便无需注册第三方服务。
您可以通过 Java 中的 Android 自动填充框架示例在您的应用中测试自动填充服务。示例应用提供自动填充服务和客户端 Activity 类,您可以使用它们来测试工作流程,然后再将其与您的应用结合使用。此页面引用了 android-AutofillFramework 示例应用。
安装应用后,请在模拟器的系统设置中启用自动填充服务,方法是前往设置 > 系统 > 语言和输入法 > 高级 > 输入帮助 > 自动填充服务。
分析数据要求
如需在应用中测试自动填充服务,相应服务需要具有可用于填充应用的数据,还需要了解应用视图中所需的数据类型。例如,如果应用使用的视图需要用户名,那么自动填充服务必须具有一个数据集(其中包含一个用户名)和一种知道该视图需要此类数据的机制。
通过设置 android:autofillHints 属性,让自动填充服务知道您的视图需要哪些类型的数据。某些服务使用复杂的启发法来确定数据类型,还有一些服务(例如示例应用)则依赖于开发者来提供这些信息。如果您在与自动填充服务相关的视图中设置 android:autofillHints 属性,则您的应用能够更好地提供自动填充服务。
运行测试
分析了数据要求之后,您便可以运行测试,其中包括在自动填充服务中保存测试数据以及在应用中触发自动填充服务。
在服务中保存数据
如需在处于活跃状态的自动填充服务中保存数据,请执行以下操作:
- 打开一个应用,其中包含您想要在测试过程中使用的数据类型的视图。android-AutofillFramework 示例应用为界面提供需要几种数据类型(例如信用卡号和用户名)的视图。
- 点按包含所需数据类型的视图。
- 在视图中输入一个值。
- 点按确认按钮,例如登录或提交。您通常需要在服务保存数据之前提交表单。
- 验证系统对话框中的权限请求。系统对话框会显示正处于活跃状态的服务的名称,并会询问是否它就是您要在测试中使用的服务。如果您想使用该服务,请点按保存。
如果 Android 没有显示权限对话框,或者该服务并非您要在测试中使用的服务,请在系统设置中检查该服务当前是否处于活跃状态。
在应用中触发自动填充服务
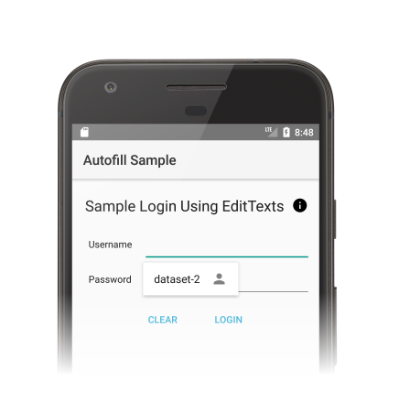
如需在应用中触发自动填充服务,请执行以下操作:
- 打开应用,找到包含您想要测试的视图的 activity。
- 点按需要填充的视图。
- 系统会显示自动填充界面,其中包含可填充视图的数据集,如图 1 所示。
- 点按要使用的数据所在的数据集。该视图会显示之前存储在自动填充服务中的数据。
如果 Android 没有显示自动填充界面,您可以尝试使用以下问题排查选项:
- 检查您应用中的视图是否使用
android:autofillHints属性中合适的值。如需查看该属性的可能值列表,请查看View类中以AUTOFILL_HINT为前缀的常量。 - 在需要填充的视图上,检查
android:importantForAutofill属性是否设置为no以外的值;或者在该视图或其某个父级中,检查该属性是否设置为noExcludeDescendants以外的值。