קל לארגן דפים בעזרת אוספים
אפשר לשמור ולסווג תוכן על סמך ההעדפות שלך.
WebP הוא פורמט קובץ תמונה של Google שמספק דחיסת נתונים מסוג lossy (כמו JPEG) וגם שקיפות (כמו PNG), אבל יכול לספק דחיסה טובה יותר מאשר JPEG או PNG. תמונות WebP עם דחיסה מאבדת נתמכות ב-Android מגרסה 4.0 (רמת API 14) ואילך, ותמונות WebP ללא דחיסה מאבדת ושקופות נתמכות ב-Android מגרסה 4.3 (רמת API 18) ואילך.
בדף הזה מוסבר איך להמיר תמונות לפורמט WebP ואיך להמיר תמונות WebP לפורמט PNG.
Android Studio יכול להמיר תמונות בפורמט PNG, JPG, BMP או GIF סטטי לפורמט WebP.
אפשר להמיר תמונות בודדות או תיקיות של תמונות.
כדי להמיר תמונה או תיקייה של תמונות, פועלים לפי השלבים הבאים:
לוחצים לחיצה ימנית על קובץ תמונה או על תיקייה שמכילה קובצי תמונה, ואז לוחצים על המרה ל-WebP.
תיפתח תיבת הדו-שיח המרת תמונות ל-WebP. הגדרות ברירת המחדל תלויות בהגדרה minSdkVersion של המודול הנוכחי.
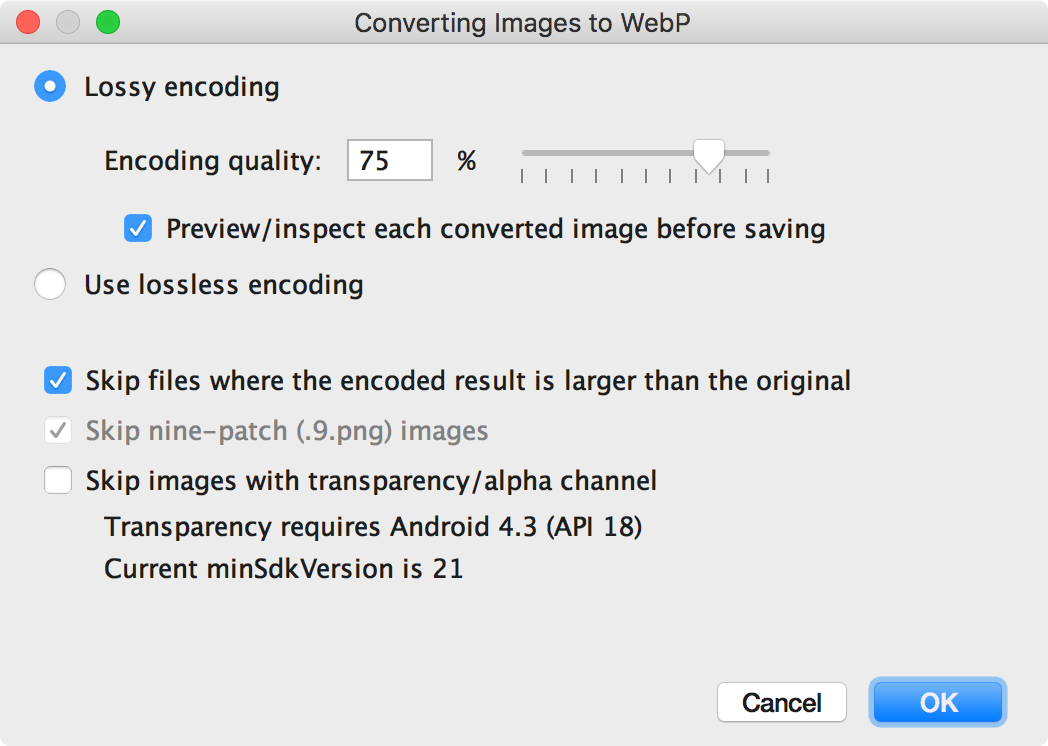
איור 1. תיבת הדו-שיח 'המרת תמונות ל-WebP'.
בוחרים קידוד עם אובדן נתונים או בלי אובדן נתונים.
קידוד ללא אובדן נתונים זמין רק אם הגיל שלכם minSdkVersion הוא 18 ומעלה.
אם בוחרים קידוד עם אובדן נתונים, מגדירים את איכות הקידוד ובוחרים אם להציג תצוגה מקדימה של כל תמונה שהומרה לפני השמירה.
אפשר גם לבחור לדלג על המרה של קבצים שבהם הגרסה המקודדת תהיה גדולה יותר מהגרסה המקורית, או על קבצים עם שקיפות או ערוץ אלפא. מכיוון ש-Android Studio מאפשר ליצור תמונות WebP שקופות רק אם minSdkVersion מוגדר ל-18 ומעלה, תיבת הסימון Skip images with transparency/alpha channel מסומנת אוטומטית אם minSdkVersion נמוך מ-18.
הערה: אי אפשר להמיר קובצי 9-patch לתמונות WebP. כלי ההמרה תמיד מדלג אוטומטית על תמונות 9-patch.
לוחצים על אישור כדי להתחיל בהמרה.
אם ממירים יותר מתמונה אחת, ההמרה היא שלב אחד, ואפשר לבטל אותה כדי להחזיר את כל התמונות שהומרו בבת אחת.
אם בחרתם בהמרה ללא אובדן נתונים, ההמרה מתבצעת באופן מיידי. התמונות יומרו במיקום המקורי שלהן. אם בחרתם בהמרה עם אובדן נתונים, ממשיכים לשלב הבא.
אם בחרתם בהמרה עם אובדן נתונים ובחרתם להציג תצוגה מקדימה של כל תמונה שהומרה לפני השמירה, Android Studio יציג לכם כל תמונה במהלך ההמרה כדי שתוכלו לבדוק את תוצאת ההמרה. במהלך שלב התצוגה המקדימה, אפשר לשנות את הגדרת האיכות של כל תמונה בנפרד, כמו שמוצג באיור 2.
אם לא בחרתם להציג תצוגה מקדימה של התמונות שהומרו, Android Studio ידלג על השלב הזה וימיר את התמונות באופן מיידי.
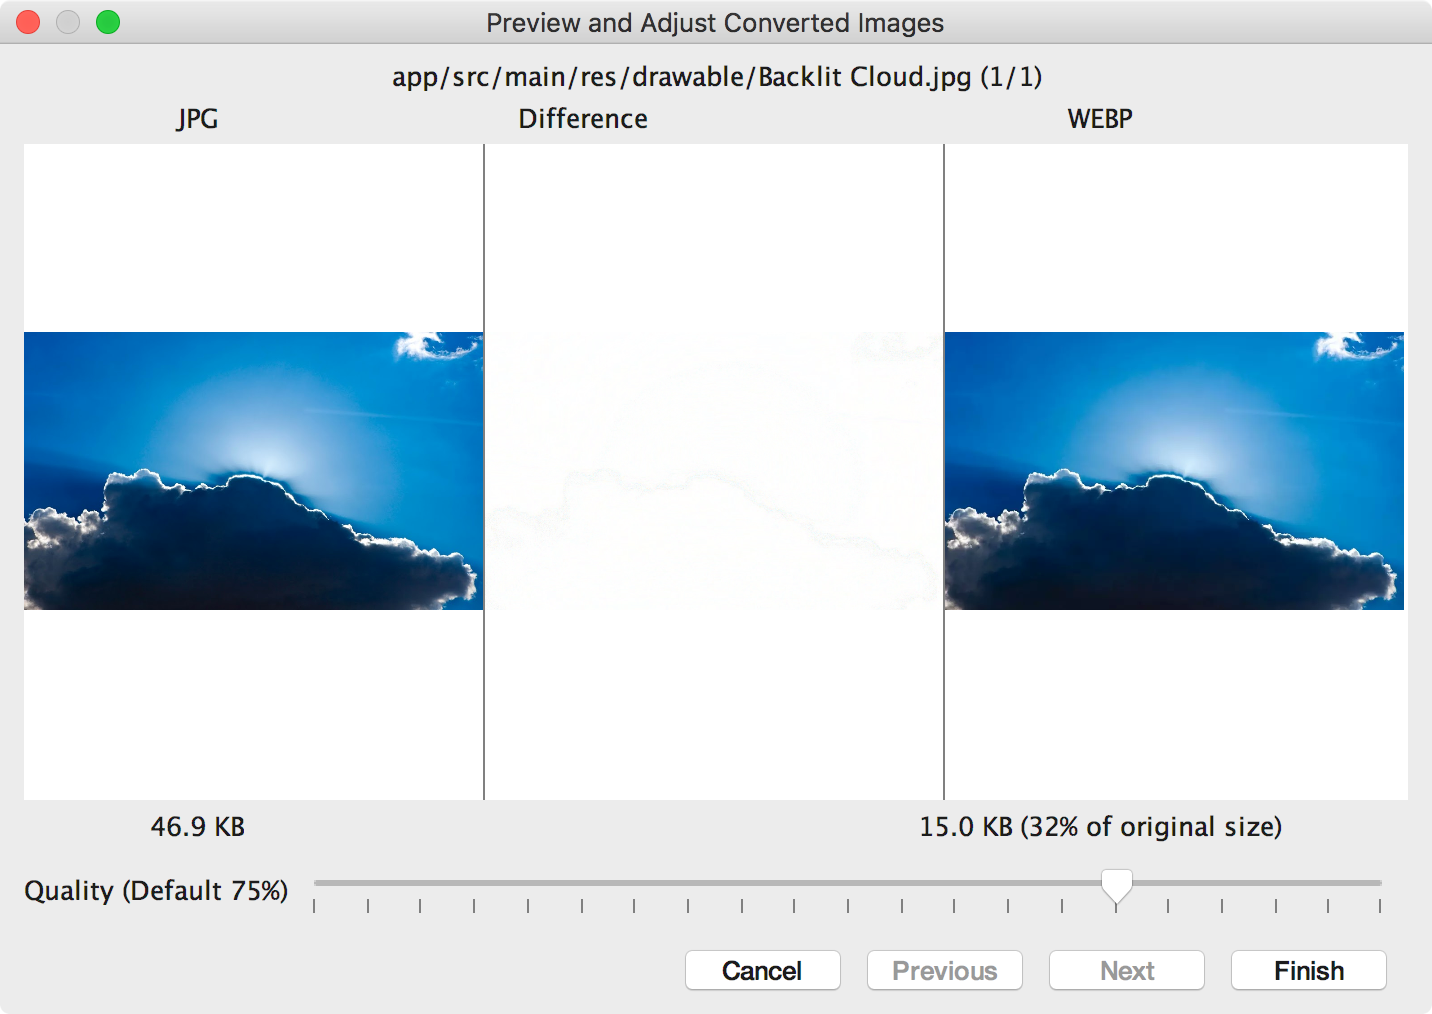
איור 2. תצוגה מקדימה של המרה של תמונה בפורמט JPG לפורמט WebP
באיכות של 75%.
באיור 2 מוצגת תמונת ה-JPG המקורית בצד שמאל ותמונת ה-WebP עם קידוד lossy בצד ימין. בתיבת הדו-שיח מוצג גודל הקובץ של התמונה המקורית ושל התמונה שהומרה. אפשר לגרור את המחוון שמאלה או ימינה כדי לשנות את הגדרת האיכות ולראות מיד את ההשפעה על התמונה המקודדת ועל גודל הקובץ.
באזור האמצעי מוצגים הפיקסלים ששונים בין התמונה המקורית לבין התמונה המקודדת. באיור 2, כשהאיכות מוגדרת ל-75%, כמעט אין הבדל בין שתי התמונות. באיור 3 רואים את אותה תמונה, אבל עם קידוד שבו האיכות מוגדרת ל-0%.
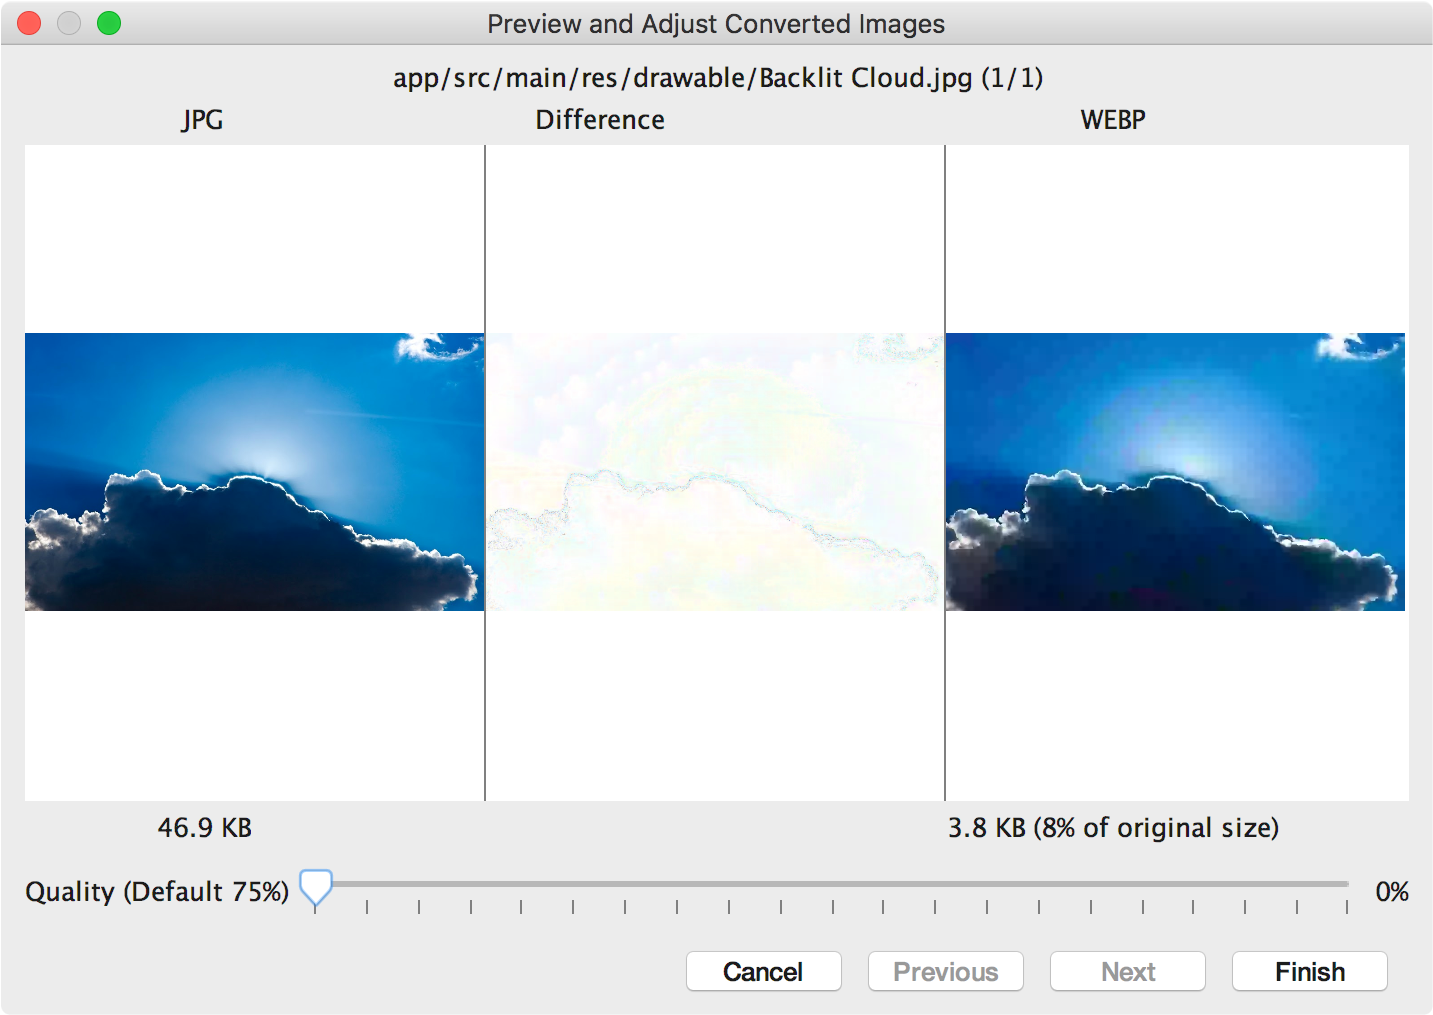
איור 3. תצוגה מקדימה של המרת תמונה בפורמט JPG לפורמט WebP
באיכות של 0%.
הערה: אם מגדירים את האיכות ל-100% והערך של
minSdkVersion הוא 18 ומעלה, Android Studio
עובר אוטומטית לקידוד ללא אובדן נתונים.
בוחרים הגדרת איכות לכל תמונה שבודקים. אם ממירים יותר מתמונה אחת, לוחצים על הבא כדי לעבור לתמונה הבאה.
לוחצים על סיום. התמונות יומרו במיקום המקורי שלהן.
המרת תמונות WebP ל-PNG
אם רוצים להשתמש בתמונת WebP מהפרויקט למטרה אחרת – למשל, בדף אינטרנט שצריך להציג תמונות בדפדפן בצורה נכונה בלי תמיכה ב-WebP – אפשר להשתמש ב-Android Studio כדי להמיר תמונות WebP לפורמט PNG.
כדי להמיר תמונה בפורמט WebP לפורמט PNG, פועלים לפי השלבים הבאים:
לוחצים לחיצה ימנית על תמונה בפורמט WebP ב-Android Studio, ואז לוחצים על המרת התמונה לפורמט PNG.
מופיעה תיבת דו-שיח עם השאלה אם רוצים למחוק את קובץ ה-WebP המקורי אחרי ההמרה או לשמור גם את קובץ ה-WebP המקורי וגם את קובץ ה-PNG החדש.
לוחצים על כן כדי למחוק את קובץ ה-WebP המקורי או על לא כדי לשמור את קובץ ה-WebP בנוסף לקובץ ה-PNG. התמונה תומר באופן מיידי.
דוגמאות התוכן והקוד שבדף הזה כפופות לרישיונות המפורטים בקטע רישיון לתוכן. Java ו-OpenJDK הם סימנים מסחריים או סימנים מסחריים רשומים של חברת Oracle ו/או של השותפים העצמאיים שלה.
עדכון אחרון: 2025-07-27 (שעון UTC).
[null,null,["עדכון אחרון: 2025-07-27 (שעון UTC)."],[],[],null,["# Create WebP images\n\n[WebP](https://developers.google.com/speed/webp/) is an image file format from\nGoogle that provides lossy compression (like JPEG) as well as transparency (like\nPNG) but can provide better compression than either JPEG or PNG. Lossy WebP\nimages are supported in Android 4.0 (API level 14) and higher, and lossless and\ntransparent WebP images are supported in Android 4.3 (API level 18) and higher.\nThis page shows how to convert images to WebP format and how to convert WebP\nimages to PNG format.\n| **Note:** Because support for lossless and transparent WebP images is only available in Android 4.3 and higher, your project must declare a `minSdkVersion` of 18 or higher to create lossless or transparent WebP images using Android Studio.\n\nFor more information about\nselecting the correct image format to improve download speed, see [Reduce image\ndownload sizes](/topic/performance/network-xfer#webp).\n\nConvert images to WebP\n----------------------\n\nAndroid Studio can convert PNG, JPG, BMP, or static GIF images to WebP format.\nYou can convert individual images or folders of images.\n\nTo convert an image or folder of images, proceed as follows:\n\n1. Right-click an image file or a folder containing image files, and then click **Convert to WebP**.\n2. The **Converting Images to WebP** dialog opens. The default settings\n depend on the `minSdkVersion` setting for the current module.\n\n \u003cbr /\u003e\n\n **Figure 1.** The Converting Images to WebP dialog.\n3.\n Select either lossy or lossless encoding.\n\n Lossless encoding is only available if your `minSdkVersion` is set to 18 or higher.\n\n If you select lossy encoding, set the encoding quality and choose whether\n to preview each converted image before saving.\n\n\n You can also choose to skip the conversion of any files where the encoded\n version would be larger than the original or any files with transparency\n or an alpha channel. Because Android Studio only lets you\n create transparent WebP images if your `minSdkVersion` is set\n to 18 or higher, the **Skip images with transparency/alpha channel**\n checkbox is automatically selected if your `minSdkVersion`\n is lower than 18.\n\n\n **Note:** 9-patch files can't be converted to WebP images. The\n converter tool always automatically skips 9-patch images.\n4. Click **OK** to begin the conversion.\n\n If you are converting more than\n one image, the conversion is a single step, and can be undone to revert all\n the images you converted at once.\n\n If you selected lossless conversion, the conversion happens\n immediately. Your images are converted in their original\n location. If you selected lossy conversion, continue to the next step.\n5.\n If you selected lossy conversion and you chose to\n preview each converted image before saving, Android Studio\n shows you each image during the conversion so you can inspect the\n conversion result. During\n the preview step, you can adjust the quality setting for each image\n individually, as shown in figure 2.\n\n If you did not choose to preview the converted images, Android\n Studio skips this step and converts your images immediately.\n **Figure 2.** Previewing the conversion of a JPG image to WebP format at 75% quality.\n\n\n Figure 2 shows the original JPG image on the left and the lossy-encoded\n WebP image on the right. The dialog shows the file size for the original\n and the converted image. You can drag the slider left or right\n to change the quality setting and immediately see the effect on the\n encoded image and the file size.\n\n\n The middle area shows the pixels that differ between the original image\n and the encoded image. In figure 2, with the quality set to 75%, there's\n almost no difference between the two images. Figure 3 shows the same image\n encoded with the quality set to 0%.\n **Figure 3.** Previewing the conversion of a JPG image to WebP format at 0% quality.\n\n **Note:** If you set the quality to 100% and the\n `minSdkVersion` is set to 18 or higher, Android Studio\n automatically switches to lossless encoding instead.\n\n Select a quality setting for each image you review. If you are converting\n more than one image, click **Next** to advance to the next image.\n6. Click **Finish**. Your images are converted in their original location.\n\nConvert WebP images to PNG\n--------------------------\n\nIf you want to use a WebP image from your project for another purpose---for\nexample, in a web page that needs to correctly display images in a browser\nwithout WebP support---you can use Android Studio to convert WebP images to PNG\nformat.\n\nTo convert a WebP image to PNG, proceed as follows:\n\n1. Right-click a WebP image in Android Studio, and then click **Convert to\n PNG**.\n2. A dialog appears, asking whether you would like to\n delete the original WebP file after conversion or keep the original WebP\n file as well as the new PNG file.\n\n Click **Yes** to delete the original WebP file or **No**\n to retain the WebP file in addition to the PNG file. Your image is converted\n immediately."]]