
เอกสารนี้จะอธิบายวิธีตั้งค่าการทดสอบเอสเปรสโซทั่วไปแบบต่างๆ
จับคู่ข้อมูลพร็อพเพอร์ตี้ที่อยู่ถัดจากข้อมูลพร็อพเพอร์ตี้อื่น
เลย์เอาต์อาจมีมุมมองบางอย่างที่ไม่ซ้ำกัน สำหรับ
เช่น ปุ่มโทรซ้ำในตารางรายชื่อติดต่ออาจมี
R.id มีข้อความเดียวกัน และมีพร็อพเพอร์ตี้เหมือนกับการเรียกอื่น
ภายในลำดับชั้นการแสดงผล
ตัวอย่างเช่น ในกิจกรรมนี้ มุมมองที่มีข้อความ "7" ซ้ำกันในหลาย
แถว:
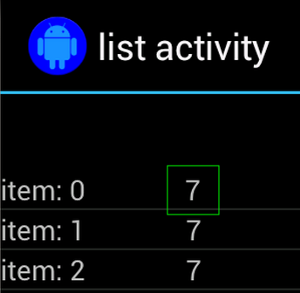
บ่อยครั้งที่มุมมองที่ซ้ำกันจะถูกจับคู่กับป้ายกำกับที่ไม่ซ้ำบางป้ายที่อยู่
ที่อยู่ด้านข้าง เช่น ชื่อของรายชื่อติดต่อ ข้างปุ่มโทร ในกรณีนี้
คุณสามารถใช้ตัวจับคู่ hasSibling() เพื่อจำกัดการเลือกของคุณให้แคบลงได้
Kotlin
onView(allOf(withText("7"), hasSibling(withText("item: 0"))))
    .perform(click())
Java
onView(allOf(withText("7"), hasSibling(withText("item: 0"))))
    .perform(click());
จับคู่มุมมองที่อยู่ในแถบการดำเนินการ
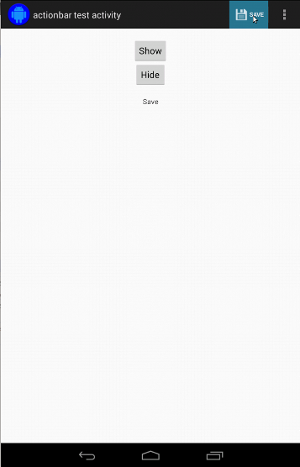
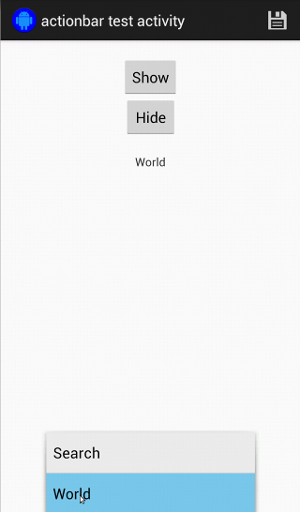
ActionBarTestActivity มีแถบการทำงาน 2 แถบที่แตกต่างกัน: แถบการดำเนินการปกติ
แถบการทำงานและแถบการทำงานตามบริบทที่สร้างขึ้นจากเมนูตัวเลือก ทั้ง 2 อย่าง
แถบการดำเนินการมี 1 รายการที่มองเห็นได้เสมอ และอีก 2 รายการซึ่งแสดงเฉพาะ
ปรากฏในเมนูรายการเพิ่มเติม เมื่อมีการคลิกรายการ จะเป็นการเปลี่ยน TextView เป็น
เนื้อหาของรายการที่คลิก
ไอคอนที่มองเห็นได้ของแถบการทำงานทั้ง 2 แถบจะมีลักษณะตรงไปตรงมา ตามที่แสดง ในข้อมูลโค้ดต่อไปนี้
Kotlin
fun testClickActionBarItem() {
    // We make sure the contextual action bar is hidden.
    onView(withId(R.id.hide_contextual_action_bar))
        .perform(click())

    // Click on the icon - we can find it by the r.Id.
    onView(withId(R.id.action_save))
        .perform(click())

    // Verify that we have really clicked on the icon
    // by checking the TextView content.
    onView(withId(R.id.text_action_bar_result))
        .check(matches(withText("Save")))
}
Java
public void testClickActionBarItem() {
    // We make sure the contextual action bar is hidden.
    onView(withId(R.id.hide_contextual_action_bar))
        .perform(click());

    // Click on the icon - we can find it by the r.Id.
    onView(withId(R.id.action_save))
        .perform(click());

    // Verify that we have really clicked on the icon
    // by checking the TextView content.
    onView(withId(R.id.text_action_bar_result))
        .check(matches(withText("Save")));
}
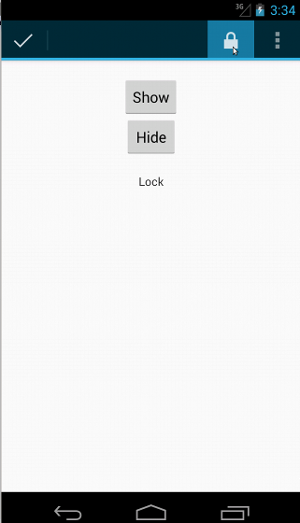
โค้ดจะเหมือนกันสำหรับแถบการทำงานตามบริบท:
Kotlin
fun testClickActionModeItem() {
    // Make sure we show the contextual action bar.
    onView(withId(R.id.show_contextual_action_bar))
        .perform(click())

    // Click on the icon.
    onView((withId(R.id.action_lock)))
        .perform(click())

    // Verify that we have really clicked on the icon
    // by checking the TextView content.
    onView(withId(R.id.text_action_bar_result))
        .check(matches(withText("Lock")))
}
Java
public void testClickActionModeItem() {
    // Make sure we show the contextual action bar.
    onView(withId(R.id.show_contextual_action_bar))
        .perform(click());

    // Click on the icon.
    onView((withId(R.id.action_lock)))
        .perform(click());

    // Verify that we have really clicked on the icon
    // by checking the TextView content.
    onView(withId(R.id.text_action_bar_result))
        .check(matches(withText("Lock")));
}
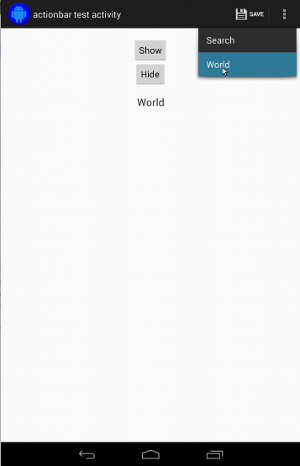
การคลิกรายการในเมนูรายการเพิ่มเติมจะยากขึ้นเล็กน้อยสำหรับการดำเนินการปกติ เนื่องจากอุปกรณ์บางเครื่องมีปุ่มเมนูรายการเพิ่มเติมของฮาร์ดแวร์ ซึ่งจะเปิด มีรายการมากเกินไปในเมนูตัวเลือก และอุปกรณ์บางอย่างมีซอฟต์แวร์ล้น ปุ่มเมนู ซึ่งจะเปิดเมนูรายการเพิ่มเติมปกติ โชคดีที่ Espresso ให้ความสำคัญ ให้กับเรา
สำหรับแถบการดำเนินการปกติ ให้ทำดังนี้
Kotlin
fun testActionBarOverflow() {
    // Make sure we hide the contextual action bar.
    onView(withId(R.id.hide_contextual_action_bar))
        .perform(click())

    // Open the options menu OR open the overflow menu, depending on whether
    // the device has a hardware or software overflow menu button.
    openActionBarOverflowOrOptionsMenu(
            ApplicationProvider.getApplicationContext<Context>())

    // Click the item.
    onView(withText("World"))
        .perform(click())

    // Verify that we have really clicked on the icon by checking
    // the TextView content.
    onView(withId(R.id.text_action_bar_result))
        .check(matches(withText("World")))
}
Java
public void testActionBarOverflow() {
    // Make sure we hide the contextual action bar.
    onView(withId(R.id.hide_contextual_action_bar))
        .perform(click());

    // Open the options menu OR open the overflow menu, depending on whether
    // the device has a hardware or software overflow menu button.
    openActionBarOverflowOrOptionsMenu(
            ApplicationProvider.getApplicationContext());

    // Click the item.
    onView(withText("World"))
        .perform(click());

    // Verify that we have really clicked on the icon by checking
    // the TextView content.
    onView(withId(R.id.text_action_bar_result))
        .check(matches(withText("World")));
}
อุปกรณ์ที่มีปุ่มเมนูรายการเพิ่มเติมของฮาร์ดแวร์จะมีลักษณะดังนี้
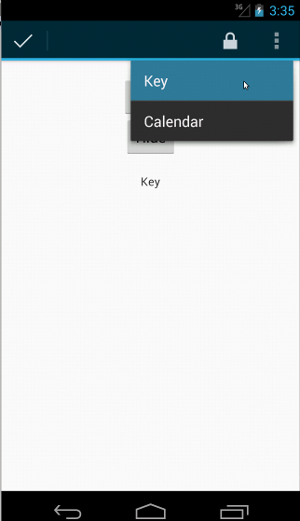
สำหรับแถบการดำเนินการตามบริบท สิ่งนี้จะง่ายอีกครั้ง:
Kotlin
fun testActionModeOverflow() {
    // Show the contextual action bar.
    onView(withId(R.id.show_contextual_action_bar))
        .perform(click())

    // Open the overflow menu from contextual action mode.
    openContextualActionModeOverflowMenu()

    // Click on the item.
    onView(withText("Key"))
        .perform(click())

    // Verify that we have really clicked on the icon by
    // checking the TextView content.
    onView(withId(R.id.text_action_bar_result))
        .check(matches(withText("Key")))
    }
}
Java
public void testActionModeOverflow() {
    // Show the contextual action bar.
    onView(withId(R.id.show_contextual_action_bar))
        .perform(click());

    // Open the overflow menu from contextual action mode.
    openContextualActionModeOverflowMenu();

    // Click on the item.
    onView(withText("Key"))
        .perform(click());

    // Verify that we have really clicked on the icon by
    // checking the TextView content.
    onView(withId(R.id.text_action_bar_result))
        .check(matches(withText("Key")));
    }
}
หากต้องการดูโค้ดแบบเต็มสำหรับตัวอย่างเหล่านี้ ให้ดูที่
ตัวอย่าง ActionBarTest.java ใน GitHub
ยืนยันว่าระบบจะไม่แสดงมุมมอง
ภายหลังการดำเนินการต่างๆ คุณจะต้องยืนยัน
ของ UI ที่อยู่ระหว่างทดสอบ บางครั้งกรณีนี้อาจเป็นกรณีลบ เช่น
ยังไม่มีอะไรเกิดขึ้น โปรดทราบว่าคุณสามารถเปลี่ยนมุมมองแฮมเครสต์ใดก็ได้
เครื่องมือจับคู่ลงใน ViewAssertion โดยใช้ ViewAssertions.matches()
ในตัวอย่างด้านล่าง เรานำตัวจับคู่ isDisplayed() มาปรับที่ตรงกันกลับโดยใช้
เครื่องมือจับคู่ not() มาตรฐาน:
Kotlin
import androidx.test.espresso.Espresso.onView
import androidx.test.espresso.assertion.ViewAssertions.matches
import androidx.test.espresso.matcher.ViewMatchers.isDisplayed
import androidx.test.espresso.matcher.ViewMatchers.withId
import org.hamcrest.Matchers.not

onView(withId(R.id.bottom_left))
    .check(matches(not(isDisplayed())))
Java
import static androidx.test.espresso.Espresso.onView;
import static androidx.test.espresso.assertion.ViewAssertions.matches;
import static androidx.test.espresso.matcher.ViewMatchers.isDisplayed;
import static androidx.test.espresso.matcher.ViewMatchers.withId;
import static org.hamcrest.Matchers.not;

onView(withId(R.id.bottom_left))
    .check(matches(not(isDisplayed())));
แนวทางข้างต้นจะใช้งานได้หากมุมมองนั้นยังคงเป็นส่วนหนึ่งของลำดับชั้น หากใช่
ไม่ใช่ คุณจะได้รับ NoMatchingViewException และจำเป็นต้องใช้
ViewAssertions.doesNotExist()
ยืนยันว่าไม่มีมุมมองอยู่
หากข้อมูลพร็อพเพอร์ตี้หายไปจากลำดับชั้นการแสดงผล ซึ่งอาจเกิดขึ้นได้เมื่อ
การดำเนินการทำให้เกิดการเปลี่ยนไปยังกิจกรรมอื่น คุณควรใช้
ViewAssertions.doesNotExist():
Kotlin
import androidx.test.espresso.Espresso.onView
import androidx.test.espresso.assertion.ViewAssertions.doesNotExist
import androidx.test.espresso.matcher.ViewMatchers.withId

onView(withId(R.id.bottom_left))
    .check(doesNotExist())
Java
import static androidx.test.espresso.Espresso.onView;
import static androidx.test.espresso.assertion.ViewAssertions.doesNotExist;
import static androidx.test.espresso.matcher.ViewMatchers.withId;

onView(withId(R.id.bottom_left))
    .check(doesNotExist());
ยืนยันว่ารายการข้อมูลไม่ได้อยู่ในอะแดปเตอร์
หากต้องการพิสูจน์ว่ารายการข้อมูลบางรายการไม่ได้อยู่ใน AdapterView คุณต้องดำเนินการ
จะต่างกันเล็กน้อย เราต้องหาAdapterViewที่สนใจ
เพื่อสืบสวนข้อมูลที่ตนเก็บไว้ เราไม่จำเป็นต้องใช้ onData()
เราจะใช้ onView() เพื่อค้นหา AdapterView แทน แล้วใช้
ตัวจับคู่เพื่อทำงานกับข้อมูลภายในมุมมอง
อันดับแรก ตัวจับคู่:
Kotlin
private fun withAdaptedData(dataMatcher: Matcher<Any>): Matcher<View> {
    return object : TypeSafeMatcher<View>() {

        override fun describeTo(description: Description) {
            description.appendText("with class name: ")
            dataMatcher.describeTo(description)
        }

        public override fun matchesSafely(view: View) : Boolean {
            if (view !is AdapterView<*>) {
                return false
            }

            val adapter = view.adapter
            for (i in 0 until adapter.count) {
                if (dataMatcher.matches(adapter.getItem(i))) {
                    return true
                }
            }

            return false
        }
    }
}
Java
private static Matcher<View> withAdaptedData(final Matcher<Object> dataMatcher) {
    return new TypeSafeMatcher<View>() {

        @Override
        public void describeTo(Description description) {
            description.appendText("with class name: ");
            dataMatcher.describeTo(description);
        }

        @Override
        public boolean matchesSafely(View view) {
            if (!(view instanceof AdapterView)) {
                return false;
            }

            @SuppressWarnings("rawtypes")
            Adapter adapter = ((AdapterView) view).getAdapter();
            for (int i = 0; i < adapter.getCount(); i++) {
                if (dataMatcher.matches(adapter.getItem(i))) {
                    return true;
                }
            }

            return false;
        }
    };
}
แค่ใช้ onView() ก็จะเจอ AdapterView:
Kotlin
fun testDataItemNotInAdapter() {
    onView(withId(R.id.list))
          .check(matches(not(withAdaptedData(withItemContent("item: 168")))))
    }
}
Java
@SuppressWarnings("unchecked")
public void testDataItemNotInAdapter() {
    onView(withId(R.id.list))
          .check(matches(not(withAdaptedData(withItemContent("item: 168")))));
    }
}
และเราจะยืนยันไม่สำเร็จหากรายการเท่ากับ "item: 168" อยู่ในมุมมองอะแดปเตอร์พร้อมรายการรหัส
หากต้องการดูตัวอย่างทั้งหมด ให้ดูที่เมธอด testDataItemNotInAdapter() ภายในเมธอด
AdapterViewTest.java
ใน GitHub
ใช้เครื่องจัดการความล้มเหลวที่กำหนดเอง
การแทนที่ FailureHandler เริ่มต้นใน Espresso ด้วยตัวเลือกที่กำหนดเองช่วยให้
การจัดการข้อผิดพลาดเพิ่มเติมหรือข้อผิดพลาดอื่นๆ เช่น การจับภาพหน้าจอหรือการส่ง
พร้อมกับข้อมูลการแก้ไขข้อบกพร่องเพิ่มเติม
ตัวอย่าง CustomFailureHandlerTest แสดงวิธีนำพารามิเตอร์ที่กำหนดเอง
เครื่องจัดการความล้มเหลว:
Kotlin
private class CustomFailureHandler(targetContext: Context) : FailureHandler {
    private val delegate: FailureHandler

    init {
        delegate = DefaultFailureHandler(targetContext)
    }

    override fun handle(error: Throwable, viewMatcher: Matcher<View>) {
        try {
            delegate.handle(error, viewMatcher)
        } catch (e: NoMatchingViewException) {
            throw MySpecialException(e)
        }

    }
}
Java
private static class CustomFailureHandler implements FailureHandler {
    private final FailureHandler delegate;

    public CustomFailureHandler(Context targetContext) {
        delegate = new DefaultFailureHandler(targetContext);
    }

    @Override
    public void handle(Throwable error, Matcher<View> viewMatcher) {
        try {
            delegate.handle(error, viewMatcher);
        } catch (NoMatchingViewException e) {
            throw new MySpecialException(e);
        }
    }
}
เครื่องจัดการความล้มเหลวนี้ใช้ MySpecialException แทนที่จะเป็น
NoMatchingViewException และมอบสิทธิ์ความล้มเหลวอื่นๆ ทั้งหมดให้กับ
DefaultFailureHandler CustomFailureHandler สามารถลงทะเบียนกับ
เอสเพรสโซ ในเมธอด setUp() ของการทดสอบ:
Kotlin
@Throws(Exception::class)
override fun setUp() {
    super.setUp()
    getActivity()
    setFailureHandler(CustomFailureHandler(
            ApplicationProvider.getApplicationContext<Context>()))
}
Java
@Override
public void setUp() throws Exception {
    super.setUp();
    getActivity();
    setFailureHandler(new CustomFailureHandler(
            ApplicationProvider.getApplicationContext()));
}
สำหรับข้อมูลเพิ่มเติม โปรดดู
FailureHandler
อินเทอร์เฟซและ
Espresso.setFailureHandler()
กำหนดเป้าหมายหน้าต่างที่ไม่ใช่ค่าเริ่มต้น
Android รองรับหลายหน้าต่าง โดยปกติแล้ว สิ่งนี้จะโปร่งใสต่อผู้ใช้
และนักพัฒนาแอป แต่ในบางกรณีก็จะเห็นหลายหน้าต่าง
เหมือนกับตอนที่หน้าต่างการเติมข้อความอัตโนมัติถูกวาดทับหน้าต่างแอปพลิเคชันหลักใน
วิดเจ็ต Search เพื่อให้สิ่งต่างๆ ง่ายขึ้น โดยค่าเริ่มต้น เอสเพรสโซ่ใช้การเรียนรู้ในการ
เดา Window ที่คุณตั้งใจจะโต้ตอบด้วย การเรียนรู้นี้เกือบจะ
ดีเพียงพอเสมอ ในบางกรณีซึ่งพบได้ไม่บ่อยนัก คุณจะต้องระบุกรอบเวลา
ที่การโต้ตอบควรกำหนดเป้าหมาย ซึ่งทำได้โดยการระบุหน้าต่างรากของตัวเอง
ตัวจับคู่ หรือตัวจับคู่ Root
Kotlin
onView(withText("South China Sea"))
    .inRoot(withDecorView(not(`is`(getActivity().getWindow().getDecorView()))))
    .perform(click())
Java
onView(withText("South China Sea"))
    .inRoot(withDecorView(not(is(getActivity().getWindow().getDecorView()))))
    .perform(click());
เช่นเดียวกันกับกรณีของ
ViewMatchers
เราได้จัดเตรียมชุดของ
RootMatchers
คุณใช้งานออบเจ็กต์ Matcher ของคุณเองได้เสมอ
ดูที่ MultipleWindowTest ตัวอย่าง ใน GitHub
จับคู่ส่วนหัวหรือส่วนท้ายในมุมมองรายการ
เพิ่มส่วนหัวและส่วนท้ายลงใน ListViews โดยใช้ addHeaderView() และ
addFooterView() วิธี เพื่อให้ Espresso.onData() รู้ว่าออบเจ็กต์ข้อมูลใด
ให้ตรงกัน ตรวจสอบว่าได้ส่งค่าออบเจ็กต์ข้อมูลค่าที่กำหนดล่วงหน้าเป็นพารามิเตอร์ที่ 2
ไปยัง addHeaderView() และ addFooterView() เช่น
Kotlin
const val FOOTER = "FOOTER"
...
val footerView = layoutInflater.inflate(R.layout.list_item, listView, false)
footerView.findViewById<TextView>(R.id.item_content).text = "count:"
footerView.findViewById<TextView>(R.id.item_size).text
        = data.size.toString
listView.addFooterView(footerView, FOOTER, true)
Java
public static final String FOOTER = "FOOTER";
...
View footerView = layoutInflater.inflate(R.layout.list_item, listView, false);
footerView.findViewById<TextView>(R.id.item_content).setText("count:");
footerView.findViewById<TextView>(R.id.item_size).setText(String.valueOf(data.size()));
listView.addFooterView(footerView, FOOTER, true);
จากนั้น คุณสามารถเขียนตัวจับคู่สำหรับส่วนท้ายได้ดังนี้
Kotlin
import org.hamcrest.Matchers.allOf
import org.hamcrest.Matchers.instanceOf
import org.hamcrest.Matchers.`is`

fun isFooter(): Matcher<Any> {
    return allOf(`is`(instanceOf(String::class.java)),
            `is`(LongListActivity.FOOTER))
}
Java
import static org.hamcrest.Matchers.allOf;
import static org.hamcrest.Matchers.instanceOf;
import static org.hamcrest.Matchers.is;

@SuppressWarnings("unchecked")
public static Matcher<Object> isFooter() {
    return allOf(is(instanceOf(String.class)), is(LongListActivity.FOOTER));
}
และการโหลดมุมมองในการทดสอบเป็นเรื่องเล็กๆ น้อยๆ
Kotlin
import androidx.test.espresso.Espresso.onData
import androidx.test.espresso.action.ViewActions.click
import androidx.test.espresso.sample.LongListMatchers.isFooter

fun testClickFooter() {
    onData(isFooter())
        .perform(click())

    // ...
}
Java
import static androidx.test.espresso.Espresso.onData;
import static androidx.test.espresso.action.ViewActions.click;
import static androidx.test.espresso.sample.LongListMatchers.isFooter;

public void testClickFooter() {
    onData(isFooter())
        .perform(click());

    // ...
}
ดูตัวอย่างโค้ดแบบเต็มที่พบในเมธอด testClickFooter() ของ
AdapterViewTest.java
ใน GitHub