
Gemini Developer API की मदद से, Google के Gemini मॉडल ऐक्सेस किए जा सकते हैं. इससे, Android ऐप्लिकेशन में जनरेटिव एआई की बेहतरीन सुविधाएं जोड़ी जा सकती हैं. इनमें बातचीत वाली चैट, इमेज जनरेशन (Nano Banana की मदद से), और टेक्स्ट, इमेज, ऑडियो, और वीडियो इनपुट के आधार पर टेक्स्ट जनरेशन शामिल हैं.
Gemini Pro और Flash मॉडल ऐक्सेस करने के लिए, Firebase AI Logic के साथ Gemini Developer API का इस्तेमाल किया जा सकता है. इससे, क्रेडिट कार्ड की ज़रूरत के बिना काम शुरू किया जा सकता है. साथ ही, इसमें बिना किसी शुल्क के इस्तेमाल करने की सुविधा भी मिलती है. कम संख्या में उपयोगकर्ताओं के साथ इंटिग्रेशन की पुष्टि करने के बाद, पैसे चुकाकर इस्तेमाल करने वाले प्लान पर स्विच करके, इसे बढ़ाया जा सकता है.

शुरू करना
अपने ऐप्लिकेशन से सीधे Gemini API के साथ इंटरैक्ट करने से पहले, आपको कुछ काम करने होंगे. इनमें, प्रॉम्प्ट के बारे में जानना, Firebase सेट अप करना, और SDK टूल का इस्तेमाल करने के लिए अपने ऐप्लिकेशन को सेट अप करना शामिल है.
प्रॉम्प्ट के साथ एक्सपेरिमेंट करना
प्रॉम्प्ट के साथ एक्सपेरिमेंट करने से, आपको अपने Android ऐप्लिकेशन के लिए सबसे सही फ़्रेज़, कॉन्टेंट, और फ़ॉर्मैट ढूंढने में मदद मिल सकती है. Google AI Studio एक इंटिग्रेटेड डेवलपमेंट एनवायरमेंट (IDE) है. इसका इस्तेमाल, अपने ऐप्लिकेशन के इस्तेमाल के उदाहरणों के लिए प्रॉम्प्ट के प्रोटोटाइप बनाने और उन्हें डिज़ाइन करने के लिए किया जा सकता है.
अपने इस्तेमाल के उदाहरण के लिए असरदार प्रॉम्प्ट बनाने में, बड़े पैमाने पर एक्सपेरिमेंट करना शामिल होता है. यह प्रोसेस का एक अहम हिस्सा है. Firebase के दस्तावेज़ में, प्रॉम्प्ट के बारे में ज़्यादा जाना जा सकता है.
प्रॉम्प्ट से संतुष्ट होने के बाद, <> बटन पर क्लिक करें. इससे आपको कोड स्निपेट मिलेंगे, जिन्हें अपने कोड में जोड़ा जा सकता है.
Firebase प्रोजेक्ट सेट अप करना और अपने ऐप्लिकेशन को Firebase से कनेक्ट करना
अपने ऐप्लिकेशन से एपीआई को कॉल करने के लिए, Firebase AI Logic को सेट अप करने की गाइड के "पहला चरण" में दिए गए निर्देशों का पालन करें. इससे, अपने ऐप्लिकेशन में Firebase और SDK टूल को सेट अप किया जा सकेगा.
Gradle डिपेंडेंसी जोड़ना
अपने ऐप्लिकेशन मॉड्यूल में, यह Gradle डिपेंडेंसी जोड़ें:
Kotlin
dependencies {
  // ... other androidx dependencies

  // Import the BoM for the Firebase platform
  implementation(platform("com.google.firebase:firebase-bom:34.15.0"))

  // Add the dependency for the Firebase AI Logic library When using the BoM,
  // you don't specify versions in Firebase library dependencies
  implementation("com.google.firebase:firebase-ai")
}
Java
dependencies {
  // Import the BoM for the Firebase platform
  implementation(platform("com.google.firebase:34.15.0"))

  // Add the dependency for the Firebase AI Logic library When using the BoM,
  // you don't specify versions in Firebase library dependencies
  implementation("com.google.firebase:firebase-ai")

  // Required for one-shot operations (to use `ListenableFuture` from Guava
  // Android)
  implementation("com.google.guava:guava:31.0.1-android")

  // Required for streaming operations (to use `Publisher` from Reactive
  // Streams)
  implementation("org.reactivestreams:reactive-streams:1.0.4")
}
जनरेटिव मॉडल को शुरू करना
GenerativeModel को इंस्टैंशिएट करके और मॉडल का नाम तय करके शुरू करें:
Kotlin
// Start by instantiating a GenerativeModel and specifying the model name: val model = Firebase.ai(backend = GenerativeBackend.googleAI()) .generativeModel("gemini-2.5-flash")
Java
GenerativeModel firebaseAI = FirebaseAI.getInstance(GenerativeBackend.googleAI()) .generativeModel("gemini-2.5-flash"); GenerativeModelFutures model = GenerativeModelFutures.from(firebaseAI);
Gemini Developer API के साथ इस्तेमाल किए जा सकने वाले मॉडल के बारे में ज़्यादा जानें. मॉडल के पैरामीटर कॉन्फ़िगर करने के बारे में भी ज़्यादा जाना जा सकता है.
अपने ऐप्लिकेशन से Gemini Developer API के साथ इंटरैक्ट करना
अब आपने SDK टूल का इस्तेमाल करने के लिए, Firebase और अपने ऐप्लिकेशन को सेट अप कर लिया है. अब अपने ऐप्लिकेशन से Gemini Developer API के साथ इंटरैक्ट किया जा सकता है.
टेक्स्ट जनरेट करो
टेक्स्ट जवाब जनरेट करने के लिए, अपने प्रॉम्प्ट के साथ generateContent() को कॉल करें.
Kotlin
scope.launch { val response = model.generateContent("Write a story about a magic backpack.") }
Java
Content prompt = new Content.Builder() .addText("Write a story about a magic backpack.") .build(); ListenableFuture<GenerateContentResponse> response = model.generateContent(prompt); Futures.addCallback(response, new FutureCallback<GenerateContentResponse>() { @Override public void onSuccess(GenerateContentResponse result) { String resultText = result.getText(); } @Override public void onFailure(Throwable t) { t.printStackTrace(); } }, executor);
इमेज और अन्य मीडिया से टेक्स्ट जनरेट करना
ऐसे प्रॉम्प्ट से भी टेक्स्ट जनरेट किया जा सकता है जिसमें टेक्स्ट के साथ-साथ इमेज या अन्य मीडिया शामिल हो. generateContent() को कॉल करते समय, मीडिया को इनलाइन डेटा के तौर पर पास किया जा सकता है.
उदाहरण के लिए, बिटमैप का इस्तेमाल करने के लिए, image कॉन्टेंट टाइप का इस्तेमाल करें:
Kotlin
scope.launch { val response = model.generateContent( content { image(bitmap) text("what is the object in the picture?") } ) }
Java
Content content = new Content.Builder() .addImage(bitmap) .addText("what is the object in the picture?") .build(); ListenableFuture<GenerateContentResponse> response = model.generateContent(content); Futures.addCallback(response, new FutureCallback<GenerateContentResponse>() { @Override public void onSuccess(GenerateContentResponse result) { String resultText = result.getText(); } @Override public void onFailure(Throwable t) { t.printStackTrace(); } }, executor);
ऑडियो फ़ाइल पास करने के लिए, inlineData कॉन्टेंट टाइप का इस्तेमाल करें:
Kotlin
scope.launch { val contentResolver = applicationContext.contentResolver contentResolver.openInputStream(audioUri).use { stream -> stream?.let { val bytes = it.readBytes() val prompt = content { inlineData(bytes, "audio/mpeg") // Specify the appropriate audio MIME type text("Transcribe this audio recording.") } val response = model.generateContent(prompt) } } }
Java
ContentResolver resolver = applicationContext.getContentResolver(); try (InputStream stream = resolver.openInputStream(audioUri)) { File audioFile = new File(new URI(audioUri.toString())); int audioSize = (int) audioFile.length(); byte[] audioBytes = new byte[audioSize]; if (stream != null) { stream.read(audioBytes, 0, audioBytes.length); stream.close(); // Provide a prompt that includes audio specified earlier and text Content prompt = new Content.Builder() .addInlineData(audioBytes, "audio/mpeg") // Specify the appropriate audio MIME type .addText("Transcribe what's said in this audio recording.") .build(); // To generate text output, call `generateContent` with the prompt ListenableFuture<GenerateContentResponse> response = model.generateContent(prompt); Futures.addCallback(response, new FutureCallback<GenerateContentResponse>() { @Override public void onSuccess(GenerateContentResponse result) { String text = result.getText(); Log.d(TAG, (text == null) ? "" : text); } @Override public void onFailure(Throwable t) { Log.e(TAG, "Failed to generate a response", t); } }, executor); } else { Log.e(TAG, "Error getting input stream for file."); // Handle the error appropriately } } catch (IOException e) { Log.e(TAG, "Failed to read the audio file", e); } catch (URISyntaxException e) { Log.e(TAG, "Invalid audio file", e); }
वीडियो फ़ाइल उपलब्ध कराने के लिए, inlineData कॉन्टेंट टाइप का इस्तेमाल जारी रखें:
Kotlin
scope.launch { val contentResolver = applicationContext.contentResolver contentResolver.openInputStream(videoUri).use { stream -> stream?.let { val bytes = it.readBytes() val prompt = content { inlineData(bytes, "video/mp4") // Specify the appropriate video MIME type text("Describe the content of this video") } val response = model.generateContent(prompt) } } }
Java
ContentResolver resolver = applicationContext.getContentResolver(); try (InputStream stream = resolver.openInputStream(videoUri)) { File videoFile = new File(new URI(videoUri.toString())); int videoSize = (int) videoFile.length(); byte[] videoBytes = new byte[videoSize]; if (stream != null) { stream.read(videoBytes, 0, videoBytes.length); stream.close(); // Provide a prompt that includes video specified earlier and text Content prompt = new Content.Builder() .addInlineData(videoBytes, "video/mp4") .addText("Describe the content of this video") .build(); // To generate text output, call generateContent with the prompt ListenableFuture<GenerateContentResponse> response = model.generateContent(prompt); Futures.addCallback(response, new FutureCallback<GenerateContentResponse>() { @Override public void onSuccess(GenerateContentResponse result) { String resultText = result.getText(); System.out.println(resultText); } @Override public void onFailure(Throwable t) { t.printStackTrace(); } }, executor); } } catch (IOException e) { e.printStackTrace(); } catch (URISyntaxException e) { e.printStackTrace(); }
इसी तरह, PDF (application/pdf) और सादे टेक्स्ट (text/plain) वाले दस्तावेज़ भी पास किए जा सकते हैं. इसके लिए, उनके MIME टाइप को पैरामीटर के तौर पर पास करें.
सिलसिलेवार बातचीत
आप सिलसिलेवार बातचीत की सुविधा भी दे सकते हैं. startChat() फ़ंक्शन से चैट शुरू करें. ज़रूरत पड़ने पर, मॉडल को मैसेज का इतिहास दिया जा सकता है. इसके बाद, चैट मैसेज भेजने के लिए sendMessage() फ़ंक्शन को कॉल करें.
Kotlin
val chat = model.startChat( history = listOf( content(role = "user") { text("Hello, I have 2 dogs in my house.") }, content(role = "model") { text("Great to meet you. What would you like to know?") } ) ) scope.launch { val response = chat.sendMessage("How many paws are in my house?") }
Java
Content.Builder userContentBuilder = new Content.Builder(); userContentBuilder.setRole("user"); userContentBuilder.addText("Hello, I have 2 dogs in my house."); Content userContent = userContentBuilder.build(); Content.Builder modelContentBuilder = new Content.Builder(); modelContentBuilder.setRole("model"); modelContentBuilder.addText("Great to meet you. What would you like to know?"); Content modelContent = modelContentBuilder.build(); List<Content> history = Arrays.asList(userContent, modelContent); // Initialize the chat ChatFutures chat = model.startChat(history); // Create a new user message Content.Builder messageBuilder = new Content.Builder(); messageBuilder.setRole("user"); messageBuilder.addText("How many paws are in my house?"); Content message = messageBuilder.build(); // Send the message ListenableFuture<GenerateContentResponse> response = chat.sendMessage(message); Futures.addCallback(response, new FutureCallback<GenerateContentResponse>() { @Override public void onSuccess(GenerateContentResponse result) { String resultText = result.getText(); System.out.println(resultText); } @Override public void onFailure(Throwable t) { t.printStackTrace(); } }, executor);
Nano Banana की मदद से Android पर इमेज जनरेट करना
Gemini 2.5 Flash Image मॉडल (इसे Nano Banana भी कहा जाता है) दुनिया भर की जानकारी और तर्क का इस्तेमाल करके, इमेज जनरेट और एडिट कर सकता है. यह कॉन्टेक्स्ट के हिसाब से काम की इमेज जनरेट करता है. साथ ही, टेक्स्ट और इमेज के आउटपुट को आसानी से मिक्स या इंटरलीव करता है. यह लंबे टेक्स्ट सीक्वेंस के साथ सटीक विज़ुअल भी जनरेट कर सकता है. साथ ही, कॉन्टेक्स्ट बनाए रखते हुए, बातचीत के ज़रिए इमेज एडिटिंग की सुविधा देता है.
इस गाइड में, Android के लिए Firebase AI Logic SDK का इस्तेमाल करके, Gemini 2.5 Flash Image मॉडल (Nano Banana) का इस्तेमाल करने का तरीका बताया गया है. Gemini की मदद से इमेज जनरेट करने के बारे में ज़्यादा जानने के लिए, Firebase के दस्तावेज़ में Gemini की मदद से इमेज जनरेट करना लेख पढ़ें.
जनरेटिव मॉडल को शुरू करना
GenerativeModel को इंस्टैंशिएट करें और मॉडल का नाम gemini-2.5-flash-image-preview तय करें. पक्का करें कि आपने responseModalities को कॉन्फ़िगर किया हो, ताकि इसमें TEXT और IMAGE, दोनों शामिल हों.
Kotlin
val model = Firebase.ai(backend = GenerativeBackend.googleAI()).generativeModel( modelName = "gemini-2.5-flash-image-preview", // Configure the model to respond with text and images (required) generationConfig = generationConfig { responseModalities = listOf( ResponseModality.TEXT, ResponseModality.IMAGE ) } )
Java
GenerativeModel ai = FirebaseAI.getInstance(GenerativeBackend.googleAI()).generativeModel( "gemini-2.5-flash-image-preview", // Configure the model to respond with text and images (required) new GenerationConfig.Builder() .setResponseModalities(Arrays.asList(ResponseModality.TEXT, ResponseModality.IMAGE)) .build() ); GenerativeModelFutures model = GenerativeModelFutures.from(ai);
इमेज जनरेट करना (सिर्फ़ टेक्स्ट इनपुट)
Gemini मॉडल को सिर्फ़ टेक्स्ट वाला प्रॉम्प्ट देकर, इमेज जनरेट करने के लिए कहा जा सकता है:
Kotlin
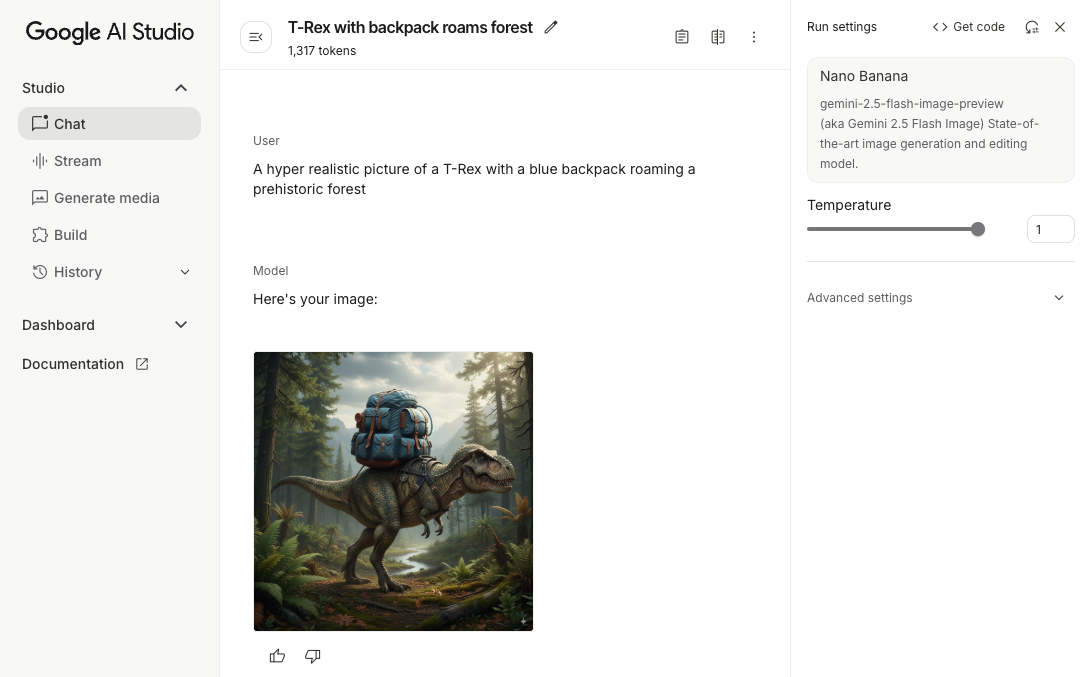
scope.launch { // Provide a text prompt instructing the model to generate an image val prompt = "A hyper realistic picture of a t-rex with a blue bag pack roaming a pre-historic forest." // To generate image output, call `generateContent` with the text input val generatedImageAsBitmap: Bitmap? = model.generateContent(prompt) .candidates.first().content.parts.filterIsInstance<ImagePart>() .firstOrNull()?.image }
Java
// Provide a text prompt instructing the model to generate an image Content prompt = new Content.Builder() .addText("Generate an image of the Eiffel Tower with fireworks in the background.") .build(); // To generate an image, call `generateContent` with the text input ListenableFuture<GenerateContentResponse> response = model.generateContent(prompt); Futures.addCallback(response, new FutureCallback<GenerateContentResponse>() { @Override public void onSuccess(GenerateContentResponse result) { // iterate over all the parts in the first candidate in the result object for (Part part : result.getCandidates().get(0).getContent().getParts()) { if (part instanceof ImagePart) { ImagePart imagePart = (ImagePart) part; // The returned image as a bitmap Bitmap generatedImageAsBitmap = imagePart.getImage(); break; } } } @Override public void onFailure(Throwable t) { t.printStackTrace(); } }, executor);
इमेज एडिट करना (टेक्स्ट और इमेज इनपुट)
Gemini मॉडल से मौजूदा इमेज एडिट करने के लिए कहा जा सकता है. इसके लिए, अपने प्रॉम्प्ट में टेक्स्ट के साथ-साथ एक या उससे ज़्यादा इमेज शामिल करें:
Kotlin
scope.launch { // Provide a text prompt instructing the model to edit the image val prompt = content { image(bitmap) text("Edit this image to make it look like a cartoon") } // To edit the image, call `generateContent` with the prompt (image and text input) val generatedImageAsBitmap: Bitmap? = model.generateContent(prompt) .candidates.first().content.parts.filterIsInstance<ImagePart>().firstOrNull()?.image // Handle the generated text and image }
Java
// Provide an image for the model to edit Bitmap bitmap = BitmapFactory.decodeResource(resources, R.drawable.scones); // Provide a text prompt instructing the model to edit the image Content promptcontent = new Content.Builder() .addImage(bitmap) .addText("Edit this image to make it look like a cartoon") .build(); // To edit the image, call `generateContent` with the prompt (image and text input) ListenableFuture<GenerateContentResponse> response = model.generateContent(promptcontent); Futures.addCallback(response, new FutureCallback<GenerateContentResponse>() { @Override public void onSuccess(GenerateContentResponse result) { // iterate over all the parts in the first candidate in the result object for (Part part : result.getCandidates().get(0).getContent().getParts()) { if (part instanceof ImagePart) { ImagePart imagePart = (ImagePart) part; Bitmap generatedImageAsBitmap = imagePart.getImage(); break; } } } @Override public void onFailure(Throwable t) { t.printStackTrace(); } }, executor);
सिलसिलेवार बातचीत के ज़रिए इमेज में बदलाव करना और उन्हें बेहतर बनाना
बातचीत के ज़रिए इमेज एडिटिंग के लिए, सिलसिलेवार बातचीत का इस्तेमाल किया जा सकता है. इससे, ओरिजनल इमेज को फिर से भेजे बिना, एडिट में सुधार करने के लिए फ़ॉलो-अप अनुरोध किए जा सकते हैं.
सबसे पहले, startChat() से चैट शुरू करें. इसके अलावा, मैसेज का इतिहास भी दिया जा सकता है. इसके बाद, अगले मैसेज के लिए sendMessage() का इस्तेमाल करें:
Kotlin
scope.launch { // Create the initial prompt instructing the model to edit the image val prompt = content { image(bitmap) text("Edit this image to make it look like a cartoon") } // Initialize the chat val chat = model.startChat() // To generate an initial response, send a user message with the image and text prompt var response = chat.sendMessage(prompt) // Inspect the returned image var generatedImageAsBitmap: Bitmap? = response .candidates.first().content.parts.filterIsInstance<ImagePart>().firstOrNull()?.image // Follow up requests do not need to specify the image again response = chat.sendMessage("But make it old-school line drawing style") generatedImageAsBitmap = response .candidates.first().content.parts.filterIsInstance<ImagePart>().firstOrNull()?.image }
Java
// Provide an image for the model to edit Bitmap bitmap = BitmapFactory.decodeResource(resources, R.drawable.scones); // Initialize the chat ChatFutures chat = model.startChat(); // Create the initial prompt instructing the model to edit the image Content prompt = new Content.Builder() .setRole("user") .addImage(bitmap) .addText("Edit this image to make it look like a cartoon") .build(); // To generate an initial response, send a user message with the image and text prompt ListenableFuture<GenerateContentResponse> response = chat.sendMessage(prompt); // Extract the image from the initial response ListenableFuture<Bitmap> initialRequest = Futures.transform(response, result -> { for (Part part : result.getCandidates().get(0).getContent().getParts()) { if (part instanceof ImagePart) { ImagePart imagePart = (ImagePart) part; return imagePart.getImage(); } } return null; }, executor); // Follow up requests do not need to specify the image again ListenableFuture<GenerateContentResponse> modelResponseFuture = Futures.transformAsync( initialRequest, generatedImage -> { Content followUpPrompt = new Content.Builder() .addText("But make it old-school line drawing style") .build(); return chat.sendMessage(followUpPrompt); }, executor); // Add a final callback to check the reworked image Futures.addCallback(modelResponseFuture, new FutureCallback<GenerateContentResponse>() { @Override public void onSuccess(GenerateContentResponse result) { for (Part part : result.getCandidates().get(0).getContent().getParts()) { if (part instanceof ImagePart) { ImagePart imagePart = (ImagePart) part; Bitmap generatedImageAsBitmap = imagePart.getImage(); break; } } } @Override public void onFailure(Throwable t) { t.printStackTrace(); } }, executor);
ज़रूरी बातें और सीमाएं
इन बातों और सीमाओं का ध्यान रखें:
- आउटपुट फ़ॉर्मैट: इमेज, पीएनजी के तौर पर जनरेट की जाती हैं. इनकी ज़्यादा से ज़्यादा डाइमेंशन 1024 पिक्सल होती है.
- इनपुट टाइप: मॉडल, इमेज जनरेट करने के लिए ऑडियो या वीडियो इनपुट के साथ काम नहीं करता.
- भाषा की उपलब्धता: बेहतर परफ़ॉर्मेंस के लिए, इन भाषाओं का इस्तेमाल करें:
अंग्रेज़ी (
en), मेक्सिकन स्पैनिश (es-mx), जापानी (ja-jp), सरलीकृत चीनी (zh-cn), और हिंदी (hi-in). - जनरेशन से जुड़ी समस्याएं:
- ऐसा हो सकता है कि इमेज जनरेशन हमेशा ट्रिगर न हो. इसकी वजह से, कभी-कभी सिर्फ़ टेक्स्ट वाला आउटपुट मिल सकता है. इमेज आउटपुट के लिए साफ़ तौर पर पूछें (उदाहरण के लिए, "कोई इमेज जनरेट करो", "साथ-साथ इमेज उपलब्ध कराओ", "इमेज अपडेट करो").
- ऐसा हो सकता है कि मॉडल, जनरेशन की प्रोसेस बीच में ही रोक दे. फिर से कोशिश करें या कोई दूसरा प्रॉम्प्ट आज़माएं.
- ऐसा हो सकता है कि मॉडल, टेक्स्ट को इमेज के तौर पर जनरेट करे. टेक्स्ट आउटपुट के लिए साफ़ तौर पर पूछें (उदाहरण के लिए, "इलस्ट्रेशन के साथ-साथ, कहानी वाला टेक्स्ट जनरेट करो").
ज़्यादा जानकारी के लिए, Firebase का दस्तावेज़ देखें.
अगले चरण
अपने ऐप्लिकेशन को सेट अप करने के बाद, इन अगले चरणों पर ध्यान दें:
- GitHub पर, Android Quickstart Firebase सैंपल ऐप्लिकेशन और Android AI सैंपल कैटलॉग की समीक्षा करें.
- अपने ऐप्लिकेशन को प्रोडक्शन के लिए तैयार करें. इसमें, Firebase App Check को सेट अप करना शामिल है, ताकि Gemini API को बिना अनुमति वाले क्लाइंट के गलत इस्तेमाल से बचाया जा सके.
- Firebase के Firebase दस्तावेज़ में, Firebase AI Logic के बारे में ज़्यादा जानें.