

Gemini Developer API נותן לכם גישה למודלים של Gemini מבית Google, ומאפשר לכם לשלב באפליקציות ל-Android תכונות מתקדמות של AI גנרטיבי – כולל שיחות צ'אט, יצירת תמונות (באמצעות Nano Banana) ויצירת טקסט על סמך קלט של טקסט, תמונה, אודיו ווידאו.
כדי לגשת למודלים של Gemini Pro ו-Flash, אתם יכולים להשתמש ב-Gemini Developer API עם Firebase AI Logic. היא מאפשרת לכם להתחיל בלי להזין אמצעי תשלום (כמו כרטיס אשראי), ומציעה תוכנית בחינם נדיבה. אחרי שמאמתים את השילוב עם בסיס משתמשים קטן, אפשר לשדרג לרמה בתשלום כדי להגדיל את בסיס המשתמשים.

תחילת העבודה
לפני שמתחילים להשתמש ב-Gemini API ישירות מהאפליקציה, צריך לבצע כמה פעולות, כולל להכיר את ההנחיות ולהגדיר את Firebase ואת האפליקציה לשימוש ב-SDK.
התנסות בהנחיות
ניסויים עם פרומפטים יכולים לעזור לכם למצוא את הניסוח, התוכן והפורמט הטובים ביותר לאפליקציית Android שלכם. Google AI Studio היא סביבת פיתוח משולבת (IDE) שבה אתם יכולים ליצור אב טיפוס ולעצב פרומפטים לתרחישי שימוש של האפליקציה.
כדי ליצור הנחיות יעילות לתרחיש לדוגמה, צריך לערוך ניסויים רבים, וזה חלק קריטי בתהליך. מידע נוסף על הנדסת פרומפטים זמין במאמרי העזרה של Firebase.
כשההנחיה מוכנה, לוחצים על הכפתור <> כדי לקבל קטעי קוד שאפשר להוסיף לקוד שלכם.
הגדרת פרויקט ב-Firebase וקישור האפליקציה ל-Firebase
כשתהיו מוכנים לשלוח קריאה ל-API מהאפליקציה, פעלו לפי ההוראות ב"שלב 1" במדריך לתחילת העבודה עם Firebase AI Logic כדי להגדיר את Firebase ולהפעיל את ממשקי ה-API והשירותים הנדרשים.
הוספת יחסי התלות של Gradle
מוסיפים את יחסי התלות הבאים של Gradle למודול האפליקציה:
Kotlin
dependencies {
  // ... other androidx dependencies

  // Import the BoM for the Firebase platform
  implementation(platform("com.google.firebase:firebase-bom:35.1.0"))

  // Add the dependencies for the Firebase AI Logic and App Check libraries
  // When using the BoM, you don't specify versions in Firebase library dependencies
  implementation("com.google.firebase:firebase-ai")
  implementation("com.google.firebase:firebase-appcheck-debug")
}
Java
dependencies {
  // Import the BoM for the Firebase platform
  implementation(platform("com.google.firebase:firebase-bom:35.1.0"))

  // Add the dependencies for the Firebase AI Logic and App Check libraries
  // When using the BoM, you don't specify versions in Firebase library dependencies
  implementation("com.google.firebase:firebase-ai")
  implementation("com.google.firebase:firebase-appcheck-debug")

  // Required for one-shot operations (to use `ListenableFuture` from Guava Android)
  implementation("com.google.guava:guava:31.0.1-android")

  // Required for streaming operations (to use `Publisher` from Reactive Streams)
  implementation("org.reactivestreams:reactive-streams:1.0.4")
}
הגדרת ספק אימות לצורכי ניפוי באגים של App Check לפיתוח מקומי
החל מתחילת יולי 2026, כחלק מתהליך ההגדרה המודרך של AI Logic במסוף Firebase, המערכת תאכוף באופן אוטומטי את Firebase App Check כדי להגן על Gemini API. לפיתוח מקומי, צריך להגדיר את ספק אימות לצורכי ניפוי באגים של App Check כדי לעקוף את האימות תוך שמירה על האכיפה של App Check.
בגרסת ה-build לניפוי באגים, מגדירים את App Check כך שישתמש ב-factory של ספק אימות לצורכי ניפוי באגים:
Kotlin
Firebase.initialize(context = this)
Firebase.appCheck.installAppCheckProviderFactory(
    DebugAppCheckProviderFactory.getInstance(),
)
Java
FirebaseApp.initializeApp(/*context=*/ this);
FirebaseAppCheck firebaseAppCheck = FirebaseAppCheck.getInstance();
firebaseAppCheck.installAppCheckProviderFactory(
        DebugAppCheckProviderFactory.getInstance());
איך מקבלים טוקן לניפוי באגים:
מפעילים את האפליקציה באמולטור או במכשיר הבדיקה.
מחפשים את אסימון ניפוי הבאגים של App Check ביומנים. לדוגמה:
D DebugAppCheckProvider: Enter this debug secret into the allow list
in the Firebase Console for your project: 123a4567-b89c-12d3-e456-789012345678
מעתיקים את הטוקן (לדוגמה,
123a4567-b89c-12d3-e456-789012345678).
רושמים את אסימון ניפוי הבאגים ב-App Check:
במסוף Firebase, עוברים אל Security (אבטחה) > App Check > הכרטיסייה Apps (אפליקציות).
מוצאים את האפליקציה, לוחצים על סמל האפשרויות הנוספות () ובוחרים באפשרות ניהול אסימוני ניפוי באגים.
פועלים לפי ההוראות במסך כדי לרשום את אסימון ניפוי הבאגים.
פרטים על ספק האימות לצורכי ניפוי באגים (כולל איך לקבל אסימון חדש לניפוי באגים) זמינים במסמכים הרשמיים של App Check.
הפעלת המודל הגנרטיבי
כדי להתחיל, יוצרים מופע של GenerativeModel ומציינים את שם המודל:
Kotlin
// Start by instantiating a GenerativeModel and specifying the model name: val model = Firebase.ai(backend = GenerativeBackend.googleAI()) .generativeModel("gemini-3.5-flash")
Java
GenerativeModel firebaseAI = FirebaseAI.getInstance(GenerativeBackend.googleAI()) .generativeModel("gemini-3.5-flash"); GenerativeModelFutures model = GenerativeModelFutures.from(firebaseAI);
מידע נוסף על המודלים שזמינים לשימוש עם Gemini Developer API מידע נוסף על הגדרת פרמטרים של מודלים
אינטראקציה עם Gemini Developer API מהאפליקציה
עכשיו, אחרי שהגדרתם את Firebase ואת האפליקציה לשימוש ב-SDK, אתם יכולים להשתמש ב-Gemini Developer API מהאפליקציה.
יצירת טקסט
כדי ליצור תשובת טקסט, צריך להפעיל את generateContent() עם ההנחיה.
Kotlin
scope.launch { val response = model.generateContent("Write a story about a magic backpack.") }
Java
Content prompt = new Content.Builder() .addText("Write a story about a magic backpack.") .build(); ListenableFuture<GenerateContentResponse> response = model.generateContent(prompt); Futures.addCallback(response, new FutureCallback<GenerateContentResponse>() { @Override public void onSuccess(GenerateContentResponse result) { String resultText = result.getText(); } @Override public void onFailure(Throwable t) { t.printStackTrace(); } }, executor);
יצירת טקסט דינמי מבוסס-AI מתמונות וממדיה אחרת
אתם יכולים גם ליצור טקסט מהנחיה שכוללת טקסט ותמונות או מדיה אחרת. כשקוראים ל-generateContent(), אפשר להעביר את המדיה כנתונים מוטבעים.
לדוגמה, כדי להשתמש במפת סיביות, משתמשים בסוג התוכן image:
Kotlin
scope.launch { val response = model.generateContent( content { image(bitmap) text("what is the object in the picture?") } ) }
Java
Content content = new Content.Builder() .addImage(bitmap) .addText("what is the object in the picture?") .build(); ListenableFuture<GenerateContentResponse> response = model.generateContent(content); Futures.addCallback(response, new FutureCallback<GenerateContentResponse>() { @Override public void onSuccess(GenerateContentResponse result) { String resultText = result.getText(); } @Override public void onFailure(Throwable t) { t.printStackTrace(); } }, executor);
כדי להעביר קובץ אודיו, משתמשים בסוג התוכן inlineData:
Kotlin
scope.launch { val contentResolver = applicationContext.contentResolver contentResolver.openInputStream(audioUri).use { stream -> stream?.let { val bytes = it.readBytes() val prompt = content { inlineData(bytes, "audio/mpeg") // Specify the appropriate audio MIME type text("Transcribe this audio recording.") } val response = model.generateContent(prompt) } } }
Java
ContentResolver resolver = applicationContext.getContentResolver(); try (InputStream stream = resolver.openInputStream(audioUri)) { File audioFile = new File(new URI(audioUri.toString())); int audioSize = (int) audioFile.length(); byte[] audioBytes = new byte[audioSize]; if (stream != null) { stream.read(audioBytes, 0, audioBytes.length); stream.close(); // Provide a prompt that includes audio specified earlier and text Content prompt = new Content.Builder() .addInlineData(audioBytes, "audio/mpeg") // Specify the appropriate audio MIME type .addText("Transcribe what's said in this audio recording.") .build(); // To generate text output, call `generateContent` with the prompt ListenableFuture<GenerateContentResponse> response = model.generateContent(prompt); Futures.addCallback(response, new FutureCallback<GenerateContentResponse>() { @Override public void onSuccess(GenerateContentResponse result) { String text = result.getText(); Log.d(TAG, (text == null) ? "" : text); } @Override public void onFailure(Throwable t) { Log.e(TAG, "Failed to generate a response", t); } }, executor); } else { Log.e(TAG, "Error getting input stream for file."); // Handle the error appropriately } } catch (IOException e) { Log.e(TAG, "Failed to read the audio file", e); } catch (URISyntaxException e) { Log.e(TAG, "Invalid audio file", e); }
כדי לספק קובץ וידאו, צריך להמשיך להשתמש בסוג התוכן inlineData:
Kotlin
scope.launch { val contentResolver = applicationContext.contentResolver contentResolver.openInputStream(videoUri).use { stream -> stream?.let { val bytes = it.readBytes() val prompt = content { inlineData(bytes, "video/mp4") // Specify the appropriate video MIME type text("Describe the content of this video") } val response = model.generateContent(prompt) } } }
Java
ContentResolver resolver = applicationContext.getContentResolver(); try (InputStream stream = resolver.openInputStream(videoUri)) { File videoFile = new File(new URI(videoUri.toString())); int videoSize = (int) videoFile.length(); byte[] videoBytes = new byte[videoSize]; if (stream != null) { stream.read(videoBytes, 0, videoBytes.length); stream.close(); // Provide a prompt that includes video specified earlier and text Content prompt = new Content.Builder() .addInlineData(videoBytes, "video/mp4") .addText("Describe the content of this video") .build(); // To generate text output, call generateContent with the prompt ListenableFuture<GenerateContentResponse> response = model.generateContent(prompt); Futures.addCallback(response, new FutureCallback<GenerateContentResponse>() { @Override public void onSuccess(GenerateContentResponse result) { String resultText = result.getText(); System.out.println(resultText); } @Override public void onFailure(Throwable t) { t.printStackTrace(); } }, executor); } } catch (IOException e) { e.printStackTrace(); } catch (URISyntaxException e) { e.printStackTrace(); }
באופן דומה, אפשר גם להעביר מסמכי PDF (application/pdf) וטקסט פשוט (text/plain) על ידי העברת סוג ה-MIME המתאים כפרמטר.
שיחה עם זיכרון
אפשר גם לתמוך בשיחות בכמה שלבים. מתחילים צ'אט באמצעות הפונקציה startChat(). אפשר גם לספק למודל את היסטוריית ההודעות. ואז קוראים לפונקציה sendMessage() כדי לשלוח הודעות בצ'אט.
Kotlin
val chat = model.startChat( history = listOf( content(role = "user") { text("Hello, I have 2 dogs in my house.") }, content(role = "model") { text("Great to meet you. What would you like to know?") } ) ) scope.launch { val response = chat.sendMessage("How many paws are in my house?") }
Java
Content.Builder userContentBuilder = new Content.Builder(); userContentBuilder.setRole("user"); userContentBuilder.addText("Hello, I have 2 dogs in my house."); Content userContent = userContentBuilder.build(); Content.Builder modelContentBuilder = new Content.Builder(); modelContentBuilder.setRole("model"); modelContentBuilder.addText("Great to meet you. What would you like to know?"); Content modelContent = modelContentBuilder.build(); List<Content> history = Arrays.asList(userContent, modelContent); // Initialize the chat ChatFutures chat = model.startChat(history); // Create a new user message Content.Builder messageBuilder = new Content.Builder(); messageBuilder.setRole("user"); messageBuilder.addText("How many paws are in my house?"); Content message = messageBuilder.build(); // Send the message ListenableFuture<GenerateContentResponse> response = chat.sendMessage(message); Futures.addCallback(response, new FutureCallback<GenerateContentResponse>() { @Override public void onSuccess(GenerateContentResponse result) { String resultText = result.getText(); System.out.println(resultText); } @Override public void onFailure(Throwable t) { t.printStackTrace(); } }, executor);
איך יוצרים תמונות ב-Android באמצעות Nano Banana
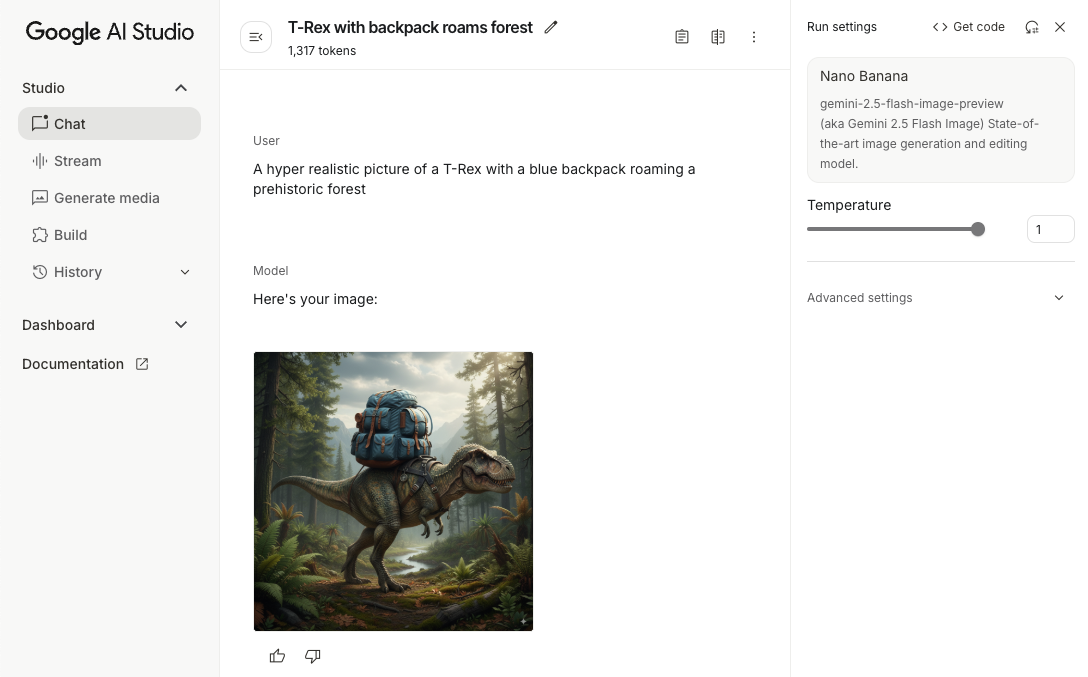
המודלים של Gemini ליצירת תמונות (שנקראים גם Nano Banana) יכולים ליצור ולערוך תמונות על סמך ידע על העולם הפיזי ויכולות חשיבה. הם יוצרים תמונות שרלוונטיות להקשר, ומשלבים בצורה חלקה פלטים של טקסט ותמונות. הם גם יכולים ליצור תמונות מדויקות עם רצפי טקסט ארוכים, ולערוך תמונות בממשק שיחה תוך שמירה על ההקשר.
במדריך הזה מוסבר איך להשתמש במודלים של Gemini לתמונות (המודלים של Nano Banana) באמצעות Firebase AI Logic SDK ל-Android. מידע נוסף על יצירת תמונות באמצעות Gemini זמין במסמכי התיעוד של Firebase.
הפעלת המודל הגנרטיבי
יוצרים מופע של GenerativeModel ומציינים שם של מודל Gemini ליצירת תמונות (כמו gemini-3.1-flash-image). לאחר מכן, מגדירים את responseModalities כך שיכלול גם את TEXT וגם את IMAGE כדי ליצור טקסט ותמונות משולבים. אם לא תכללו את TEXT, המודל יחזיר רק תמונות.
Kotlin
val model = Firebase.ai(backend = GenerativeBackend.googleAI()).generativeModel( modelName = "gemini-3.1-flash-image", // Configure the model to respond with images (required) and text (optional) generationConfig = generationConfig { responseModalities = listOf( ResponseModality.TEXT, ResponseModality.IMAGE ) } )
Java
GenerativeModel ai = FirebaseAI.getInstance(GenerativeBackend.googleAI()).generativeModel( "gemini-3.1-flash-image", // Configure the model to respond with text and images (required) new GenerationConfig.Builder() .setResponseModalities(Arrays.asList(ResponseModality.TEXT, ResponseModality.IMAGE)) .build() ); GenerativeModelFutures model = GenerativeModelFutures.from(ai);
יצירת תמונות (קלט טקסט בלבד)
כדי להנחות את מודל Gemini ליצור תמונות, אתם יכולים לתת לו הנחיה בטקסט בלבד:
Kotlin
scope.launch { // Provide a text prompt instructing the model to generate an image val prompt = "A hyper realistic picture of a t-rex with a blue bag pack roaming a pre-historic forest." // To generate image output, call `generateContent` with the text input val generatedImageAsBitmap: Bitmap? = model.generateContent(prompt) .candidates.first().content.parts.filterIsInstance<ImagePart>() .firstOrNull()?.image }
Java
// Provide a text prompt instructing the model to generate an image Content prompt = new Content.Builder() .addText("Generate an image of the Eiffel Tower with fireworks in the background.") .build(); // To generate an image, call `generateContent` with the text input ListenableFuture<GenerateContentResponse> response = model.generateContent(prompt); Futures.addCallback(response, new FutureCallback<GenerateContentResponse>() { @Override public void onSuccess(GenerateContentResponse result) { // iterate over all the parts in the first candidate in the result object for (Part part : result.getCandidates().get(0).getContent().getParts()) { if (part instanceof ImagePart) { ImagePart imagePart = (ImagePart) part; // The returned image as a bitmap Bitmap generatedImageAsBitmap = imagePart.getImage(); break; } } } @Override public void onFailure(Throwable t) { t.printStackTrace(); } }, executor);
עריכת תמונות (קלט של טקסט ותמונות)
אתם יכולים לבקש ממודל Gemini לערוך תמונות קיימות. לשם כך, צריך לספק בהנחיה גם טקסט וגם תמונה אחת או יותר:
Kotlin
scope.launch { // Provide a text prompt instructing the model to edit the image val prompt = content { image(bitmap) text("Edit this image to make it look like a cartoon") } // To edit the image, call `generateContent` with the prompt (image and text input) val generatedImageAsBitmap: Bitmap? = model.generateContent(prompt) .candidates.first().content.parts.filterIsInstance<ImagePart>().firstOrNull()?.image // Handle the generated text and image }
Java
// Provide an image for the model to edit Bitmap bitmap = BitmapFactory.decodeResource(resources, R.drawable.scones); // Provide a text prompt instructing the model to edit the image Content promptcontent = new Content.Builder() .addImage(bitmap) .addText("Edit this image to make it look like a cartoon") .build(); // To edit the image, call `generateContent` with the prompt (image and text input) ListenableFuture<GenerateContentResponse> response = model.generateContent(promptcontent); Futures.addCallback(response, new FutureCallback<GenerateContentResponse>() { @Override public void onSuccess(GenerateContentResponse result) { // iterate over all the parts in the first candidate in the result object for (Part part : result.getCandidates().get(0).getContent().getParts()) { if (part instanceof ImagePart) { ImagePart imagePart = (ImagePart) part; Bitmap generatedImageAsBitmap = imagePart.getImage(); break; } } } @Override public void onFailure(Throwable t) { t.printStackTrace(); } }, executor);
איך משפרים ועורכים תמונות באמצעות שיחה עם זיכרון
כדי לערוך תמונות בשיחה, אתם יכולים להשתמש בשיחה עם זיכרון. ככה אפשר לשלוח בקשות המשך כדי לשפר את העריכות בלי לשלוח מחדש את התמונה המקורית.
קודם כל, מתחילים שיחה עם startChat(), ואפשר גם לספק את היסטוריית ההודעות. ואז משתמשים ב-sendMessage() בהודעות הבאות:
Kotlin
scope.launch { // Create the initial prompt instructing the model to edit the image val prompt = content { image(bitmap) text("Edit this image to make it look like a cartoon") } // Initialize the chat val chat = model.startChat() // To generate an initial response, send a user message with the image and text prompt var response = chat.sendMessage(prompt) // Inspect the returned image var generatedImageAsBitmap: Bitmap? = response .candidates.first().content.parts.filterIsInstance<ImagePart>().firstOrNull()?.image // Follow up requests do not need to specify the image again response = chat.sendMessage("But make it old-school line drawing style") generatedImageAsBitmap = response .candidates.first().content.parts.filterIsInstance<ImagePart>().firstOrNull()?.image }
Java
// Provide an image for the model to edit Bitmap bitmap = BitmapFactory.decodeResource(resources, R.drawable.scones); // Initialize the chat ChatFutures chat = model.startChat(); // Create the initial prompt instructing the model to edit the image Content prompt = new Content.Builder() .setRole("user") .addImage(bitmap) .addText("Edit this image to make it look like a cartoon") .build(); // To generate an initial response, send a user message with the image and text prompt ListenableFuture<GenerateContentResponse> response = chat.sendMessage(prompt); // Extract the image from the initial response ListenableFuture<Bitmap> initialRequest = Futures.transform(response, result -> { for (Part part : result.getCandidates().get(0).getContent().getParts()) { if (part instanceof ImagePart) { ImagePart imagePart = (ImagePart) part; return imagePart.getImage(); } } return null; }, executor); // Follow up requests do not need to specify the image again ListenableFuture<GenerateContentResponse> modelResponseFuture = Futures.transformAsync( initialRequest, generatedImage -> { Content followUpPrompt = new Content.Builder() .addText("But make it old-school line drawing style") .build(); return chat.sendMessage(followUpPrompt); }, executor); // Add a final callback to check the reworked image Futures.addCallback(modelResponseFuture, new FutureCallback<GenerateContentResponse>() { @Override public void onSuccess(GenerateContentResponse result) { for (Part part : result.getCandidates().get(0).getContent().getParts()) { if (part instanceof ImagePart) { ImagePart imagePart = (ImagePart) part; Bitmap generatedImageAsBitmap = imagePart.getImage(); break; } } } @Override public void onFailure(Throwable t) { t.printStackTrace(); } }, executor);
שיקולים ומגבלות
שימו לב לשיקולים ולמגבלות הבאים:
- פורמט פלט: התמונות נוצרות כקובצי PNG בגודל מקסימלי של 1,024 פיקסלים.
- סוגי קלט: המודל לא תומך בקלט של אודיו או וידאו ליצירת תמונות.
- שפות נתמכות: כדי לקבל את התוצאות הכי טובות, כדאי להשתמש בשפות הבאות: אנגלית (
en), ספרדית מקסיקנית (es-mx), יפנית (ja-jp), סינית פשוטה (zh-cn) והינדי (hi-in). - בעיות ביצירת תוכן:
- יצירת התמונות לא תמיד תופעל, ולפעמים התוצאה תהיה פלט של טקסט בלבד. נסו לבקש תמונות באופן מפורש (לדוגמה, "תיצור תמונה", "תספק תמונות תוך כדי", "תעדכן את התמונה").
- יכול להיות שהמודל יפסיק ליצור את התשובה באמצע. אפשר לנסות שוב או להזין הנחיה אחרת.
- המודל יכול ליצור טקסט כתמונה. נסו לבקש פלט של טקסט באופן מפורש (לדוגמה, "צור טקסט נרטיבי יחד עם איורים").
פרטים נוספים זמינים במסמכי התיעוד של Firebase.
השלבים הבאים
אחרי שמגדירים את האפליקציה, כדאי לבצע את הפעולות הבאות:
- עיינו באפליקציה לדוגמה של Firebase למדריך למתחילים ב-Android ובקטלוג הדוגמאות של AI ל-Android ב-GitHub.
- הכינו את האפליקציה לסביבת הייצור, כולל הגדרת Firebase App Check כדי להגן על Gemini API מפני ניצול לרעה על ידי לקוחות לא מורשים.
- מידע נוסף על Firebase AI Logic זמין במסמכי התיעוד של Firebase.