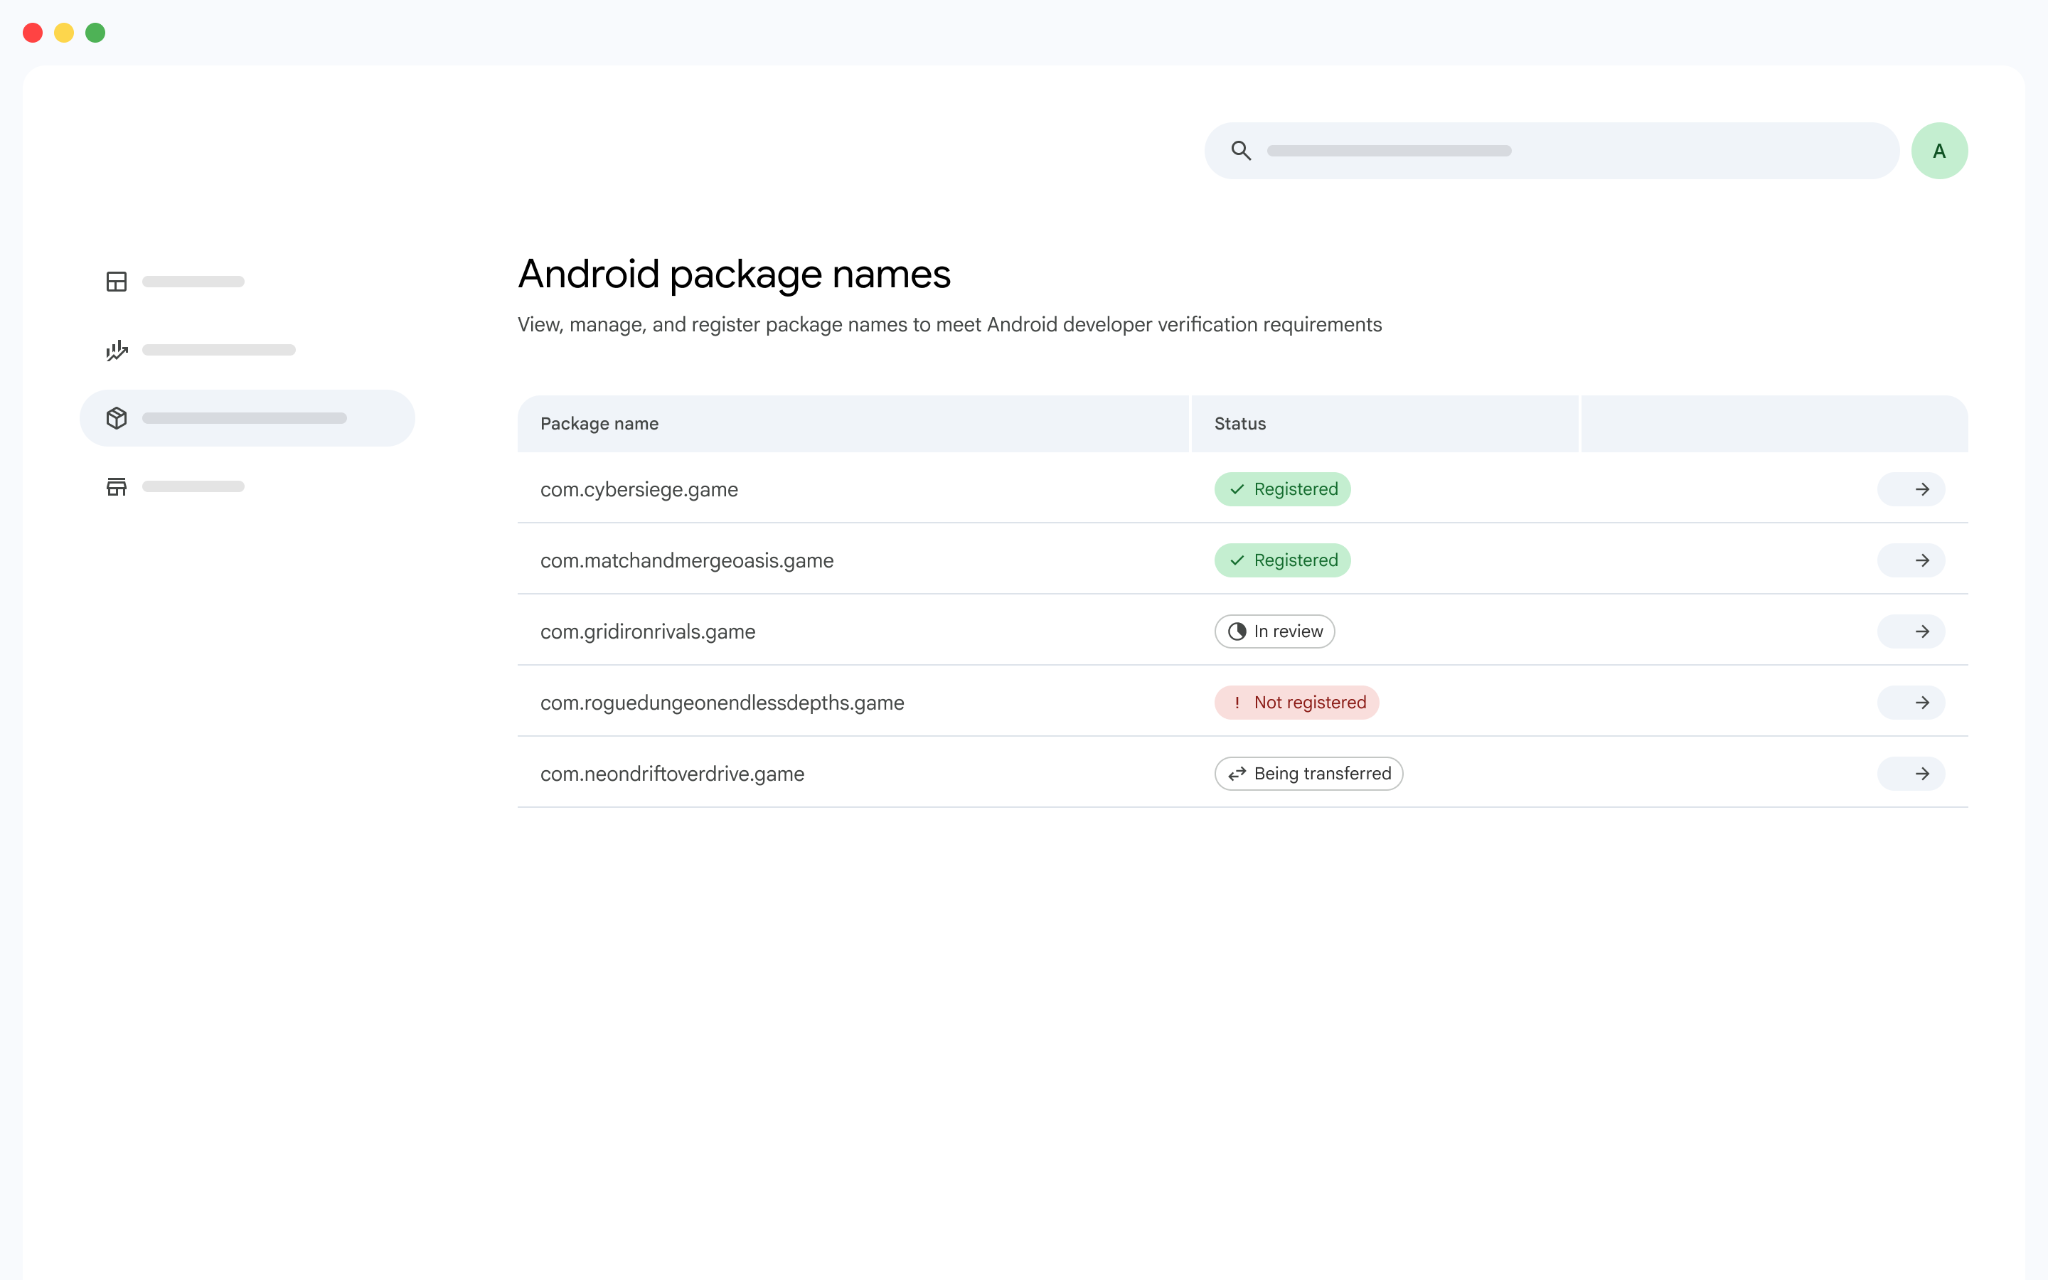
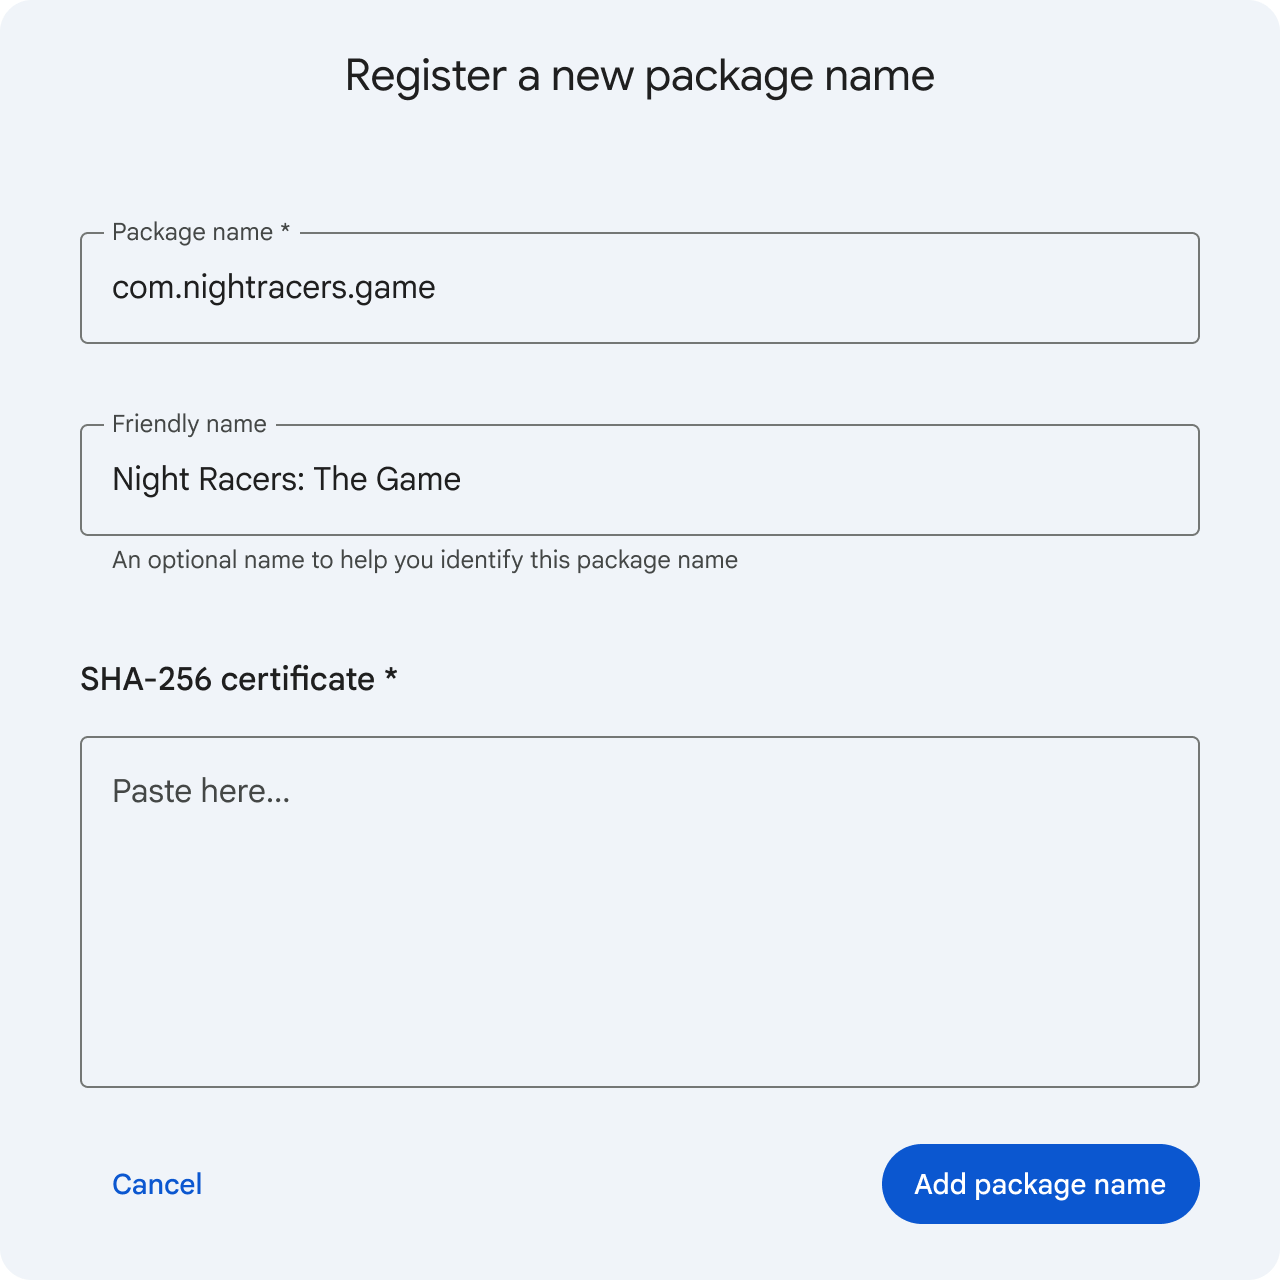
The Android Developer Console API is a public interface designed to allow app distributors and individual developers to programmatically register package names in Android Developer Console.
Your server-to-server capabilities as an:
| App distributor | Individual developer |
|---|---|
| Register a package name - key on behalf of the developer that is publishing an app to the store. Register a package name with a store-managed key. Prove ownership of a key associated with a package name. | Register a package name - key in your continuous deployment workflows. Prove ownership of a key associated with a package name. |
Before you begin
Before you begin, you should have:
- Administrative access to a Google Cloud project.
- A basic understanding of:
You should also be familiar with the following terms:
| Term | Definition |
|---|---|
| Developer account | Represents an Android Developer Console account which can own one or more package names. It contains a verification state (NOT_VERIFIED or VERIFIED). |
| Package name | A specific Android package name (for example, com.example.app) within a developer account, which can be associated with one or more keys. It contains a registration state (DRAFT, IN_REVIEW, REGISTERED, or PENDING_TRANSFER). |
| Key | The specific public certificate/key used to sign an Android package name. Includes the SHA-256 hash and the current registration state (DRAFT, OWNERSHIP_VERIFIED, IN_REVIEW, REGISTERED, or PENDING_TRANSFER). |
Get started
Complete the following steps to access the Android Developer Console API:
Create a Google Cloud project
- Create a Google Cloud account if you don't already have one.
- Open the Google Cloud console.
- Create a Google Cloud project.
Enable the API in your Google Cloud project
- Open the Google Cloud console.
- In the navigation menu (☰), select APIs & Services > Library.
- Select the Google Cloud project you want to enable the API in from the project drop-down menu.
- Use the APIs & Services search bar to select Android Developer Console API.
- Enable the API:
- Navigate to the API's overview page by selecting it from the search results.
- Click the blue Enable button. Google Cloud activates the API for your selected project, which usually takes only a moment. Once enabled, you can start using it.
Authenticate the API
To make calls to the Android Developer Console API, you must authenticate your requests using OAuth 2.0.
Authenticate with OAuth 2.0
The Android Developer Console API requires OAuth 2.0 authentication to authorize access to developer account resources and package names. Because developer account data is tied to a user's Google Account rather than a Google Cloud project, Service Accounts, Workload Identity Federation, and API keys cannot be used to authenticate API requests.
OAuth 2.0 scope
The following scope is required for all operations:
| OAuth 2.0 Scope | Description |
|---|---|
https://www.googleapis.com/auth/androiddeveloperconsole |
View and manage package names and data in your Android Developer Console accounts |
Implement the OAuth 2.0 Web Server flow
To integrate with the Android Developer Console API, applications must use the OAuth 2.0 Web Server flow. Depending on your application type and automation needs, you can choose between two main credential management strategies:
| Option A (Recommended): Offline / automated access (CI/CD & server integration) | Option B: Ephemeral / interactive access |
|---|---|
|
This strategy allows automated processes (like CI/CD pipelines) to run in the background without human intervention: One-time user consent setup: During the initial setup, a developer or account owner completes a one-time consent flow in their browser. Your application requests offline access ( access_type=offline) along with the API scope. Google returns an authorization code, which your application exchanges for an initial access token and a long-lived refresh token.Background execution: Securely store the refresh_token in your deployment environment or secret manager (for example, GitHub Actions Secrets, Google Secret Manager). For subsequent API calls, your automated workflow uses the stored refresh token to obtain a fresh short-lived access token on demand, bypassing any manual login or 2FA prompts.
|
If you prefer to avoid storing long-lived refresh tokens in your environment, or if your application runs in an interactive user context: Prompt on execution: Do not request offline access or store a refresh token. Each time the tool or application is executed, prompt the user to authenticate by redirecting them to the Google OAuth consent page in their browser. Short-lived access: The user logs in and consents, and the application receives a short-lived access token directly (or using authorization code exchange). This access token is used to make API calls and is discarded after execution. Future runs require the user to re-authenticate. |
Register a package name
Package name registration is the process of associating a key to a package name. How a key is registered depends on whether you are registering a key to a new or an existing package name in Android.
Register a new package name
For a new package name that has never been seen on Android, you can provide the public key certificate from the app's signing key pair.
Register an existing package name
To register an existing package name, you must prove ownership of a known private signing key. Unlike new registration, the API returns a list of known public certificate fingerprints that are eligible for registration. These keys can be used for direct registration.
If the key that you are registering is listed as "requires justification", you can still register it, but in addition to completing proof of ownership, the developer is also required to submit a justification for using the package name.
Key eligibility rules
The list of eligible keys is determined by package name eligibility rules designed to minimize package name sharing (introduced as part of Android developer verification).
In scenarios where a package name is used by multiple developers or has multiple signing keys, eligibility is determined as follows:
| Scenario | Rule for direct registration | Rule for other developers |
|---|---|---|
| Majority key holder | The key that accounts for over 50% of total known installs has priority. | All other developers must provide a justification. |
| 50+ installs | If no single key has >50% of installs, all keys with 50 or more installs are eligible. | Developers with keys having fewer than 50 installs must provide a justification. |
| Under 50 installs | If no keys meet the 50-install threshold, any key can be used on a first-come, first-served basis | Once one developer registers, others must provide a justification. |
Verify key ownership
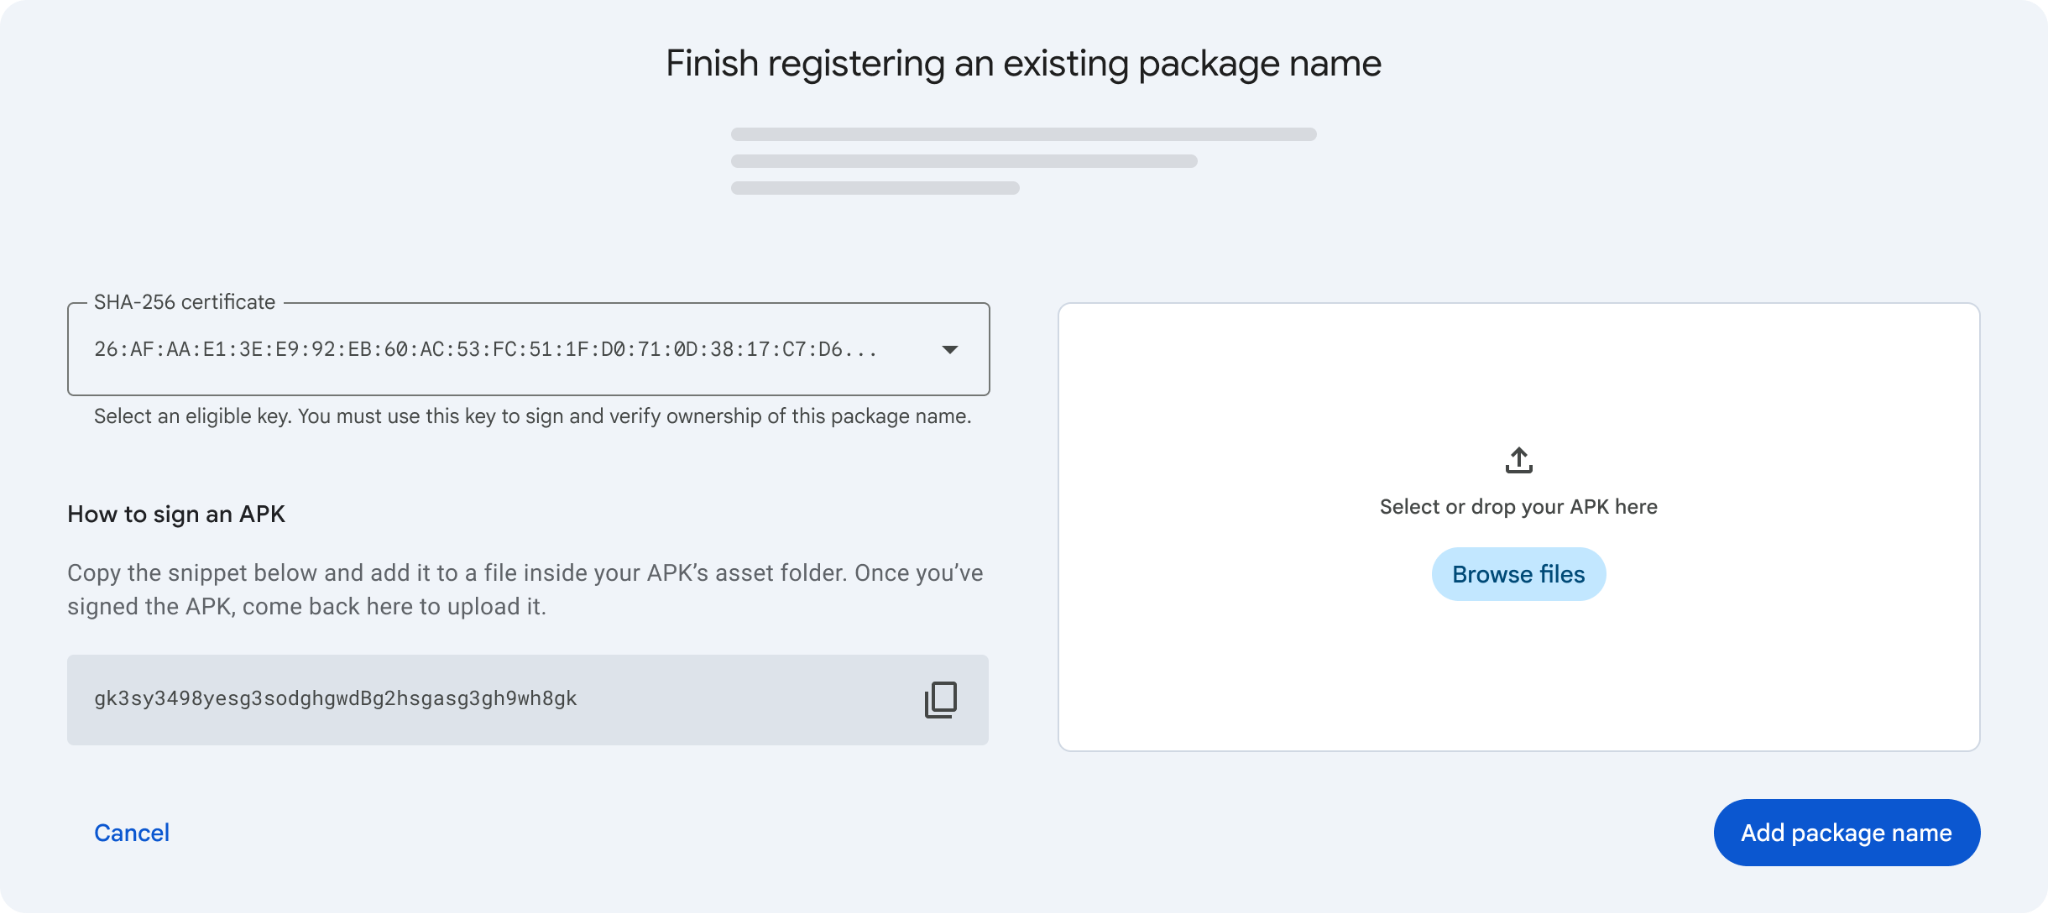
To complete verification for an existing package name, the API provides a
verification string. This verification string needs to be included inside a new
file called adi-registration.properties inside the app's assets folder. You
must then sign and upload the APK using the private key corresponding to the
public key that you are registering.
Justify key registration
If a key registration requires a justification, developers must submit a detailed business rationale. Google reviews this justification, and approval for package name registration can take up to 24 hours.
User experience best practices
It is recommended that applications using the Android Developer Console API follow these patterns to ensure a seamless integration.
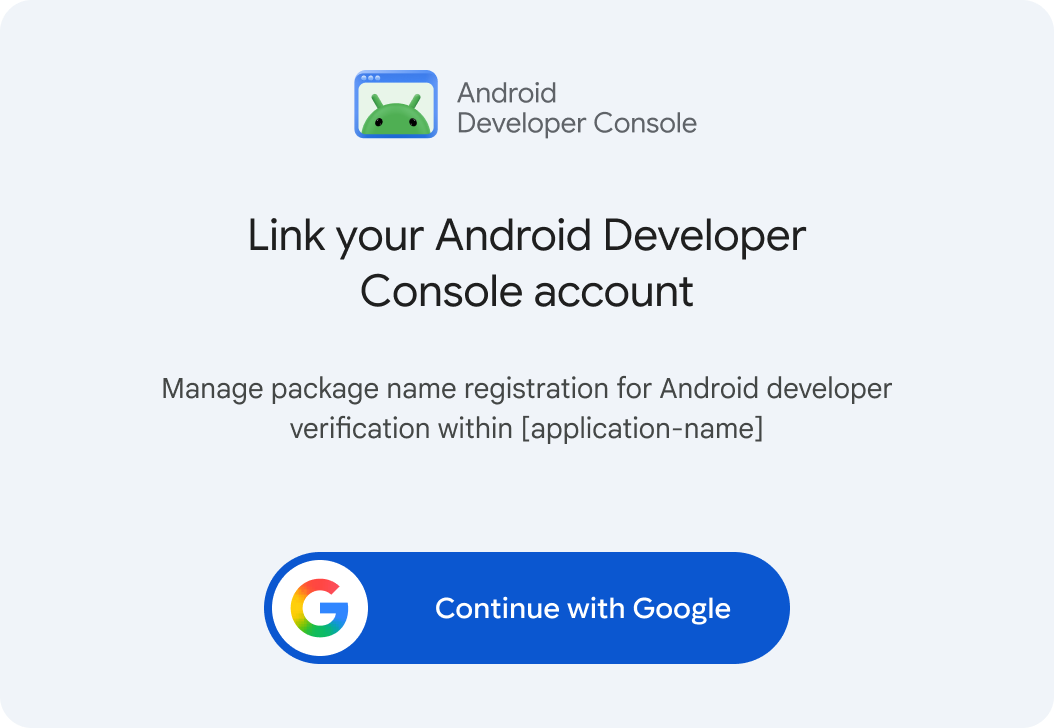
Establish clear OAuth authorization context
Providing explicit context before requesting OAuth authorization helps developers understand why account access is required. To guide users effectively, present a clear explanation of the expected functionality prior to launching the OAuth consent screen.
Structure the authorization context using the following format:
- Title: "Link your Android Developer Console account"
- Summary: "Manage package name registration for Android developer verification within [application-name]"
- Action Button: "Continue with Google" or "Sign in with Google" button
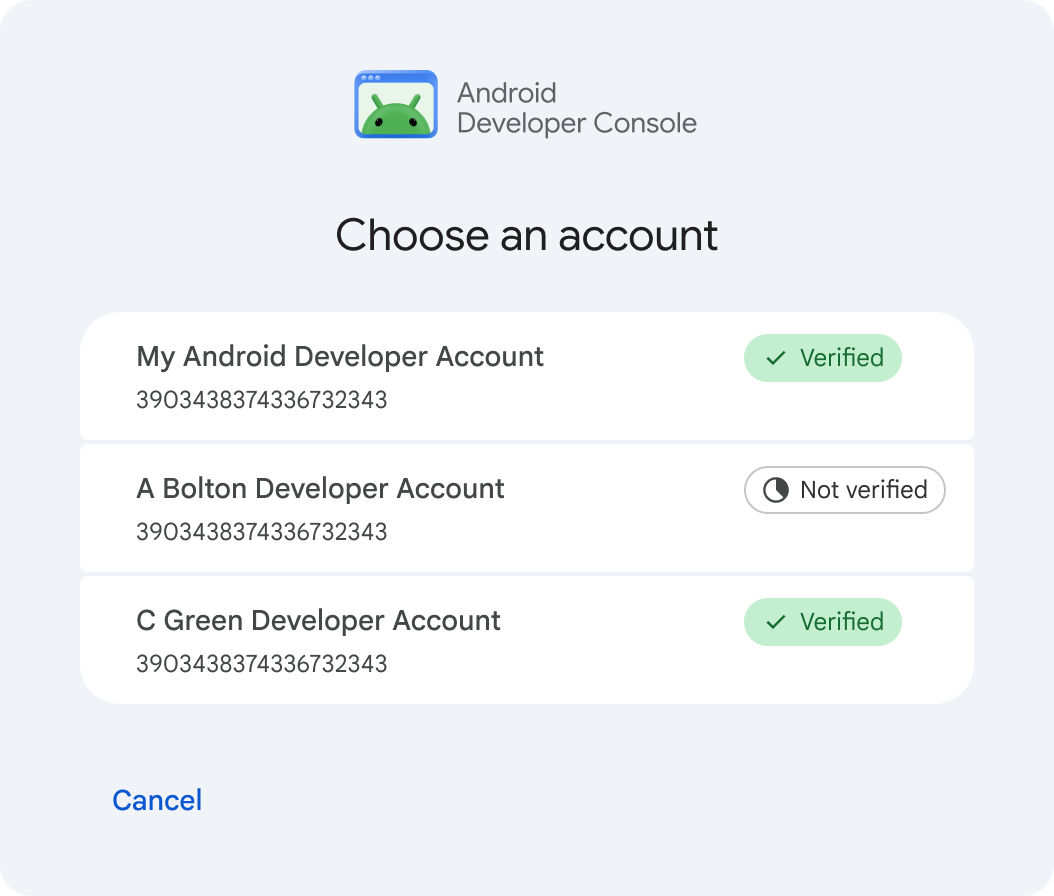
Identify the developer accounts
- Integrate with the
ListDeveloperAccountsAPI method to retrieve and list all developer accounts for which access has been authorized. - Provide an account picker to allow the developer to choose their preferred developer account.
- Prominently feature the account
displayName, using the account number from thenamefield as secondary information. - Display account verification states (
verificationState):VERIFIED: Confirm verified developer identity with a positive visual cue (e.g., a green checkmark).NOT_VERIFIED: Indicate that verification is incomplete and restrict package registration for the account. Optionally, provide a primary CTA button directing developers to the Android Developer Console upon selecting the account.
If an empty response is received because no developer accounts are associated with the Google Account, guide developers to the Android Developer Console using a primary CTA button.
Manage package names
- Integrate with the
ListAndroidPackagesAPI endpoint to retrieve all package names associated with the developer account. Provide developers with a centralized interface, such as a list or table, to monitor their package states effectively. - Display the
packageNamealongside its current registration status (DRAFT,IN_REVIEW,REGISTERED, orPENDING_TRANSFER), applying distinct visual indicators for each status. If a "friendly name" was provided and saved during creation, you may optionally include it in the display.
Manage keys
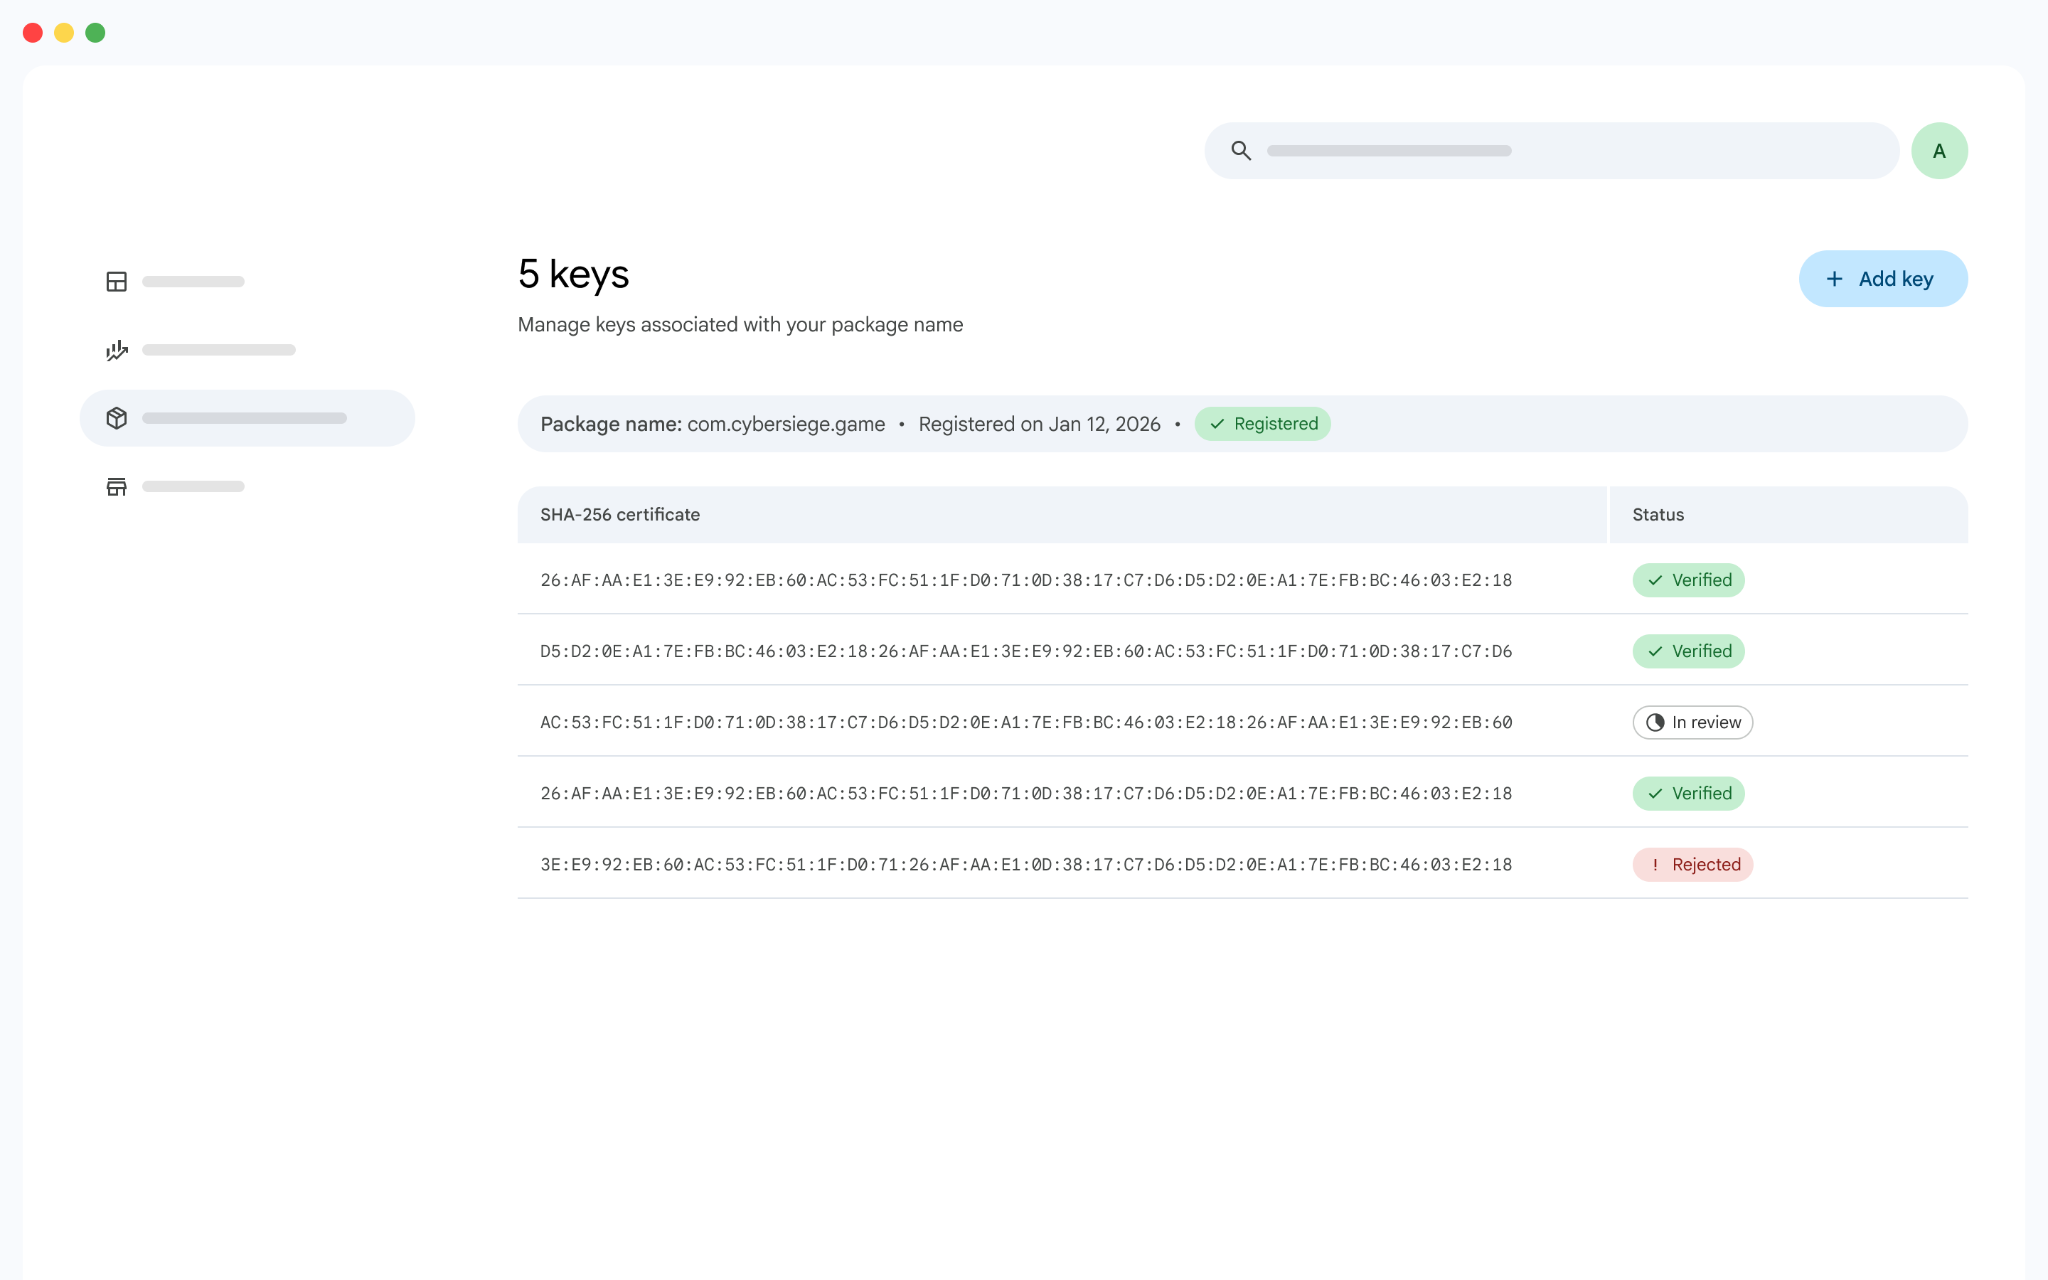
- Call the
ListAndroidPackageKeysAPI endpoint to fetch all keys tied to a package name, offering developers a structured overview (such as a table or list) to monitor their registration status. - Present the
certificateFingerprintSha256for every key alongside its registration state (DRAFT,OWNERSHIP_VERIFIED,IN_REVIEW,REGISTERED_ACTIVE, orPENDING_TRANSFER), employing distinct visual indicators to differentiate between states.
- Enable developers to register additional keys under an existing package name
by integrating with the
CreateAndroidPackageKeyAPI method.
Register a package name
- Use a form-based layout where developers input their package name into a text field, provided this information has not already been gathered by your application (e.g., through an earlier prompt).
- Call the
CreateAndroidPackageAPI method to enroll a package name under the developer account, and call theGetAndroidPackageRegistrationPolicyAPI method to determine the applicable key eligibility rules. - Based on the designated
keySelectionStrategyfor the package name, prompt the developer to perform one of the following:- If
keySelectionStrategyis set toSELECT_KEY_FROM_LIST: Have the developer pick a key for registration from the providedknownKeyslist (containing SHA-256 certificate fingerprints), such as using radio buttons. This flow requires key ownership verification (refer to Verify ownership of a key below). - If
keySelectionStrategyis set toUSE_ANY_KEY: Prompt the developer to supply a key directly. Key ownership verification is not needed in this case.
- If
- Call the
CreateAndroidPackageKeyAPI method to associate the chosen key with the new package name.
Alternatively, your application can automatically detect and extract the package name or key directly from an uploaded app.
Verify ownership of a key
When keySelectionStrategy is set to SELECT_KEY_FROM_LIST, developers must
prove ownership of their private signing key. Proof of ownership requires
submitting a signed APK that incorporates the API-generated verificationToken.
To support key ownership verification, integrate the
VerifyAndroidPackageKeyOwnership API method and build out the following user
interface components:
- Token display component: Display the
verificationTokenprominently inside a code snippet block, including a handy "Copy to Clipboard" button. - Developer setup instructions: Provide detailed instructions directing the
developer to place an
adi-registration.propertiesfile containing theverificationTokeninto the app's assets folder. - APK submission dropzone: Offer a dedicated file upload dropzone to receive the signed APK.
Justify the registration of a key
When a known key has its justificationRequired field set to REQUIRED,
registering that key alongside the package name requires developers to submit a
thorough business rationale.
Submit this justification by calling the
JustifyAndroidPackageKeyRegistration API method. Ensure your application's
user interface features a dedicated text input area to collect the justification
from the developer, and notify them that providing a rationale is required
before submitting the key registration request. Google reviews the submitted
justification, a process that can take up to 24 hours to approve before the
package name registration is complete.
Automate key verification for managed keys
If your application manages a developer's signing key, the developer cannot
manually sign an APK for ownership verification. You must instead execute the
VerifyAndroidPackageKeyOwnership API call automatically on their behalf.
By handling the token inclusion and APK upload process automatically, your application removes these manual steps. Be sure to notify developers that key ownership verification is managed seamlessly by your application using the key stored in your system.
Follow brand guidelines
To maintain user trust and ensure transparency, all applications integrating with the Android Developer Console API are required to adhere to the following brand guidelines.
Terminology and capitalization
When referencing the product in user-facing materials or documentation, always use the full name Android Developer Console. Do not use the abbreviation "ADC".
The program must be referred to as Android developer verification. Follow this exact capitalization and spelling in all contexts.
To prevent ambiguity with APKs or AABs, use the term "package name" specifically rather than just "package".
When describing the process of adding a package name, use the phrase "register a package name" instead of "claim a package name".
Use "Sign-in" call to action
OAuth 2.0 authentication with Android Developer Console relies on Google Identity Services. To remain compliant with the Google Identity Services branding guidelines, you must use the "Continue with Google" or "Sign in with Google" call-to-action on the authorization button. This text is mandatory and cannot be modified, as it ensures users understand they are using their Google credentials to authorize your application to access their Google Account.
Maintain brand identity and integrity
When integrating the Android Developer Console logo into your application interface, you must follow these specifications to preserve visual identity and brand integrity:
- Logo placement and hierarchy: Use only the official, approved Android Developer Console logo. The logo must always remain secondary to your own application's primary branding elements to avoid misrepresenting the application as an official Google product.
- Visual style and distortions: The asset must always be rendered with its aspect ratio fully constrained. You must never distort, stretch, skew, crop, flip, or modify the components of the logo. Do not alter the official color palette, swap foreground or background colors, or apply drop shadows, glow effects, or decorative gradients.
- Usage restrictions: Do not incorporate any Google-owned branding elements into your own application assets. The Android Developer Console logo asset may only be used inside the application layout context to explicitly signify an active integration.
Additional resources
- Check app registration status with the Android Developer ID Status API
- Register on Android Developer Console
- Register on Google Play Console
- Sign your app