
יש כמה דרכים לצלם את ממשק המשתמש של Wear OS:
- Android Studio: אפשר להשתמש ב-Logcat כדי לצלם מסך.
- אפליקציה נלווית: במכשירי Google Pixel Watch, משתמשים באפשרות צילום מסך במכשיר לביש כדי לצלם מסך.
- הקלטת מסך ב-Wear OS: הקלטת סרטון של המסך.
יצירת צילומי מסך והקלטות מסך ב-Android Studio
אפשר לצלם צילומי מסך ולהקליט סרטונים של ממשק המשתמש של אפליקציית המכשיר הלביש ישירות מ-Android Studio. התהליך זהה לזה של גורמי צורה אחרים, ואפשר לבצע אותו מכמה מקומות בסביבת הפיתוח המשולבת (IDE).
- פותחים את האפליקציה ב-Android Studio.
- מריצים את האפליקציה במכשיר או באמולטור.
- עוברים למסך שרוצים לצלם.
- מפעילים את צילום המסך מאחד מחלונות הכלים הבאים:
- החלון Logcat: בסרגל הכלים, לוחצים על הסמל צילום מסך כדי לצלם מסך, או על הסמל הקלטת מסך כדי להקליט סרטון. יכול להיות שהסמלים האלה נמצאים בתפריט האפשרויות הנוספות.
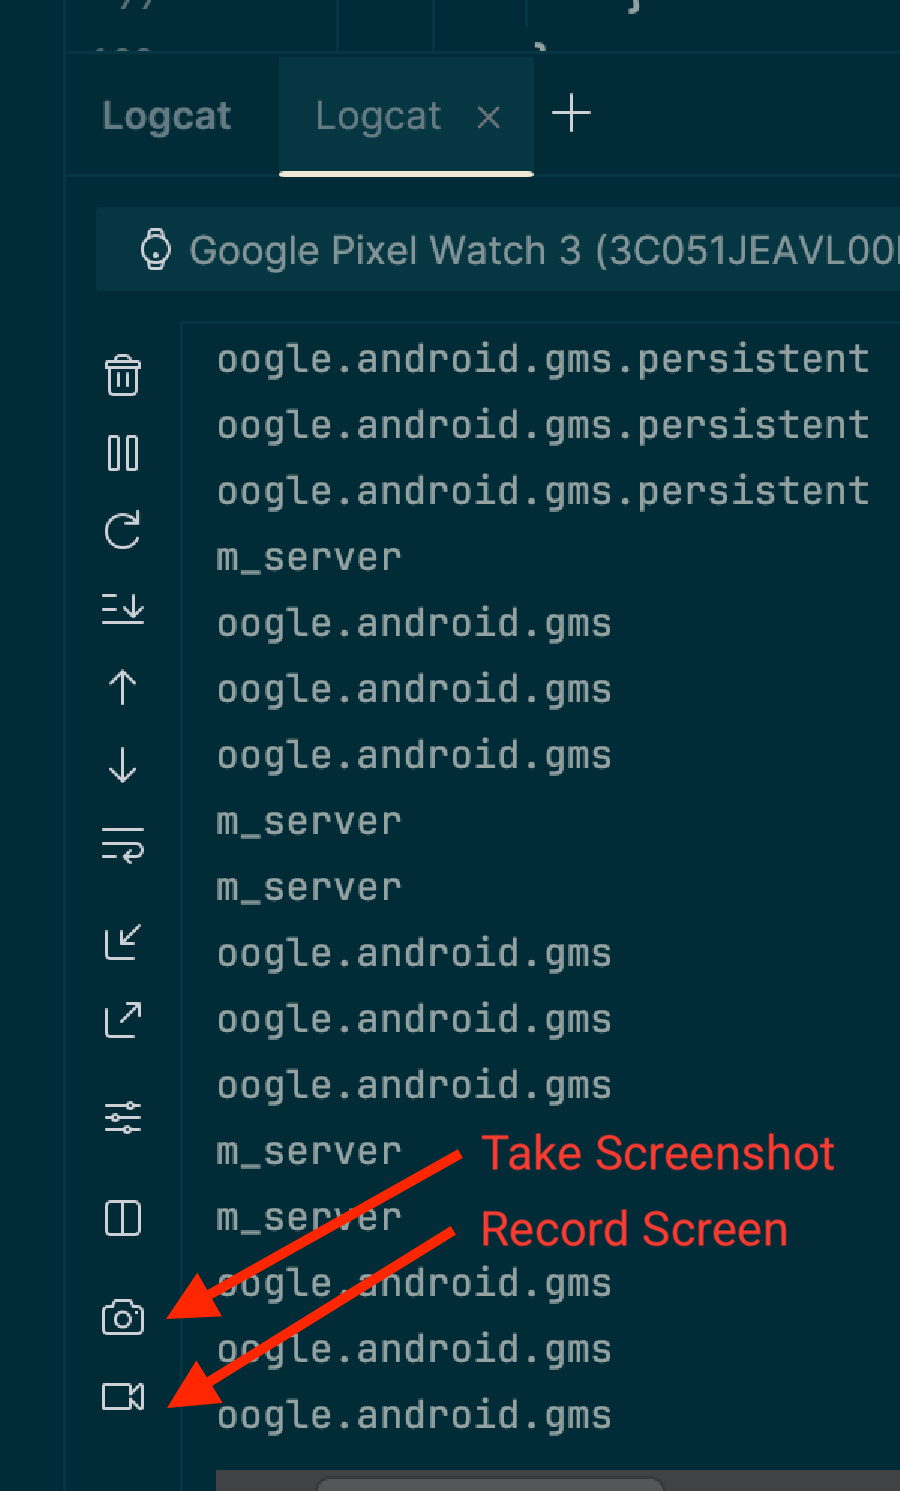
- החלון Running Devices: בסרגל הכלים של המכשיר יש גם סמלים של Take Screenshot (צילום מסך) ו-Record Screen (צילום המסך בווידאו). הערה:
אמצעי הבקרה האלה זמינים רק אם משתמשים בשיקוף מכשיר
כדי להזרים את התצוגה של המכשיר לחלון הזה.

- החלון Logcat: בסרגל הכלים, לוחצים על הסמל צילום מסך כדי לצלם מסך, או על הסמל הקלטת מסך כדי להקליט סרטון. יכול להיות שהסמלים האלה נמצאים בתפריט האפשרויות הנוספות.
- מבצעים את הפעולות הבאות כדי לסיים את הצילום:
- לצילומי מסך: חלון עריכה מופיע אחרי הצילום. אפשר לבצע התאמות, כמו הוספת מסגרת למכשיר, לפני שלוחצים על שמירה.
- להקלטות מסך: אחרי שלוחצים על לחצן ההקלטה, בוחרים את אפשרויות הווידאו ולוחצים על התחלת ההקלטה. מבצעים פעולות באפליקציה, ואז לוחצים על הפסקת ההקלטה כשמסיימים. מופיעה תיבת דו-שיח שמאפשרת לשמור את הקובץ שנוצר.
יצירת צילומי מסך והקלטות מסך באמצעות adb
אפשר להשתמש בממשק הגישור של Android (adb) כדי לצלם תוכן מסך משורת הפקודה.
צילומי מסך
משתמשים בפקודה screencap כדי לצלם צילום מסך של התצוגה במכשיר Wear OS. היא פועלת בדיוק כמו בנייד.
# Use 'exec-out' instead of 'shell' to get raw data
$ adb exec-out screencap -p > screen.png
שיקול ספציפי ל-Wear OS הוא שהפקודה הזו מתעדת את מאגר המסגרות הגולמי והמרובע, שלא כולל מסכה עגולה. כדי ליצור צילומי מסך מלוטשים, אפשר להשתמש בכלי לעריכת תמונות כדי להוסיף מסכה עגולה. לדוגמה, באמצעות ImageMagick:
# Use ImageMagick to apply a circular mask
$ adb exec-out screencap -p | magick - \
    -alpha set -background none -fill white \
      \( +clone -channel A -evaluate set 0 +channel -draw "circle %[fx:(w-1)/2],%[fx:(h-1)/2] %[fx:(w-1)/2],0.5" \) \
    -compose dstin -composite \
    png:screen.png
הקלטות מסך
בניגוד לנייד, הפקודה הרגילה adb screenrecord לא נתמכת ב-Wear OS.
במקום זאת, אנחנו ממליצים על הכלי scrcpy בקוד פתוח. כדי להשתמש ב-ffmpeg באופן בסיסי ולהקליט קובץ וידאו מהמסך של המכשיר, מריצים את הפקודה הבאה:
# Record the screen to a file named video.mp4. Use Ctrl+C to stop.
scrcpy --no-audio --no-window --record video.mp4
כדי להפסיק את ההקלטה אוטומטית אחרי 30 שניות, משתמשים באפשרות --time-limit:
# Record the screen to a file named video.mp4, stopping after 30 seconds.
scrcpy --no-audio --no-window --record video.mp4 --time-limit=30
יצירת צילומי מסך באמצעות האפליקציה הנלווית
כדי לצלם צילומי מסך במכשיר Google Pixel Watch, אפשר להשתמש באפליקציה הנלווית Google Pixel Watch. כך עושים זאת:
- בממשק המשתמש, מוצאים את המסך שרוצים לצלם.
- בטלפון Android, מפעילים את האפשרויות למפתחים, אם עדיין לא עשיתם את זה, על ידי מעבר אל הגדרות > מידע על הטלפון והקשה על מספר Build שבע פעמים.
- פותחים את האפליקציה הנלווית של Wear בטלפון.
- מקישים על לחצן האפשרויות הנוספות (3 נקודות) בפינה השמאלית העליונה כדי לפתוח את התפריט.
- מקישים על צילום מסך במכשיר הלביש. מופיעה ההודעה הבאה: בקשה לצילום מסך נשלחה. אחר כך תקבלו את ההתראות הבאות: צילום המסך של השעון מוכן לשליחה ומקישים כדי לשלוח.
- מקישים על ההתראה כדי לקבל אפשרויות לשליחה או לשיתוף של צילום המסך באמצעות Bluetooth, Gmail או אפשרויות אחרות.