
Wear OS offre diversi modi per acquisire la UI di Wear OS:
- Android Studio: utilizza Logcat per acquisire screenshot.
- App complementare: sui dispositivi Google Pixel Watch, utilizza l'opzione Scatta screenshot del wearable per scattare screenshot.
- Registra schermo per Wear OS: registra un video dello schermo.
Acquisire screenshot e registrazioni dello schermo in Android Studio
Acquisisci screenshot e registra video dell'UI dell'app per wearable direttamente da Android Studio. La procedura è la stessa degli altri fattori di forma e può essere eseguita da diverse posizioni all'interno dell'IDE.
- Apri l'app in Android Studio.
- Esegui l'app su un dispositivo o un emulatore.
- Vai alla schermata che vuoi acquisire.
- Avvia l'acquisizione dello schermo da una delle seguenti finestre degli strumenti:
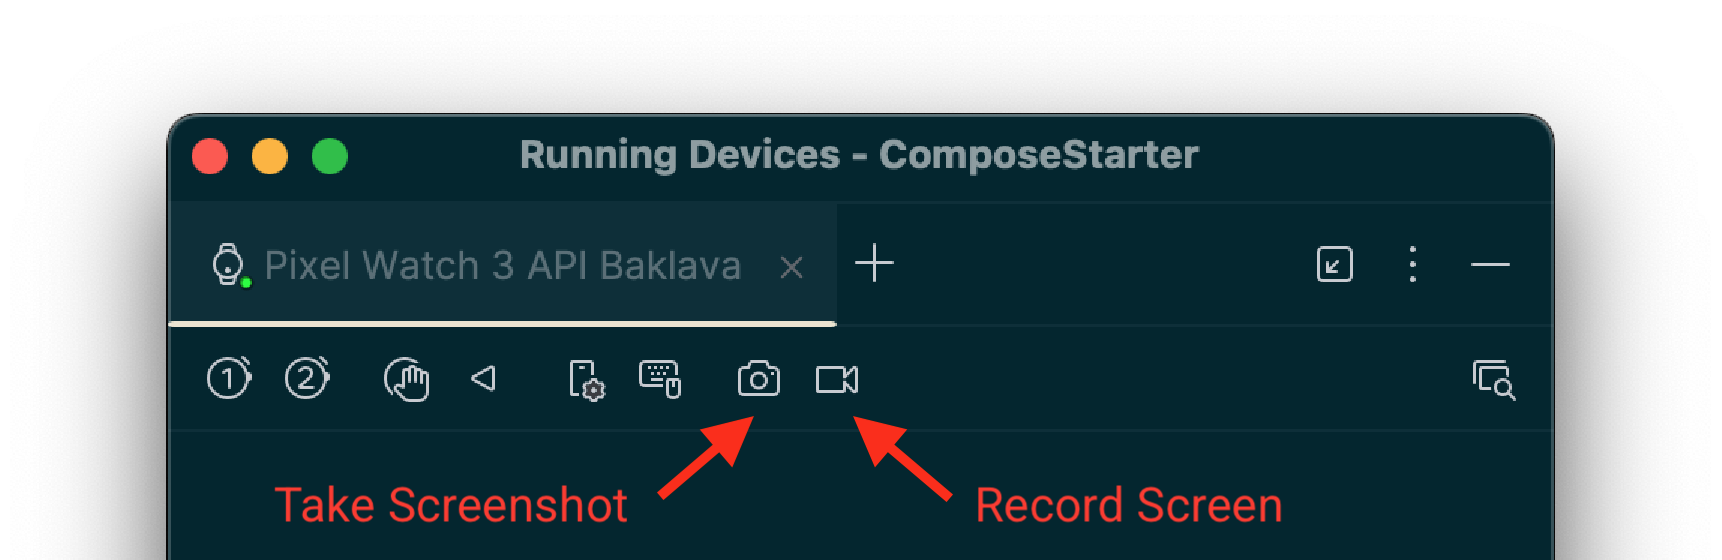
- La finestra Logcat: nella barra degli strumenti, fai clic sull'icona
Acquisisci screenshot per acquisire uno screenshot o sull'icona Registra schermo
per registrare un video. Queste icone potrebbero trovarsi nel menu
overflow.

- La finestra Dispositivi in esecuzione:la barra degli strumenti del dispositivo fornisce anche le icone Acquisisci screenshot e Registra schermo. Nota:Questi controlli sono disponibili solo se utilizzi la duplicazione dello schermo
per trasmettere in streaming il display del dispositivo in questa finestra.
- La finestra Logcat: nella barra degli strumenti, fai clic sull'icona
Acquisisci screenshot per acquisire uno screenshot o sull'icona Registra schermo
per registrare un video. Queste icone potrebbero trovarsi nel menu
overflow.
- Finalizza l'acquisizione:
- Per gli screenshot:dopo l'acquisizione viene visualizzata una finestra dell'editor. Puoi apportare modifiche, ad esempio aggiungere una cornice al dispositivo, prima di fare clic su Salva.
- Per le registrazioni dello schermo:dopo aver fatto clic sul pulsante di registrazione, seleziona le opzioni video e fai clic su Avvia registrazione. Interagisci con l'app e poi fai clic su Interrompi registrazione quando hai finito. Viene visualizzata una finestra di dialogo che ti consente di salvare il file risultante.
Acquisire screenshot e registrazioni dello schermo utilizzando adb
Puoi utilizzare Android Debug Bridge (adb) per acquisire i contenuti dello schermo dalla riga di comando.
Screenshot
Utilizza il comando screencap per acquisire uno screenshot del display del tuo dispositivo Wear OS. Funziona esattamente come sui dispositivi mobili.
# Use 'exec-out' instead of 'shell' to get raw data
$ adb exec-out screencap -p > screen.png
Una considerazione specifica per Wear OS è che questo comando acquisisce il buffer del frame quadrato non elaborato, che non include una maschera circolare. Per screenshot rifiniti, puoi applicare una maschera circolare utilizzando uno strumento di modifica delle immagini. Ad esempio, utilizzando ImageMagick:
# Use ImageMagick to apply a circular mask
$ adb exec-out screencap -p | magick - \
    -alpha set -background none -fill white \
      \( +clone -channel A -evaluate set 0 +channel -draw "circle %[fx:(w-1)/2],%[fx:(h-1)/2] %[fx:(w-1)/2],0.5" \) \
    -compose dstin -composite \
    png:screen.png
Registrazioni dello schermo
A differenza dei dispositivi mobili, il comando standard adb screenrecord non è supportato
su Wear OS.
Ti consigliamo invece lo strumento open source scrcpy. Per l'utilizzo di base per registrare un file video dallo schermo del dispositivo, esegui questo comando:
# Record the screen to a file named video.mp4. Use Ctrl+C to stop.
scrcpy --no-audio --no-window --record video.mp4
Per interrompere automaticamente la registrazione dopo 30 secondi, utilizza l'opzione --time-limit:
# Record the screen to a file named video.mp4, stopping after 30 seconds.
scrcpy --no-audio --no-window --record video.mp4 --time-limit=30
Acquisire screenshot con l'app complementare
Per acquisire screenshot di un dispositivo Google Pixel Watch, puoi utilizzare l'app complementare Google Pixel Watch. Segui questi passaggi:
- Nell'interfaccia utente, trova la schermata che vuoi acquisire.
- Sullo smartphone Android, attiva le Opzioni sviluppatore, se non l'hai già fatto, andando su Impostazioni > Informazioni sullo smartphone e toccando Numero build sette volte.
- Apri l'app complementare Wear sul tuo smartphone.
- Tocca il pulsante con tre puntini nell'angolo in alto a destra per aprire il menu.
- Tocca Acquisisci screenshot indossabile. Viene visualizzato il seguente messaggio: Richiesta di screenshot inviata. A questo punto ricevi le seguenti notifiche: Screenshot dell'orologio pronto per l'invio e Tocca per inviare.
- Tocca la notifica per ricevere le opzioni di invio o condivisione dello screenshot tramite Bluetooth, Gmail o altre opzioni.