

คอมโพเนนต์การนำทางมีคลาส NavigationUI คลาสนี้มีเมธอดแบบคงที่ซึ่งจัดการการไปยังส่วนต่างๆ ด้วยแถบแอปด้านบน ลิ้นชักการนำทาง และแถบการไปยังส่วนต่างๆ ด้านล่าง
แถบแอปด้านบน
แถบแอปด้านบนเป็นตำแหน่งที่สอดคล้องกันที่ด้านบนของแอปสำหรับแสดงข้อมูลและการดำเนินการจากหน้าจอปัจจุบัน
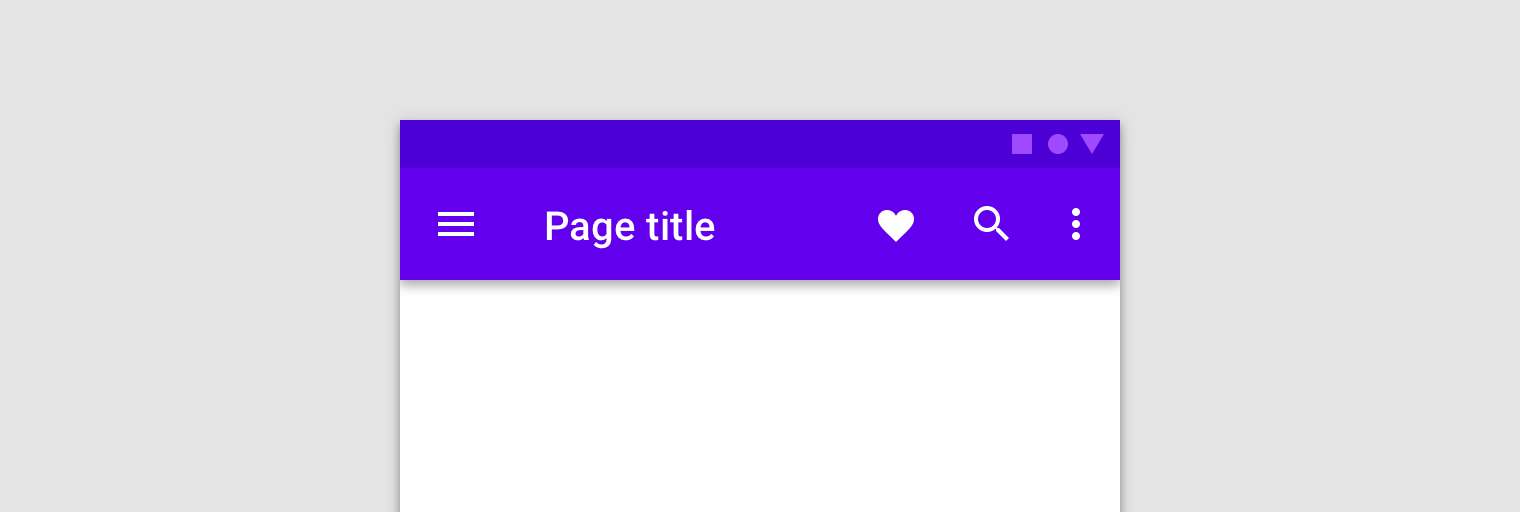
NavigationUI มีเมธอดที่อัปเดตเนื้อหาในแถบแอปด้านบนโดยอัตโนมัติเมื่อผู้ใช้ไปยังส่วนต่างๆ ของแอป เช่น NavigationUI ใช้ป้ายกำกับปลายทางจากกราฟการนำทางเพื่อให้ชื่อของแถบแอปด้านบนเป็นปัจจุบันอยู่เสมอ
<navigation>
    <fragment ...
              android:label="Page title">
      ...
    </fragment>
</navigation>
เมื่อใช้ NavigationUI กับการติดตั้งใช้งานแถบแอปด้านบนที่กล่าวถึงด้านล่าง ป้ายกำกับที่คุณแนบกับปลายทางจะป้อนข้อมูลโดยอัตโนมัติจากอาร์กิวเมนต์ที่ระบุไว้สำหรับปลายทางโดยใช้รูปแบบ {argName} ในป้ายกำกับ
NavigationUI รองรับแถบแอปด้านบนประเภทต่อไปนี้
ดูข้อมูลเพิ่มเติมเกี่ยวกับแถบแอปได้ที่หัวข้อตั้งค่าแถบแอป
AppBarConfiguration
NavigationUI ใช้ออบเจ็กต์ AppBarConfiguration เพื่อจัดการลักษณะการทำงานของปุ่มการนำทางที่มุมซ้ายบนของพื้นที่แสดงผลของแอป
ลักษณะการทำงานของปุ่มการนำทางจะเปลี่ยนไปตามว่าผู้ใช้อยู่ที่ปลายทางระดับบนสุดหรือไม่
ปลายทางระดับบนสุดคือปลายทางระดับรากหรือระดับสูงสุดในชุดปลายทางที่เกี่ยวข้องตามลำดับชั้น ปลายทางระดับบนสุดจะไม่แสดงปุ่มขึ้นในแถบแอปด้านบนเนื่องจากไม่มีปลายทางระดับที่สูงกว่า โดยค่าเริ่มต้น ปลายทางเริ่มต้นของแอปจะเป็นปลายทางระดับบนสุดเพียงแห่งเดียว
เมื่อผู้ใช้อยู่ที่ปลายทางระดับบนสุด ปุ่มการนำทางจะกลายเป็นไอคอนลิ้นชัก  หากปลายทางใช้
DrawerLayout หากปลายทางไม่ได้ใช้ DrawerLayout ปุ่มการนำทางจะซ่อนอยู่ เมื่อผู้ใช้อยู่ในปลายทางอื่นๆ ปุ่มการนำทางจะปรากฏเป็นปุ่มขึ้น  หากต้องการกำหนดค่าปุ่มการนำทางโดยใช้เฉพาะจุดหมายเริ่มต้นเป็นจุดหมายระดับบนสุด ให้สร้างออบเจ็กต์
AppBarConfiguration และส่งกราฟการนำทางที่เกี่ยวข้อง ดังที่แสดงด้านล่าง
Kotlin
val appBarConfiguration = AppBarConfiguration(navController.graph)
Java
AppBarConfiguration appBarConfiguration =
        new AppBarConfiguration.Builder(navController.getGraph()).build();
ในบางกรณี คุณอาจต้องกำหนดปลายทางระดับบนสุดหลายรายการแทนการใช้ปลายทางเริ่มต้นที่เป็นค่าเริ่มต้น การใช้ BottomNavigationView เป็นกรณีการใช้งานที่พบบ่อยสำหรับกรณีนี้ ซึ่งคุณอาจมีหน้าจอที่อยู่ระดับเดียวกันซึ่งไม่มีความสัมพันธ์กันตามลำดับชั้น และแต่ละหน้าจออาจมีชุดปลายทางที่เกี่ยวข้องของตนเอง ในกรณีเช่นนี้ คุณสามารถส่งชุดรหัสปลายทางไปยังคอนสตรัคเตอร์แทนได้ ดังที่แสดงด้านล่าง
Kotlin
val appBarConfiguration = AppBarConfiguration(setOf(R.id.main, R.id.profile))
Java
AppBarConfiguration appBarConfiguration =
        new AppBarConfiguration.Builder(R.id.main, R.id.profile).build();
สร้างแถบเครื่องมือ
หากต้องการสร้างแถบเครื่องมือด้วย NavigationUI ก่อนอื่นให้กำหนดแถบในกิจกรรมหลัก ดังที่แสดงต่อไปนี้
<LinearLayout>
    <androidx.appcompat.widget.Toolbar
        android:id="@+id/toolbar" />
    <androidx.fragment.app.FragmentContainerView
        android:id="@+id/nav_host_fragment"
        ... />
    ...
</LinearLayout>
จากนั้นเรียก setupWithNavController() จากเมธอด onCreate() ของกิจกรรมหลัก ดังตัวอย่างต่อไปนี้
Kotlin
override fun onCreate(savedInstanceState: Bundle?) {
    setContentView(R.layout.activity_main)

    ...

    val navController = findNavController(R.id.nav_host_fragment)
    val appBarConfiguration = AppBarConfiguration(navController.graph)
    findViewById<Toolbar>(R.id.toolbar)
        .setupWithNavController(navController, appBarConfiguration)
}
Java
@Override
protected void onCreate(Bundle savedInstanceState) {
    setContentView(R.layout.activity_main);

    ...

    NavController navController = Navigation.findNavController(this, R.id.nav_host_fragment);
    AppBarConfiguration appBarConfiguration =
            new AppBarConfiguration.Builder(navController.getGraph()).build();
    Toolbar toolbar = findViewById(R.id.toolbar);
    NavigationUI.setupWithNavController(
            toolbar, navController, appBarConfiguration);
}
หากต้องการกำหนดค่าปุ่มการนำทางให้ปรากฏเป็นปุ่มขึ้นสำหรับปลายทางทั้งหมด ให้ส่งชุดรหัสปลายทางที่ว่างเปล่าสำหรับปลายทางระดับบนสุดเมื่อสร้าง AppBarConfiguration ซึ่งจะมีประโยชน์ในกรณีที่คุณมีกิจกรรมที่ 2 ที่ควรแสดงปุ่มขึ้นใน Toolbar ในปลายทางทั้งหมด ซึ่งช่วยให้ผู้ใช้ไปยังส่วนต่างๆ กลับไปยังกิจกรรมหลักได้เมื่อไม่มีปลายทางอื่นๆ ใน Back Stack คุณสามารถใช้ setFallbackOnNavigateUpListener() เพื่อควบคุมลักษณะการทำงานสำรองเมื่อ navigateUp() ไม่ทำงาน ดังที่แสดงในตัวอย่างต่อไปนี้
Kotlin
override fun onCreate(savedInstanceState: Bundle?) {
    ...

    val navHostFragment =
        supportFragmentManager.findFragmentById(R.id.nav_host_fragment) as NavHostFragment
    val navController = navHostFragment.navController
    val appBarConfiguration = AppBarConfiguration(
        topLevelDestinationIds = setOf(),
        fallbackOnNavigateUpListener = ::onSupportNavigateUp
    )
    findViewById<Toolbar>(R.id.toolbar)
        .setupWithNavController(navController, appBarConfiguration)
}
Java
@Override
protected void onCreate(Bundle savedInstanceState) {
    ...

    NavHostFragment navHostFragment = (NavHostFragment) supportFragmentManager.findFragmentById(R.id.nav_host_fragment);
    NavController navController = navHostFragment.getNavController();
    AppBarConfiguration appBarConfiguration = new AppBarConfiguration.Builder()
        .setFallbackOnNavigateUpListener(::onSupportNavigateUp)
        .build();
    Toolbar toolbar = findViewById(R.id.toolbar);
    NavigationUI.setupWithNavController(
            toolbar, navController, appBarConfiguration);
}
รวม CollapsingToolbarLayout
หากต้องการรวม CollapsingToolbarLayout ไว้กับแถบเครื่องมือ ให้กำหนดแถบเครื่องมือและเลย์เอาต์โดยรอบในกิจกรรมก่อน ดังที่แสดงด้านล่าง
<LinearLayout>
    <com.google.android.material.appbar.AppBarLayout
        android:layout_width="match_parent"
        android:layout_height="@dimen/tall_toolbar_height">

        <com.google.android.material.appbar.CollapsingToolbarLayout
            android:id="@+id/collapsing_toolbar_layout"
            android:layout_width="match_parent"
            android:layout_height="match_parent"
            app:contentScrim="?attr/colorPrimary"
            app:expandedTitleGravity="top"
            app:layout_scrollFlags="scroll|exitUntilCollapsed|snap">

            <androidx.appcompat.widget.Toolbar
                android:id="@+id/toolbar"
                android:layout_width="match_parent"
                android:layout_height="?attr/actionBarSize"
                app:layout_collapseMode="pin"/>
        </com.google.android.material.appbar.CollapsingToolbarLayout>
    </com.google.android.material.appbar.AppBarLayout>

    <androidx.fragment.app.FragmentContainerView
        android:id="@+id/nav_host_fragment"
        ... />
    ...
</LinearLayout>
จากนั้นเรียกใช้ setupWithNavController() จากเมธอด onCreate ของกิจกรรมหลัก ดังที่แสดงด้านล่าง
Kotlin
override fun onCreate(savedInstanceState: Bundle?) {
    setContentView(R.layout.activity_main)

    ...

    val layout = findViewById<CollapsingToolbarLayout>(R.id.collapsing_toolbar_layout)
    val toolbar = findViewById<Toolbar>(R.id.toolbar)
    val navHostFragment =
        supportFragmentManager.findFragmentById(R.id.nav_host_fragment) as NavHostFragment
    val navController = navHostFragment.navController
    val appBarConfiguration = AppBarConfiguration(navController.graph)
    layout.setupWithNavController(toolbar, navController, appBarConfiguration)
}
Java
@Override
protected void onCreate(Bundle savedInstanceState) {
    setContentView(R.layout.activity_main);

    ...

    CollapsingToolbarLayout layout = findViewById(R.id.collapsing_toolbar_layout);
    Toolbar toolbar = findViewById(R.id.toolbar);
    NavHostFragment navHostFragment = supportFragmentManager.findFragmentById(R.id.nav_host_fragment);
    NavController navController = navHostFragment.getNavController();
    AppBarConfiguration appBarConfiguration =
            new AppBarConfiguration.Builder(navController.getGraph()).build();
    NavigationUI.setupWithNavController(layout, toolbar, navController, appBarConfiguration);
}
แถบการดำเนินการ
หากต้องการเพิ่มการรองรับการนำทางไปยังแถบแอปเริ่มต้น ให้เรียกใช้ setupActionBarWithNavController() จากเมธอด onCreate() ของกิจกรรมหลัก ดังที่แสดงด้านล่าง โปรดทราบว่าคุณต้องประกาศ AppBarConfiguration
นอก onCreate() เนื่องจากคุณใช้เมื่อลบล้าง
onSupportNavigateUp() ด้วย
Kotlin
private lateinit var appBarConfiguration: AppBarConfiguration

...

override fun onCreate(savedInstanceState: Bundle?) {
    ...

    val navHostFragment =
        supportFragmentManager.findFragmentById(R.id.nav_host_fragment) as NavHostFragment
    val navController = navHostFragment.navController
    appBarConfiguration = AppBarConfiguration(navController.graph)
    setupActionBarWithNavController(navController, appBarConfiguration)
}
Java
AppBarConfiguration appBarConfiguration;

...

@Override
protected void onCreate(Bundle savedInstanceState) {
    ...

    NavHostFragment navHostFragment = supportFragmentManager.findFragmentById(R.id.nav_host_fragment);
    NavController navController = navHostFragment.getNavController();
    appBarConfiguration = new AppBarConfiguration.Builder(navController.getGraph()).build();
    NavigationUI.setupActionBarWithNavController(this, navController, appBarConfiguration);
}
ถัดไป ให้ลบล้าง onSupportNavigateUp() เพื่อจัดการการไปยังส่วนต่างๆ ขึ้น
Kotlin
override fun onSupportNavigateUp(): Boolean {
    val navController = findNavController(R.id.nav_host_fragment)
    return navController.navigateUp(appBarConfiguration)
            || super.onSupportNavigateUp()
}
Java
@Override
public boolean onSupportNavigateUp() {
    NavController navController = Navigation.findNavController(this, R.id.nav_host_fragment);
    return NavigationUI.navigateUp(navController, appBarConfiguration)
            || super.onSupportNavigateUp();
}
รองรับแถบแอปรูปแบบต่างๆ
การเพิ่มแถบแอปด้านบนลงในกิจกรรมจะทำงานได้ดีเมื่อเลย์เอาต์ของแถบแอปคล้ายกันสำหรับแต่ละปลายทางในแอป อย่างไรก็ตาม หากแถบแอปด้านบนมีการเปลี่ยนแปลงอย่างมากในปลายทางต่างๆ ให้พิจารณานำแถบแอปด้านบนออกจากกิจกรรมและกำหนดไว้ในแต่ละส่วนย่อยของปลายทางแทน
ตัวอย่างเช่น ปลายทางหนึ่งอาจใช้ Toolbar มาตรฐาน ในขณะที่อีกปลายทางหนึ่งใช้ AppBarLayout เพื่อสร้างแถบแอปที่ซับซ้อนมากขึ้นพร้อมแท็บ ดังที่แสดงในรูปที่ 2
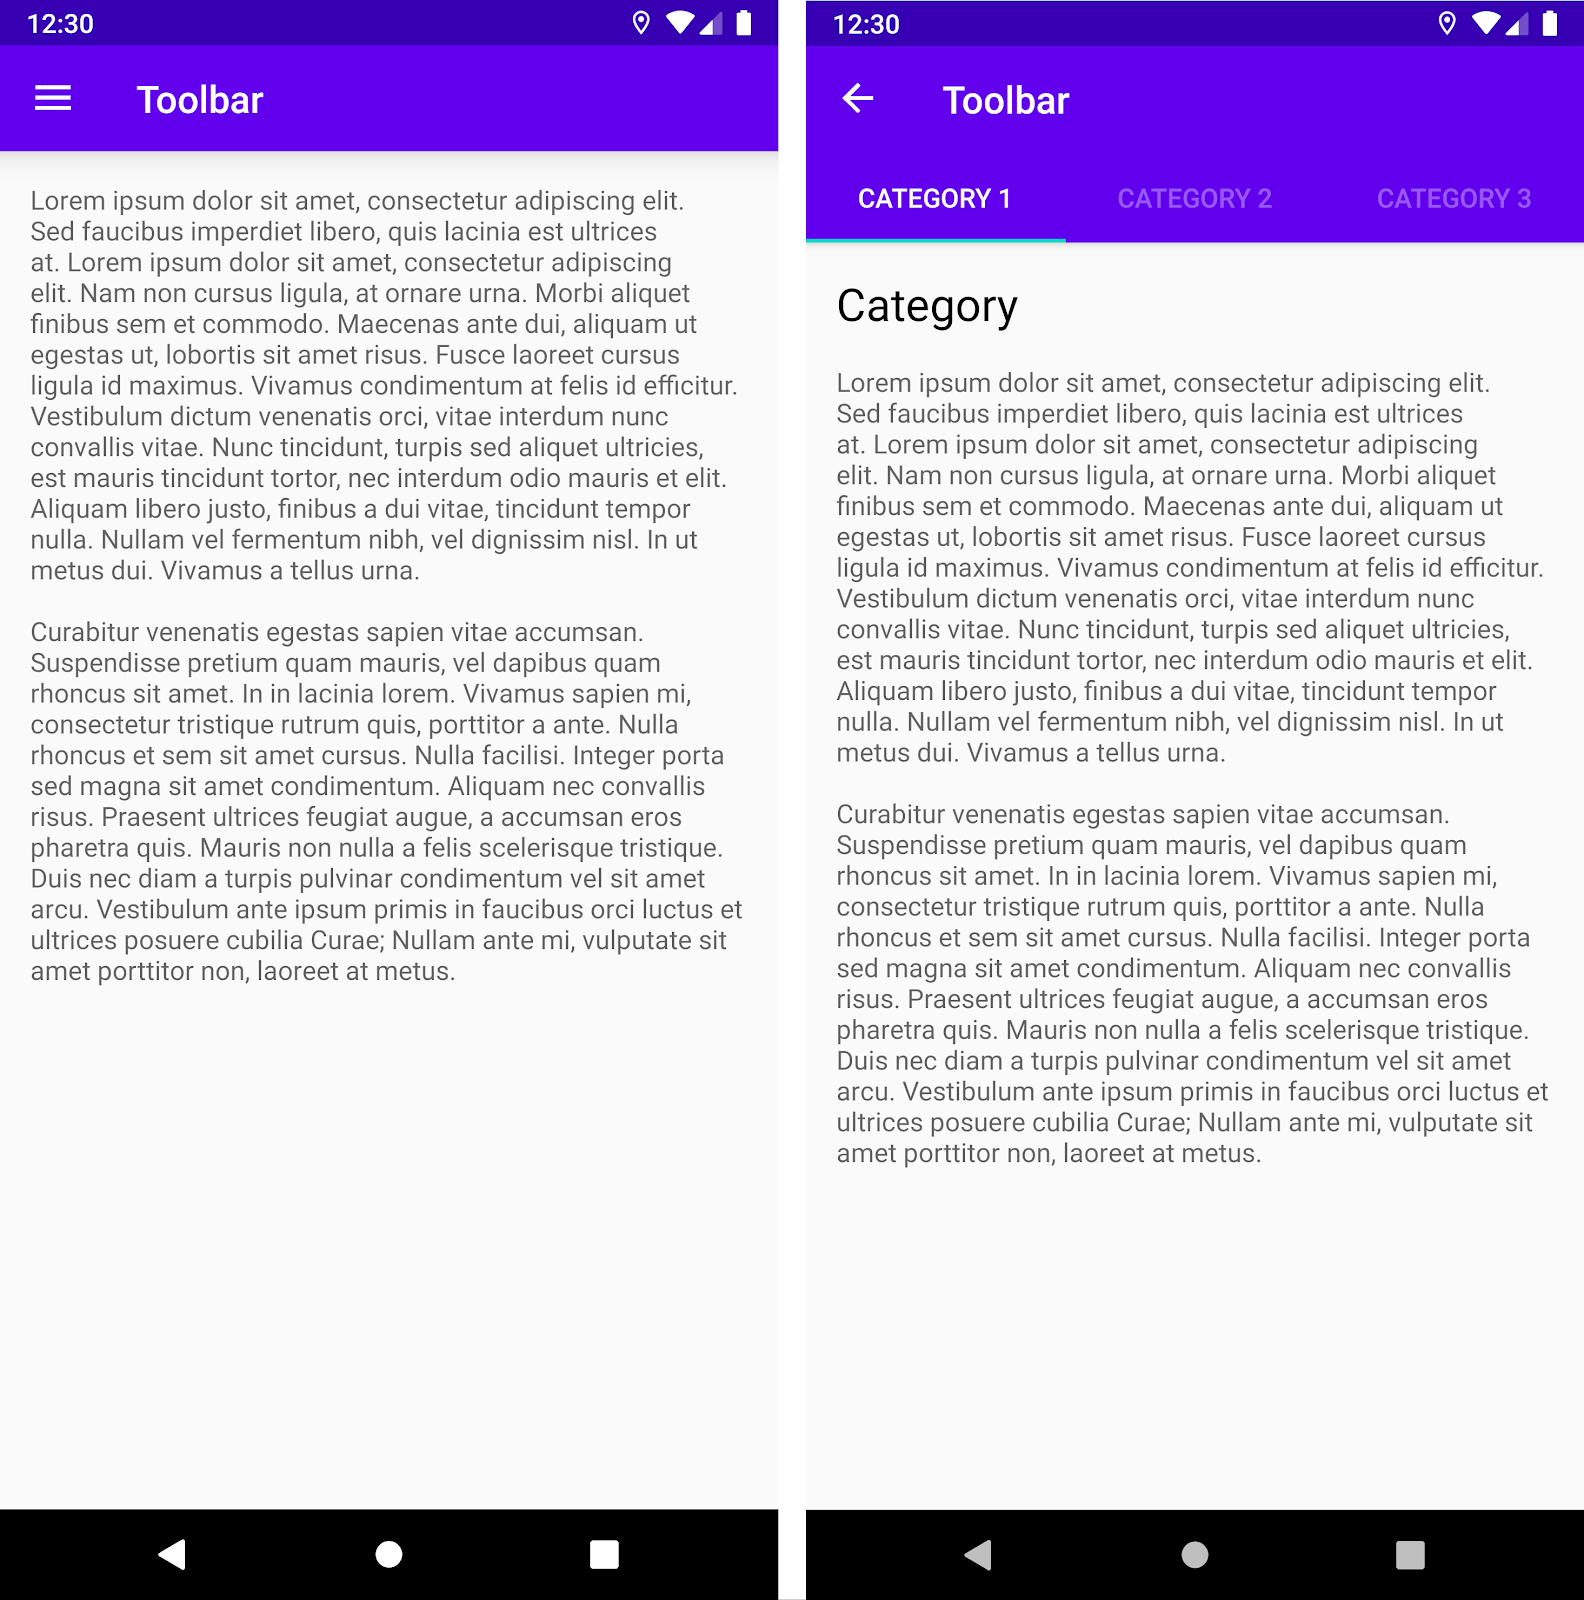
Toolbarแบบมาตรฐาน ทางด้านขวาเป็น AppBarLayout ที่มี Toolbar และแท็บต่างๆหากต้องการใช้ตัวอย่างนี้ภายใน Fragment ปลายทางโดยใช้ NavigationUI ก่อนอื่นให้กำหนดแถบแอปในเลย์เอาต์ Fragment แต่ละรายการ โดยเริ่มจาก Fragment ปลายทางที่ใช้แถบเครื่องมือมาตรฐาน
<LinearLayout>
    <androidx.appcompat.widget.Toolbar
        android:id="@+id/toolbar"
        ... />
    ...
</LinearLayout>
ถัดไป ให้กำหนด Fragment ปลายทางที่ใช้แถบแอปที่มีแท็บ ดังนี้
<LinearLayout>
    <com.google.android.material.appbar.AppBarLayout
        ... />

        <androidx.appcompat.widget.Toolbar
            android:id="@+id/toolbar"
            ... />

        <com.google.android.material.tabs.TabLayout
            ... />

    </com.google.android.material.appbar.AppBarLayout>
    ...
</LinearLayout>
ตรรกะการกำหนดค่าการนำทางจะเหมือนกันสำหรับทั้ง 2 Fragment นี้ ยกเว้นว่าคุณควรเรียกใช้ setupWithNavController() จากภายในเมธอด onViewCreated() ของแต่ละ Fragment แทนการเริ่มต้นจากกิจกรรม
Kotlin
override fun onViewCreated(view: View, savedInstanceState: Bundle?) {
    val navController = findNavController()
    val appBarConfiguration = AppBarConfiguration(navController.graph)

    view.findViewById<Toolbar>(R.id.toolbar)
            .setupWithNavController(navController, appBarConfiguration)
}
Java
@Override
public void onViewCreated(@NonNull View view,
                          @Nullable Bundle savedInstanceState) {
    NavController navController = Navigation.findNavController(view);
    AppBarConfiguration appBarConfiguration =
            new AppBarConfiguration.Builder(navController.getGraph()).build();
    Toolbar toolbar = view.findViewById(R.id.toolbar);

    NavigationUI.setupWithNavController(
            toolbar, navController, appBarConfiguration);
}
เชื่อมโยงปลายทางกับรายการในเมนู
NavigationUI ยังมีตัวช่วยในการเชื่อมโยงปลายทางกับคอมโพเนนต์ UI ที่ขับเคลื่อนด้วยเมนูด้วย NavigationUI มีเมธอดตัวช่วย onNavDestinationSelected() ซึ่งใช้ MenuItem พร้อมกับ NavController ที่โฮสต์ปลายทางที่เชื่อมโยง หาก id ของ MenuItem ตรงกับ id ของปลายทาง NavController จะไปยังปลายทางนั้นได้
ตัวอย่างเช่น ข้อมูลโค้ด XML ด้านล่างกำหนดรายการเมนูและปลายทางที่มี id, details_page_fragment ร่วมกัน
<?xml version="1.0" encoding="utf-8"?>
<navigation xmlns:app="http://schemas.android.com/apk/res-auto"
    xmlns:tools="http://schemas.android.com/tools"
    xmlns:android="http://schemas.android.com/apk/res/android"
    ... >

    ...

    <fragment android:id="@+id/details_page_fragment"
         android:label="@string/details"
         android:name="com.example.android.myapp.DetailsFragment" />
</navigation>
<menu xmlns:android="http://schemas.android.com/apk/res/android">

    ...

    <item
        android:id="@+id/details_page_fragment"
        android:icon="@drawable/ic_details"
        android:title="@string/details" />
</menu>
เช่น หากเพิ่มเมนูโดยใช้ onCreateOptionsMenu() ของกิจกรรม คุณสามารถเชื่อมโยงรายการเมนูกับปลายทางได้โดยลบล้าง onOptionsItemSelected() ของกิจกรรมเพื่อเรียกใช้ onNavDestinationSelected() ดังที่แสดงในตัวอย่างต่อไปนี้
Kotlin
override fun onOptionsItemSelected(item: MenuItem): Boolean {
    val navController = findNavController(R.id.nav_host_fragment)
    return item.onNavDestinationSelected(navController) || super.onOptionsItemSelected(item)
}
Java
@Override
public boolean onOptionsItemSelected(MenuItem item) {
    NavController navController = Navigation.findNavController(this, R.id.nav_host_fragment);
    return NavigationUI.onNavDestinationSelected(item, navController)
            || super.onOptionsItemSelected(item);
}
ตอนนี้เมื่อผู้ใช้คลิกรายการเมนู details_page_fragment แอปจะไปยังปลายทางที่เกี่ยวข้องโดยอัตโนมัติด้วย id เดียวกัน
เพิ่มลิ้นชักการนำทาง
ลิ้นชักการนำทางคือแผง UI ที่แสดงเมนูการนำทางหลักของแอป
ลิ้นชักจะปรากฏขึ้นเมื่อผู้ใช้แตะไอคอนลิ้นชัก ในแถบแอปหรือเมื่อผู้ใช้ปัดนิ้วจากขอบด้านซ้ายของหน้าจอ
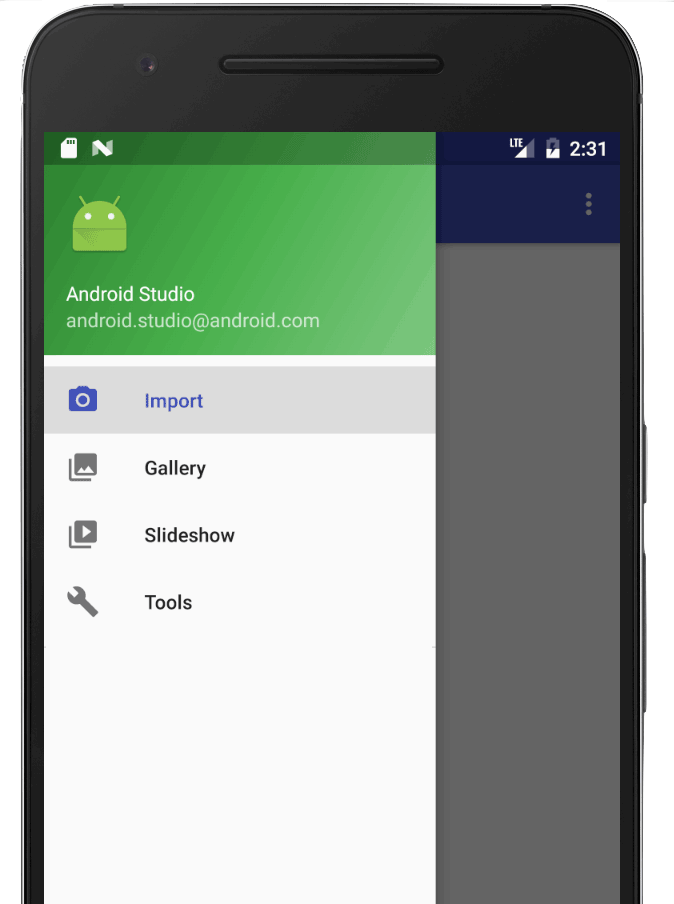
ไอคอนลิ้นชักจะแสดงในปลายทางระดับบนสุดทั้งหมดที่ใช้ DrawerLayout
หากต้องการเพิ่มลิ้นชักการนำทาง ให้ประกาศ DrawerLayout เป็นมุมมองรูทก่อน ภายใน DrawerLayout ให้เพิ่มเลย์เอาต์สำหรับเนื้อหา UI หลักและมุมมองอื่นที่มีเนื้อหาของลิ้นชักการนำทาง
ตัวอย่างเช่น เลย์เอาต์ต่อไปนี้ใช้ DrawerLayout ที่มีมุมมองย่อย 2 รายการ ได้แก่ NavHostFragment เพื่อเก็บเนื้อหาหลัก และ NavigationView สำหรับเนื้อหาของลิ้นชักการนำทาง
<?xml version="1.0" encoding="utf-8"?>
<!-- Use DrawerLayout as root container for activity -->
<androidx.drawerlayout.widget.DrawerLayout xmlns:android="http://schemas.android.com/apk/res/android"
    xmlns:app="http://schemas.android.com/apk/res-auto"
    android:id="@+id/drawer_layout"
    android:layout_width="match_parent"
    android:layout_height="match_parent"
    android:fitsSystemWindows="true">

    <!-- Layout to contain contents of main body of screen (drawer will slide over this) -->
    <androidx.fragment.app.FragmentContainerView
        android:name="androidx.navigation.fragment.NavHostFragment"
        android:id="@+id/nav_host_fragment"
        android:layout_width="match_parent"
        android:layout_height="match_parent"
        app:defaultNavHost="true"
        app:navGraph="@navigation/nav_graph" />

    <!-- Container for contents of drawer - use NavigationView to make configuration easier -->
    <com.google.android.material.navigation.NavigationView
        android:id="@+id/nav_view"
        android:layout_width="wrap_content"
        android:layout_height="match_parent"
        android:layout_gravity="start"
        android:fitsSystemWindows="true" />

</androidx.drawerlayout.widget.DrawerLayout>
ถัดไป ให้เชื่อมต่อ DrawerLayout กับกราฟการนำทางโดยส่งไปยัง AppBarConfiguration ดังที่แสดงในตัวอย่างต่อไปนี้
Kotlin
val appBarConfiguration = AppBarConfiguration(navController.graph, drawerLayout)
Java
AppBarConfiguration appBarConfiguration =
        new AppBarConfiguration.Builder(navController.getGraph())
            .setDrawerLayout(drawerLayout)
            .build();
ถัดไป ในคลาสกิจกรรมหลัก ให้เรียกใช้ setupWithNavController() จากเมธอด onCreate() ของกิจกรรมหลัก ดังที่แสดงด้านล่าง
Kotlin
override fun onCreate(savedInstanceState: Bundle?) {
    setContentView(R.layout.activity_main)

    ...

    val navHostFragment =
        supportFragmentManager.findFragmentById(R.id.nav_host_fragment) as NavHostFragment
    val navController = navHostFragment.navController
    findViewById<NavigationView>(R.id.nav_view)
        .setupWithNavController(navController)
}
Java
@Override
protected void onCreate(Bundle savedInstanceState) {
    setContentView(R.layout.activity_main);

    ...

    NavHostFragment navHostFragment = supportFragmentManager.findFragmentById(R.id.nav_host_fragment);
    NavController navController = navHostFragment.getNavController();
    NavigationView navView = findViewById(R.id.nav_view);
    NavigationUI.setupWithNavController(navView, navController);
}
ตั้งแต่ Navigation 2.4.0-alpha01 เป็นต้นไป ระบบจะบันทึกและกู้คืนสถานะของรายการเมนูแต่ละรายการเมื่อคุณใช้ setupWithNavController
แถบการไปยังส่วนต่างๆ ด้านล่าง
NavigationUI ยังจัดการแถบการไปยังส่วนต่างๆ ด้านล่างได้ด้วย เมื่อผู้ใช้เลือกรายการเมนู NavController จะเรียกใช้ onNavDestinationSelected() และอัปเดตรายการที่เลือกในแถบการนำทางด้านล่างโดยอัตโนมัติ
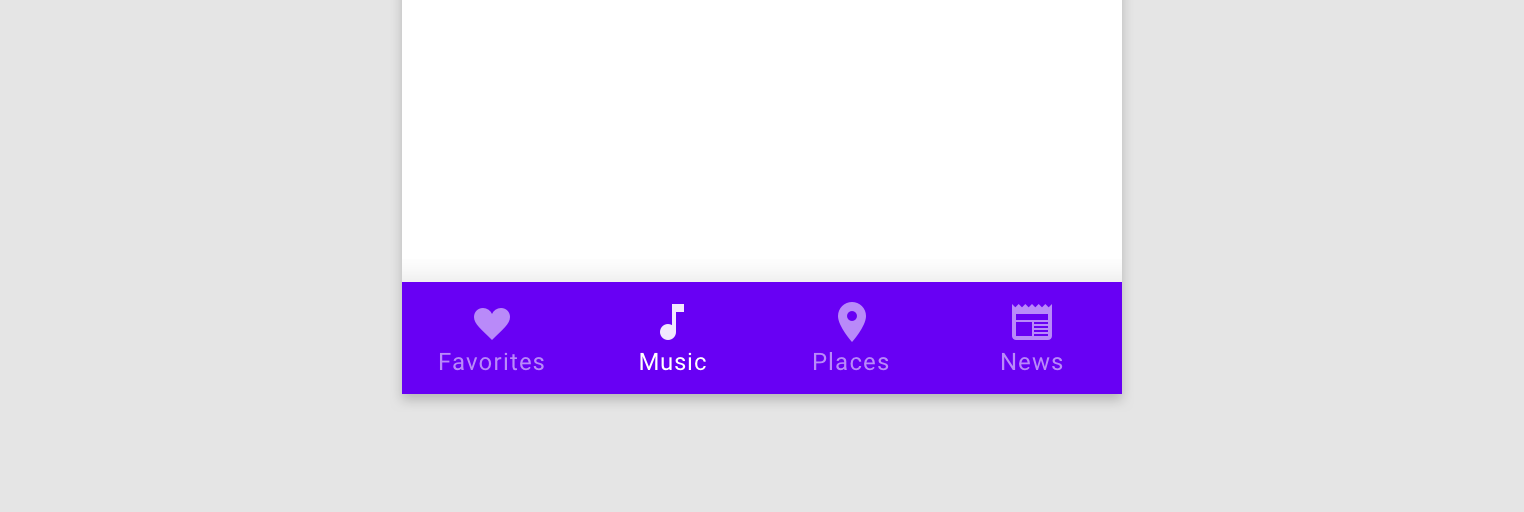
หากต้องการสร้างแถบการนำทางด้านล่างในแอป ให้กำหนดแถบในกิจกรรมหลักก่อน ดังที่แสดงด้านล่าง
<LinearLayout>
    ...
    <androidx.fragment.app.FragmentContainerView
        android:id="@+id/nav_host_fragment"
        ... />
    <com.google.android.material.bottomnavigation.BottomNavigationView
        android:id="@+id/bottom_nav"
        app:menu="@menu/menu_bottom_nav" />
</LinearLayout>
ถัดไป ในคลาสกิจกรรมหลัก ให้เรียกใช้ setupWithNavController() จากเมธอด onCreate() ของกิจกรรมหลัก ดังที่แสดงด้านล่าง
Kotlin
override fun onCreate(savedInstanceState: Bundle?) {
    setContentView(R.layout.activity_main)

    ...

    val navHostFragment =
        supportFragmentManager.findFragmentById(R.id.nav_host_fragment) as NavHostFragment
    val navController = navHostFragment.navController
    findViewById<BottomNavigationView>(R.id.bottom_nav)
        .setupWithNavController(navController)
}
Java
@Override
protected void onCreate(Bundle savedInstanceState) {
    setContentView(R.layout.activity_main);

    ...

    NavHostFragment navHostFragment = supportFragmentManager.findFragmentById(R.id.nav_host_fragment);
    NavController navController = navHostFragment.getNavController();
    BottomNavigationView bottomNav = findViewById(R.id.bottom_nav);
    NavigationUI.setupWithNavController(bottomNav, navController);
}
ตั้งแต่ Navigation 2.4.0-alpha01 เป็นต้นไป ระบบจะบันทึกและกู้คืนสถานะของรายการเมนูแต่ละรายการเมื่อคุณใช้ setupWithNavController
ฟังเหตุการณ์การนําทาง
การโต้ตอบกับNavControllerเป็นวิธีหลักในการไปยังส่วนต่างๆ ระหว่างปลายทาง NavController มีหน้าที่รับผิดชอบในการแทนที่เนื้อหาของ NavHost ด้วยปลายทางใหม่ ในหลายกรณี องค์ประกอบ UI เช่น แถบแอปด้านบนหรือตัวควบคุมการนำทางแบบถาวรอื่นๆ เช่น BottomNavigationBar จะอยู่นอก NavHost และต้องอัปเดตเมื่อคุณไปยังส่วนต่างๆ ระหว่างปลายทาง
NavController มีอินเทอร์เฟซ OnDestinationChangedListener ที่จะเรียกใช้เมื่อปลายทางปัจจุบันของ NavController หรืออาร์กิวเมนต์มีการเปลี่ยนแปลง คุณลงทะเบียน Listener ใหม่ได้โดยใช้เมธอด addOnDestinationChangedListener() โปรดทราบว่าเมื่อเรียกใช้ addOnDestinationChangedListener() หากมีปลายทางปัจจุบันอยู่ ระบบจะส่งปลายทางดังกล่าวไปยัง Listener ทันที
NavigationUI ใช้ OnDestinationChangedListener เพื่อทำให้คอมโพเนนต์ UI ทั่วไปเหล่านี้รับรู้การนำทาง อย่างไรก็ตาม โปรดทราบว่าคุณยังสามารถใช้ OnDestinationChangedListener เพียงอย่างเดียวเพื่อทำให้ UI ที่กำหนดเองหรือตรรกะทางธุรกิจรับรู้ถึงเหตุการณ์การนำทางได้ด้วย
ตัวอย่างเช่น คุณอาจมีองค์ประกอบ UI ทั่วไปที่ต้องการแสดงในบางพื้นที่ของแอป แต่ซ่อนไว้ในพื้นที่อื่นๆ เมื่อใช้ OnDestinationChangedListener ของคุณเอง คุณจะเลือกแสดงหรือซ่อนองค์ประกอบ UI เหล่านี้ตามปลายทางเป้าหมายได้ ดังที่แสดงในตัวอย่างต่อไปนี้
Kotlin
navController.addOnDestinationChangedListener { _, destination, _ ->
   if(destination.id == R.id.full_screen_destination) {
       toolbar.visibility = View.GONE
       bottomNavigationView.visibility = View.GONE
   } else {
       toolbar.visibility = View.VISIBLE
       bottomNavigationView.visibility = View.VISIBLE
   }
}
Java
navController.addOnDestinationChangedListener(new NavController.OnDestinationChangedListener() {
   @Override
   public void onDestinationChanged(@NonNull NavController controller,
           @NonNull NavDestination destination, @Nullable Bundle arguments) {
       if(destination.getId() == R.id.full_screen_destination) {
           toolbar.setVisibility(View.GONE);
           bottomNavigationView.setVisibility(View.GONE);
       } else {
           toolbar.setVisibility(View.VISIBLE);
           bottomNavigationView.setVisibility(View.VISIBLE);
       }
   }
});
Listener ที่อิงตามอาร์กิวเมนต์
หรือคุณจะใช้อาร์กิวเมนต์ที่มีค่าเริ่มต้นภายในกราฟการนําทางก็ได้ ซึ่งตัวควบคุม UI ที่เหมาะสมจะใช้เพื่ออัปเดตสถานะได้ ตัวอย่างเช่น แทนที่จะใช้ตรรกะใน OnDestinationChangedListener โดยอิงตามรหัสปลายทางตามตัวอย่างก่อนหน้า เราสามารถสร้างอาร์กิวเมนต์ใน NavGraph ได้ดังนี้
<?xml version="1.0" encoding="utf-8"?>
<navigation xmlns:android="http://schemas.android.com/apk/res/android"
    xmlns:app="http://schemas.android.com/apk/res-auto"
    android:id="@+id/navigation\_graph"
    app:startDestination="@id/fragmentOne">
    <fragment
        android:id="@+id/fragmentOne"
        android:name="com.example.android.navigation.FragmentOne"
        android:label="FragmentOne">
        <action
            android:id="@+id/action\_fragmentOne\_to\_fragmentTwo"
            app:destination="@id/fragmentTwo" />
    </fragment>
    <fragment
        android:id="@+id/fragmentTwo"
        android:name="com.example.android.navigation.FragmentTwo"
        android:label="FragmentTwo">
        <argument
            android:name="ShowAppBar"
            android:defaultValue="true" />
    </fragment>
</navigation>
อาร์กิวเมนต์นี้ไม่ได้ใช้เมื่อไปยังปลายทาง แต่ใช้เป็นวิธีแนบข้อมูลเพิ่มเติมไปยังปลายทางโดยใช้ defaultValue ในกรณีนี้ ค่าจะระบุว่าควรแสดงแถบแอปเมื่ออยู่ที่ปลายทางนี้หรือไม่
ตอนนี้เราสามารถเพิ่ม OnDestinationChangedListener ใน Activity ได้แล้ว
Kotlin
navController.addOnDestinationChangedListener { _, _, arguments ->
    appBar.isVisible = arguments?.getBoolean("ShowAppBar", false) == true
}
Java
navController.addOnDestinationChangedListener(
        new NavController.OnDestinationChangedListener() {
            @Override
            public void onDestinationChanged(
                    @NonNull NavController controller,
                    @NonNull NavDestination destination,
                    @Nullable Bundle arguments
            ) {
                boolean showAppBar = false;
                if (arguments != null) {
                    showAppBar = arguments.getBoolean("ShowAppBar", false);
                }
                if(showAppBar) {
                    appBar.setVisibility(View.VISIBLE);
                } else {
                    appBar.setVisibility(View.GONE);
                }
            }
        }
);
NavController จะเรียกใช้ Callback นี้ทุกครั้งที่ปลายทางการนำทางมีการเปลี่ยนแปลง ตอนนี้ Activity สามารถอัปเดตสถานะหรือระดับการเข้าถึงของคอมโพเนนต์ UI ที่เป็นเจ้าของตามอาร์กิวเมนต์ที่ได้รับใน Callback ได้แล้ว
ข้อดีอย่างหนึ่งของแนวทางนี้คือ Activity จะเห็นเฉพาะอาร์กิวเมนต์ในกราฟการนําทาง และไม่ทราบถึงบทบาทและความรับผิดชอบของ Fragment แต่ละรายการ ในทำนองเดียวกัน Fragment แต่ละรายการจะไม่ทราบเกี่ยวกับ Activity ที่มีอยู่และคอมโพเนนต์ UI ที่เป็นเจ้าของ
แหล่งข้อมูลเพิ่มเติม
ดูข้อมูลเพิ่มเติมเกี่ยวกับการนำทางได้ที่แหล่งข้อมูลเพิ่มเติมต่อไปนี้
Codelab
บล็อกโพสต์
วิดีโอ
- แนวทางปฏิบัติแนะนำ 10 ข้อสำหรับการเปลี่ยนไปใช้กิจกรรมเดียว
- Single Activity: Why, When, and How (Android Dev Summit '18)
- Android Jetpack: manage UI navigation with Navigation Controller (Google I/O '18)