
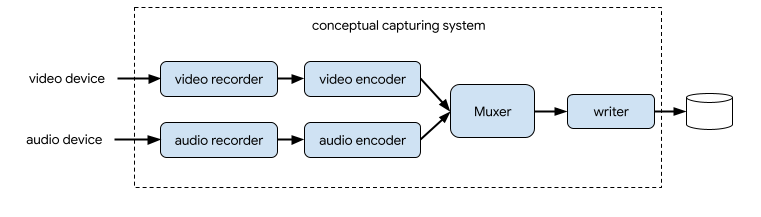
A capturing system generally records video and audio streams, compresses them, muxes the two streams, then writes the resultant stream to disk.
In CameraX, the solution for video capturing is the
VideoCapture
use case:
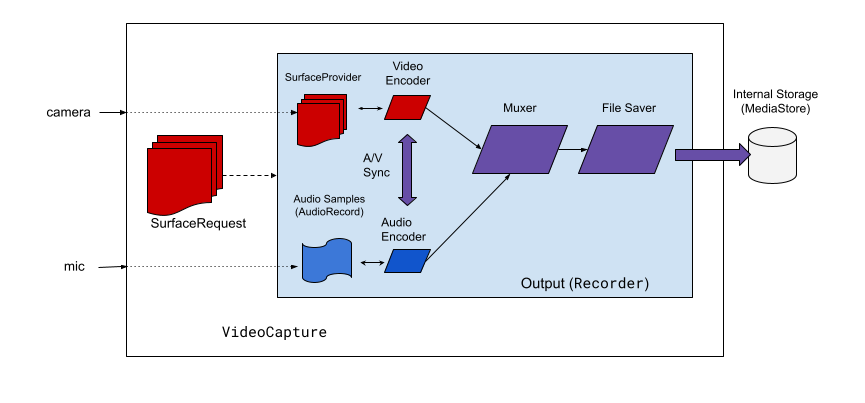
VideoCapture use case.As shown in figure 2, CameraX video capture includes a few high-level architectural components:
SurfaceProviderfor the video source.AudioSourcefor audio source.- Two encoders to encode and compress video/audio.
- A media muxer to mux the two streams.
- A file saver to write out the result.
The VideoCapture API abstracts the complex capturing engine and provides applications with a much simpler and straightforward API.
VideoCapture API overview
VideoCapture is a CameraX use case that works well on its own or when
combined with other use cases. Specific supported combinations depend on the
camera hardware capabilities, but Preview and VideoCapture is a
valid use case combination on all devices.
The VideoCapture API consists of the following objects that communicate with applications:
VideoCaptureis the top-level use case class.VideoCapturebinds to aLifecycleOwnerwith aCameraSelectorand other CameraX UseCases. For more information about these concepts and usages, see CameraX Architecture.- A
Recorderis an implementation of VideoOutput that is tightly coupled withVideoCapture.Recorderis used to perform the video and audio capturing. An application creates recordings from aRecorder. - A
PendingRecordingconfigures a recording, providing options like enabling audio and setting an event listener. You must use aRecorderto create aPendingRecording. APendingRecordingdoes not record anything. - A
Recordingperforms the actual recording. You must use aPendingRecordingto create aRecording.
Figure 3 shows the relationships between these objects:
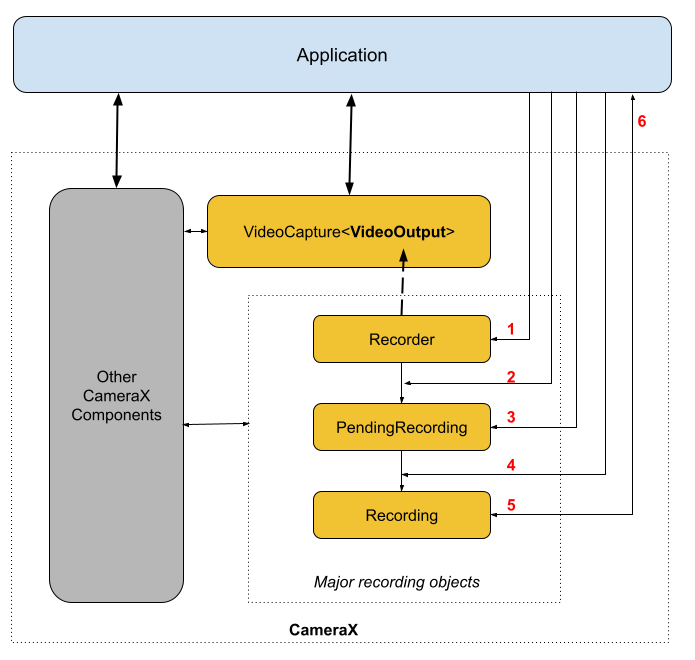
Legend:
- Create a
RecorderwithQualitySelector. - Configure the
Recorderwith one of theOutputOptions. - Enable audio with
withAudioEnabled()if needed. - Call
start()with aVideoRecordEventlistener to begin recording. - Use
pause()/resume()/stop()on theRecordingto control the recording. - Respond to
VideoRecordEventsinside your event listener.
The detailed API list is in the current.txt inside the source code.
Using the VideoCapture API
To integrate the CameraX VideoCapture use case into your app,
do the following:
- Bind
VideoCapture. - Prepare and configure recording.
- Start and control the runtime recording.
The following sections outline what you can do at each step to get an end-to-end recording session.
Bind VideoCapture
To bind the VideoCapture use case, do the following:
- Create a
Recorderobject. - Create
VideoCaptureobject. - Bind to a
Lifecycle.
CameraX VideoCapture API follows the builder design pattern. Applications
use Recorder.Builder to create a Recorder. You can also configure the
video resolution for the Recorder through a QualitySelector object.
CameraX Recorder supports the following pre-defined Qualities
for video resolutions:
Quality.UHDfor 4K ultra HD video size (2160p)Quality.FHDfor full HD video size (1080p)Quality.HDfor HD video size (720p)Quality.SDfor SD video size (480p)
Note that CameraX can also choose other resolutions when authorized by the app.
The exact video size of each selection depends on the camera and encoder's
capabilities. For more information, see the documentation for
CamcorderProfile.
Applications can configure resolution by creating a
QualitySelector.
You can create a QualitySelector using one of the following methods:
Provide a few preferred resolutions by using
fromOrderedList(), and include a fallback strategy to use in case none of the preferred resolutions is supported.CameraX can decide the best fallback match based on the selected camera's capability, refer to
QualitySelector'sFallbackStrategy specificationfor more details. For example, the following code requests the highest supported resolution for recording, and if none of the request resolutions can be supported, authorize CameraX to choose one that is the closest to the Quality.SD resolution:val qualitySelector = QualitySelector.fromOrderedList( listOf(Quality.UHD, Quality.FHD, Quality.HD, Quality.SD), FallbackStrategy.lowerQualityOrHigherThan(Quality.SD))Query the camera capabilities first, and choose from the supported resolutions using
QualitySelector::from():val cameraInfo = cameraProvider.availableCameraInfos.filter { Camera2CameraInfo .from(it) .getCameraCharacteristic(CameraCharacteristics.LENS\_FACING) == CameraMetadata.LENS_FACING_BACK } val supportedQualities = QualitySelector.getSupportedQualities(cameraInfo[0]) val filteredQualities = arrayListOf (Quality.UHD, Quality.FHD, Quality.HD, Quality.SD) .filter { supportedQualities.contains(it) } // Use a simple ListView with the id of simple_quality_list_view viewBinding.simpleQualityListView.apply { adapter = ArrayAdapter(context, android.R.layout.simple_list_item_1, filteredQualities.map { it.qualityToString() }) // Set up the user interaction to manually show or hide the system UI. setOnItemClickListener { _, _, position, _ -> // Inside View.OnClickListener, // convert Quality.* constant to QualitySelector val qualitySelector = QualitySelector.from(filteredQualities[position]) // Create a new Recorder/VideoCapture for the new quality // and bind to lifecycle val recorder = Recorder.Builder() .setQualitySelector(qualitySelector).build() // ... } } // A helper function to translate Quality to a string fun Quality.qualityToString() : String { return when (this) { Quality.UHD -> "UHD" Quality.FHD -> "FHD" Quality.HD -> "HD" Quality.SD -> "SD" else -> throw IllegalArgumentException() } }Note that the returned capability from
QualitySelector.getSupportedQualities()is guaranteed to work for either theVideoCaptureuse case or the combination ofVideoCaptureandPreviewuse cases. When binding together withImageCaptureorImageAnalysisuse case, CameraX might still fail the binding when the required combination is not supported on the requested camera.
Once you have a QualitySelector, the application can create a
VideoCapture object and perform the binding. Note that this binding is
the same as with other use cases:
val recorder = Recorder.Builder()
    .setExecutor(cameraExecutor).setQualitySelector(qualitySelector)
    .build()
val videoCapture = VideoCapture.withOutput(recorder)

try {
    // Bind use cases to camera
    cameraProvider.bindToLifecycle(
            this, CameraSelector.DEFAULT_BACK_CAMERA, preview, videoCapture)
} catch(exc: Exception) {
    Log.e(TAG, "Use case binding failed", exc)
}
Note that bindToLifecycle() returns a Camera object. See this guide for more information about controlling camera output, such as zoom and exposure.
The Recorder selects the most suitable format for the system. The most
common video codec is
H.264 AVC) with
container format
MPEG-4.
Configure and create recording
From a Recorder, the application can create recording objects to
perform the video and audio capturing. Applications create recordings by doing
the following:
- Configure
OutputOptionswith theprepareRecording(). - (Optional) Enable audio recording.
- Use
start()to register aVideoRecordEventlistener, and begin video capturing.
TheRecorder returns a Recording object when you call the start() function.
Your application can use this Recording object to finish
capturing or to perform other actions, such as pausing or resuming.
A Recorder supports one Recording object at a time. You can start a
new recording once you've called Recording.stop() or
Recording.close() on the previous Recording object.
Let's look at these steps in more detail. First, the application configures
the OutputOptions for a Recorder with Recorder.prepareRecording().
A Recorder supports the following types of OutputOptions:
FileDescriptorOutputOptionsfor capturing into aFileDescriptor.FileOutputOptionsfor capturing into aFile.MediaStoreOutputOptionsfor capturing into aMediaStore.
All OutputOptions types enable you to set a maximum file size with
setFileSizeLimit(). Other options are specific to the individual output
type, such as ParcelFileDescriptor for the FileDescriptorOutputOptions.
prepareRecording() returns a PendingRecording object, which is an
intermediate object that is used to create the corresponding
Recording object. PendingRecording is a transient class that should
be invisible in most cases and is rarely cached by the app.
Applications can further configure the recording, such as:
- Enable audio with
withAudioEnabled(). - Register a listener to receive video recording events
with
start(Executor, Consumer<VideoRecordEvent>). - Allow a recording to continuously record while the VideoCapture it's attached
to is rebound to another camera, with
PendingRecording.asPersistentRecording().
To start recording, call PendingRecording.start(). CameraX turns the
PendingRecording into a Recording, queues the recording request,
and returns the newly created Recording object to the application.
Once recording begins on the corresponding Camera device, CameraX sends a
VideoRecordEvent.EVENT_TYPE_START event.
The following example shows how to record video and audio into a
MediaStore file:
// Create MediaStoreOutputOptions for our recorder
val name = "CameraX-recording-" +
        SimpleDateFormat(FILENAME_FORMAT, Locale.US)
                .format(System.currentTimeMillis()) + ".mp4"
val contentValues = ContentValues().apply {
   put(MediaStore.Video.Media.DISPLAY_NAME, name)
}
val mediaStoreOutput = MediaStoreOutputOptions.Builder(this.contentResolver,
                              MediaStore.Video.Media.EXTERNAL_CONTENT_URI)
                              .setContentValues(contentValues)
                              .build()

// 2. Configure Recorder and Start recording to the mediaStoreOutput.
val recording = videoCapture.output
                .prepareRecording(context, mediaStoreOutput)
                .withAudioEnabled()
                .start(ContextCompat.getMainExecutor(this), captureListener)
While the camera preview is mirrored on the front camera by default, videos recorded by VideoCapture are not mirrored by default. With CameraX 1.3, it's now possible to mirror video recordings so that the front camera preview and the recorded video match.
There are three MirrorMode options: MIRROR_MODE_OFF, MIRROR_MODE_ON, and
MIRROR_MODE_ON_FRONT_ONLY. To align to the
camera preview, Google recommends using MIROR_MODE_ON_FRONT_ONLY, which means
that
mirroring is not enabled for the rear camera, but is enabled for the front
camera. For more information about MirrorMode, see
MirrorMode constants.
This code snippet shows how to call
VideoCapture.Builder.setMirrorMode() using MIRROR_MODE_ON_FRONT_ONLY. For
more information, see setMirrorMode().
Kotlin
val recorder = Recorder.Builder().build()

val videoCapture = VideoCapture.Builder(recorder)
    .setMirrorMode(MIRROR_MODE_ON_FRONT_ONLY)
    .build()

useCases.add(videoCapture);
Java
Recorder.Builder builder = new Recorder.Builder();
if (mVideoQuality != QUALITY_AUTO) {
    builder.setQualitySelector(
        QualitySelector.from(mVideoQuality));
}
  VideoCapture<Recorder> videoCapture = new VideoCapture.Builder<>(builder.build())
      .setMirrorMode(MIRROR_MODE_ON_FRONT_ONLY)
      .build();
    useCases.add(videoCapture);
Control an active recording
You can pause, resume, and stop an ongoing Recording by
using the following methods:
pauseto pause the current active recording.resume()to resume a paused active recording.stop()to finish recording and flush any associated recording objects.mute()to mute or un-mute the current recording.
Note that you can call stop() to terminate a Recording regardless
of whether the recording is in a paused or active recording state.
If you've registered an EventListener with
PendingRecording.start(), the Recording communicates
by using a
VideoRecordEvent.
VideoRecordEvent.EVENT_TYPE_STATUSis used for recording statistics such as current file size and recorded time span.VideoRecordEvent.EVENT_TYPE_FINALIZEis used for the recording result and includes information such as the URI of the final file along with any related errors.
Once your app receives a EVENT_TYPE_FINALIZE that indicates a successful
recording session, you can then access the captured video from the location
specified in OutputOptions.
Additional resources
To learn more about CameraX, see the following additional resources:
- Getting Started with CameraX Codelab
- Official CameraX sample app
- Latest CameraX Video Capture API List
- CameraX release notes
- CameraX source code