
Navigation 组件是一个库,可管理应用中多个屏幕之间的复杂导航、过渡动画、深层链接以及编译时间检查参数传递。
本文档属于通用指南,旨在指导用户迁移现有应用以使用 Navigation 组件。
大体上讲,迁移涉及以下步骤:
将特定于屏幕的界面逻辑移出 Activity - 将应用的界面逻辑从 Activity 中移出,确保每个 Activity 仅拥有全局导航界面组件(如
Toolbar)的逻辑,同时将每个屏幕的实现工作委托给 Fragment 或自定义目的地。集成 Navigation 组件 - 为每个 Activity 构建导航图,其中包含由该 Activity 管理的一个或多个 Fragment。将 Fragment 事务替换为 Navigation 组件操作。
添加 Activity 目的地 - 将
startActivity()调用替换为使用 Activity 目的地的操作。合并 Activity - 在多个 Activity 共用一个通用布局的情况下合并导航图。
前提条件
本指南假定您已迁移应用,可使用 AndroidX 库。如果尚未完成迁移,请迁移您的项目以使用 AndroidX,然后再继续操作。
将特定于屏幕的界面逻辑移出 Activity
Activity 是系统级组件,可帮助应用与 Android 进行图形互动。Activity 在应用清单中注册,从而告诉 Android 可以启动哪些 Activity。通过 activity 类,应用还可以对 Android 变更做出响应,例如当应用界面进入/退出前台或旋转时等。通过 Activity,还可以在屏幕之间共享状态。
在您的应用环境中,Activity 应充当导航宿主,并包含如何在屏幕之间转换、传递数据等方面的逻辑和信息。不过,界面细节的管理最好留给界面中较小且可重复使用的部分。建议采用 Fragment 实现此模式。如需详细了解使用 Fragment 的优势,请参阅单个 Activity:为何、何时以及如何。Navigation 组件通过 Navigation-Fragment 依赖项支持 Fragment,还支持自定义目的地类型。
如果您的应用没有使用 Fragment,则您需要先迁移应用中的每个屏幕以使用 Fragment。您当前不需要移除 Activity,您需要做的是,创建一个表示屏幕的 Fragment,并根据责任细分界面逻辑。
引入 Fragment
为了说明引入 Fragment 的过程,我们先来看看一个包含两个屏幕的应用示例:“商品列表”屏幕和“商品详情”屏幕。用户点击列表屏幕中的某个商品后会转到详情屏幕,从而可以详细了解该商品。
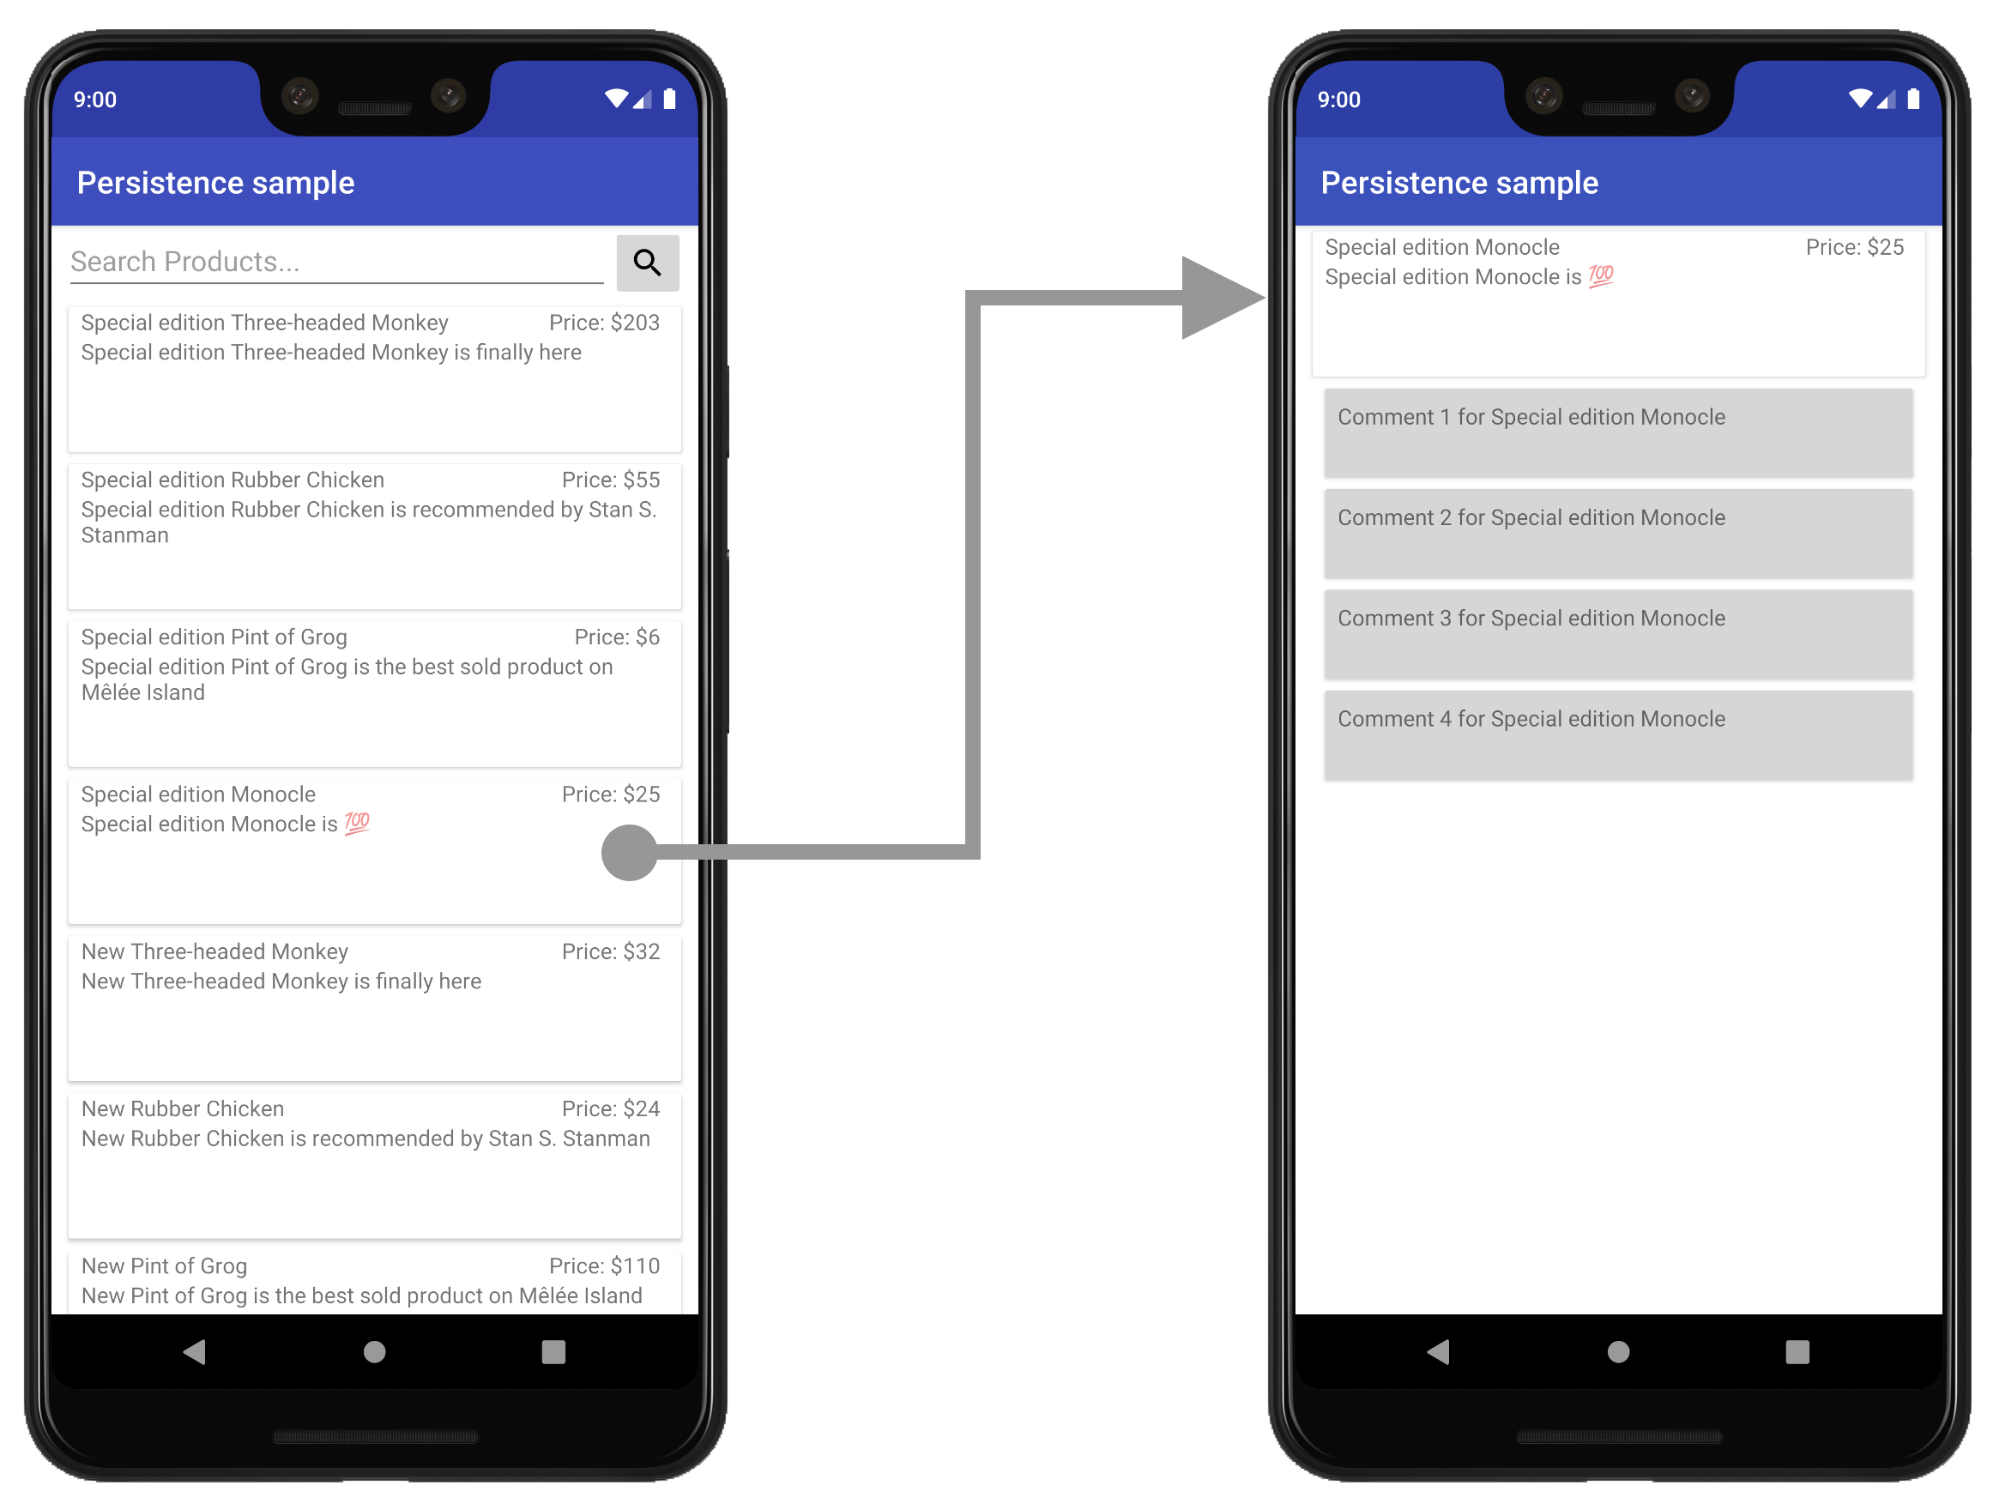
在此示例中,列表屏幕和详情屏幕目前是各自独立的 Activity。
创建新布局以托管界面
如需引入 Fragment,请先为 Activity 创建一个新的布局文件来托管该 Fragment。这会替换 Activity 的当前内容视图布局。
对于简单视图,您可以使用 FrameLayout,如以下示例 product_list_host 所示:
<FrameLayout
   xmlns:app="http://schemas.android.com/apk/res-auto"
   xmlns:android="http://schemas.android.com/apk/res/android"
   android:id="@+id/main_content"
   android:layout_height="match_parent"
   android:layout_width="match_parent" />
id 属性指的是我们之后会在其中添加 Fragment 的内容部分。
接着,在 Activity 的 onCreate() 函数中,修改 Activity 的 onCreate 函数中的布局文件引用以指向新建的布局文件:
Kotlin
class ProductListActivity : AppCompatActivity() {
    ...
    override fun onCreate(savedInstanceState: Bundle?) {
        ...
        // Replace setContentView(R.layout.product_list) with the line below
        setContentView(R.layout.product_list_host)
        ...
    }
}
Java
public class ProductListActivity extends AppCompatActivity {
    ...
    @Override
    public void onCreate(@Nullable Bundle savedInstanceState) {
        ...
        // Replace setContentView(R.layout.product_list); with the line below
        setContentView(R.layout.product_list_host);
        ...
    }
}
现有布局(在本例中为 product_list)用作您要创建的 Fragment 的根视图。
创建 Fragment
创建新的 Fragment 以管理屏幕的界面。最好与 Activity 宿主名称保持一致。例如,以下代码段使用 ProductListFragment:
Kotlin
class ProductListFragment : Fragment() {
    // Leave empty for now.
}
Java
public class ProductListFragment extends Fragment {
    // Leave empty for now.
}
将 Activity 逻辑移到 Fragment 中
定义了 Fragment 之后,下一步是将此屏幕的界面逻辑从 Activity 移到新建的 Fragment 中。如果您此前采用的是基于 Activity 的架构,那么您的 Activity onCreate() 函数中可能会有大量的视图创建逻辑。
下面是基于 Activity 的屏幕示例,其中包含我们需要移动的界面逻辑:
Kotlin
class ProductListActivity : AppCompatActivity() {

    // Views and/or ViewDataBinding references, Adapters...
    private lateinit var productAdapter: ProductAdapter
    private lateinit var binding: ProductListActivityBinding

    ...

    // ViewModels, System Services, other Dependencies...
    private val viewModel: ProductListViewModel by viewModels()

    ...

    override fun onCreate(savedInstanceState: Bundle?) {
        super.onCreate(savedInstanceState)

        // View initialization logic
        DataBindingUtil.setContentView(this, R.layout.product_list_activity)

        // Post view initialization logic
        // Connect adapters
        productAdapter = ProductAdapter(productClickCallback)
        binding.productsList.setAdapter(productAdapter)

        // Initialize view properties, set click listeners, etc.
        binding.productsSearchBtn.setOnClickListener {...}

        // Subscribe to state
        viewModel.products.observe(this, Observer { myProducts ->
            ...
        })

        // ...and so on
    }
   ...
}
Java
public class ProductListActivity extends AppCompatActivity {

    // Views and/or ViewDataBinding references, adapters...
    private ProductAdapter productAdapter;
    private ProductListActivityBinding binding;

    ...

    // ViewModels, system services, other dependencies...
    private ProductListViewModel viewModel;

    ...

    @Override
    protected void onCreate(@Nullable Bundle savedInstanceState) {
        super.onCreate(savedInstanceState);

        // View initialization logic
        DataBindingUtil.setContentView(this, R.layout.product_list_activity);

        // Post view initialization logic
        // Connect adapters
        productAdapter = new ProductAdapter(productClickCallback);
        binding.productsList.setAdapter(productAdapter);

        // Initialize ViewModels and other dependencies
        ProductListViewModel viewModel = new ViewModelProvider(this).get(ProductListViewModel.java);

        // Initialize view properties, set click listeners, etc.
        binding.productsSearchBtn.setOnClickListener(v -> { ... });

        // Subscribe to state
        viewModel.getProducts().observe(this, myProducts ->
            ...
       );

       // ...and so on
   }
您的 Activity 可能还会控制用户转到下一个屏幕的时间和方式,如下例所示:
Kotlin
    // Provided to ProductAdapter in ProductListActivity snippet.
    private val productClickCallback = ProductClickCallback { product ->
        show(product)
    }

    fun show(product: Product) {
        val intent = Intent(this, ProductActivity::class.java)
        intent.putExtra(ProductActivity.KEY_PRODUCT_ID, product.id)
        startActivity(intent)
    }
Java
// Provided to ProductAdapter in ProductListActivity snippet.
private ProductClickCallback productClickCallback = this::show;

private void show(Product product) {
    Intent intent = new Intent(this, ProductActivity.class);
    intent.putExtra(ProductActivity.KEY_PRODUCT_ID, product.getId());
    startActivity(intent);
}
在 Fragment 内,您可以在 onCreateView() 和 onViewCreated() 之间分摊此项工作,并且仅将导航逻辑留在 Activity 中:
Kotlin
class ProductListFragment : Fragment() {

    private lateinit var binding: ProductListFragmentBinding
    private val viewModel: ProductListViewModel by viewModels()

     // View initialization logic
    override fun onCreateView(inflater: LayoutInflater,
            container: ViewGroup?,
            savedInstanceState: Bundle?): View? {
        binding = DataBindingUtil.inflate(
                inflater,
                R.layout.product_list,
                container,
                false
        )
        return binding.root
    }

    // Post view initialization logic
    override fun onViewCreated(view: View, savedInstanceState: Bundle?) {
        // Connect adapters
        productAdapter = ProductAdapter(productClickCallback)
        binding.productsList.setAdapter(productAdapter)

        // Initialize view properties, set click listeners, etc.
        binding.productsSearchBtn.setOnClickListener {...}

        // Subscribe to state
        viewModel.products.observe(this, Observer { myProducts ->
            ...
        })

        // ...and so on
    }

    // Provided to ProductAdapter
    private val productClickCallback = ProductClickCallback { product ->
        if (lifecycle.currentState.isAtLeast(Lifecycle.State.STARTED)) {
            (requireActivity() as ProductListActivity).show(product)
        }
    }
    ...
}
Java
public class ProductListFragment extends Fragment {

    private ProductAdapter productAdapter;
    private ProductListFragmentBinding binding;

    // View initialization logic
    @Nullable
    @Override
    public View onCreateView(@NonNull LayoutInflater inflater,
            @Nullable ViewGroup container,
            @Nullable Bundle savedInstanceState) {
        binding = DataBindingUtil.inflate(
                inflater,
                R.layout.product_list_fragment,
                container,
                false);
        return binding.getRoot();
    }

    // Post view initialization logic
    @Override
    public void onViewCreated(@NonNull View view,
            @Nullable Bundle savedInstanceState) {

        // Connect adapters
        binding.productsList.setAdapter(productAdapter);

        // Initialize ViewModels and other dependencies
        ProductListViewModel viewModel = new ViewModelProvider(this)
                .get(ProductListViewModel.class);

        // Initialize view properties, set click listeners, etc.
        binding.productsSearchBtn.setOnClickListener(...)

        // Subscribe to state
        viewModel.getProducts().observe(this, myProducts -> {
            ...
       });

       // ...and so on

    // Provided to ProductAdapter
    private ProductClickCallback productClickCallback = new ProductClickCallback() {
        @Override
        public void onClick(Product product) {
            if (getLifecycle().getCurrentState().isAtLeast(Lifecycle.State.STARTED)) {
                ((ProductListActivity) requireActivity()).show(product);
            }
        }
    };
    ...
}
在 ProductListFragment 中,注意没有调用 setContentView() 扩充和连接布局。在 Fragment 中,onCreateView() 会初始化根视图。onCreateView() 会获取 LayoutInflater 的实例,该实例可用于根据布局资源文件扩充根视图。此示例重复使用 Activity 所使用的现有 product_list 布局,因为没有必要更改布局本身。
如果 Activity 的 onStart()、onResume()、onPause() 或 onStop() 函数中有任何与导航无关的界面逻辑,可以将这些逻辑移到 Fragment 中相应的同名函数内。
在宿主 activity 中初始化 fragment
当您将所有界面逻辑向下移动到 Fragment 之后,只有导航逻辑还应留在 Activity 中。
Kotlin
class ProductListActivity : AppCompatActivity() {

    override fun onCreate(savedInstanceState: Bundle?) {
        super.onCreate(savedInstanceState)
        setContentView(R.layout.product_list_host)
    }

    fun show(product: Product) {
        val intent = Intent(this, ProductActivity::class.java)
        intent.putExtra(ProductActivity.KEY_PRODUCT_ID, product.id)
        startActivity(intent)
    }
}
Java
public class ProductListActivity extends AppCompatActivity {

    @Override
    protected void onCreate(@Nullable Bundle savedInstanceState) {
        super.onCreate(savedInstanceState);
        setContentView(R.layout.product_list_host);
    }

    public void show(Product product) {
        Intent intent = new Intent(this, ProductActivity.class);
        intent.putExtra(ProductActivity.KEY_PRODUCT_ID, product.getId());
        startActivity(intent);
    }
}
最后一步是在设置内容视图后,在 onCreate() 中创建 Fragment 实例:
Kotlin
override fun onCreate(savedInstanceState: Bundle?) {
    super.onCreate(savedInstanceState)
    setContentView(R.layout.product_list_host)

    if (savedInstanceState == null) {
        val fragment = ProductListFragment()
        supportFragmentManager
                .beginTransaction()
                .add(R.id.main_content, fragment)
                .commit()
    }
}
Java
@Override
protected void onCreate(@Nullable Bundle savedInstanceState) {
    super.onCreate(savedInstanceState);
    setContentView(R.layout.product_list_host);

    if (savedInstanceState == null) {
        ProductListFragment fragment = new ProductListFragment();
        getSupportFragmentManager()
                .beginTransaction()
                .add(R.id.main_content, fragment)
                .commit();
    }
}
如本例所示,FragmentManager 会在配置更改时自动保存和恢复 Fragment,因此只需在 savedInstanceState 为 null 时添加 Fragment。
将 intent extra 传递给 Fragment
如果您的 Activity 通过 intent 接收 Extras,您可以将这些 extra 作为参数直接传递给 Fragment。
在此示例中,ProductDetailsFragment 直接从 Activity 的 intent extra 接收其参数:
Kotlin
...

if (savedInstanceState == null) {
    val fragment = ProductDetailsFragment()

    // Intent extras and Fragment Args are both of type android.os.Bundle.
    fragment.arguments = intent.extras

    supportFragmentManager
            .beginTransaction()
            .add(R.id.main_content, fragment)
            .commit()
}

...
Java
...

if (savedInstanceState == null) {
    ProductDetailsFragment fragment = new ProductDetailsFragment();

    // Intent extras and fragment Args are both of type android.os.Bundle.
    fragment.setArguments(getIntent().getExtras());

    getSupportFragmentManager()
            .beginTransaction()
            .add(R.id.main_content, fragment)
            .commit();
}

...
此时,您应该能够试运行应用,并且第一个屏幕已更新为使用 Fragment。继续迁移剩余的基于 Activity 的屏幕,每次迭代后都需要花些时间进行测试。
集成 Navigation 组件
使用基于 Fragment 的架构后,您就可以开始集成 Navigation 组件了。
首先,按照 Navigation 库版本说明中的说明,将最新的导航依赖项添加到项目中。
创建导航图
Navigation 组件在资源文件中以图的形式表示应用导航配置,与应用视图的表示形式很像。这有助于确保应用导航在代码库之外井井有条,并能让您直观地修改应用导航。
如需创建导航图,请先新建一个名为 navigation 的资源文件夹。如需添加图,请右键点击此目录,然后依次选择 New > Navigation resource file。

Navigation 组件将 activity 用作导航宿主,并在用户浏览您的应用时将各个 fragment 交换到该宿主中。在开始直观地布局应用的导航之前,您需要先在要托管此图的 activity 内部配置 NavHost。由于我们使用了 Fragment,因此可以使用 Navigation 组件的默认 NavHost 实现 NavHostFragment。
NavHostFragment 是通过位于宿主 Activity 中的 FragmentContainerView 配置的,如下例所示:
<androidx.fragment.app.FragmentContainerView
   android:name="androidx.navigation.fragment.NavHostFragment"
   app:navGraph="@navigation/product_list_graph"
   app:defaultNavHost="true"
   android:id="@+id/main_content"
   android:layout_width="match_parent"
   android:layout_height="match_parent" />
app:NavGraph 属性指向与此导航宿主相关联的导航图。设置此属性将会扩充导航图,并在 NavHostFragment 上设置导航图属性。app:defaultNavHost 属性确保您的 NavHostFragment 会拦截系统返回按钮。
如果您使用顶级导航(如 DrawerLayout 或 BottomNavigationView),此 FragmentContainerView 会替换您的主内容视图元素。有关示例,请参阅使用 NavigationUI 更新界面组件。
对于简单布局,您可以将此 FragmentContainerView 元素添加为根 ViewGroup 的子元素:
<FrameLayout
   xmlns:app="http://schemas.android.com/apk/res-auto"
   xmlns:android="http://schemas.android.com/apk/res/android"
   android:layout_height="match_parent"
   android:layout_width="match_parent">

<androidx.fragment.app.FragmentContainerView
   android:id="@+id/main_content"
   android:name="androidx.navigation.fragment.NavHostFragment"
   app:navGraph="@navigation/product_list_graph"
   app:defaultNavHost="true"
   android:layout_width="match_parent"
   android:layout_height="match_parent" />

</FrameLayout>
如果您点击底部的 Design 标签页,则会看到类似下图的图。在该图的左上方,在 Destinations 下,您会看到对 NavHost Activity 的引用(采用 layout_name (resource_id) 形式)。
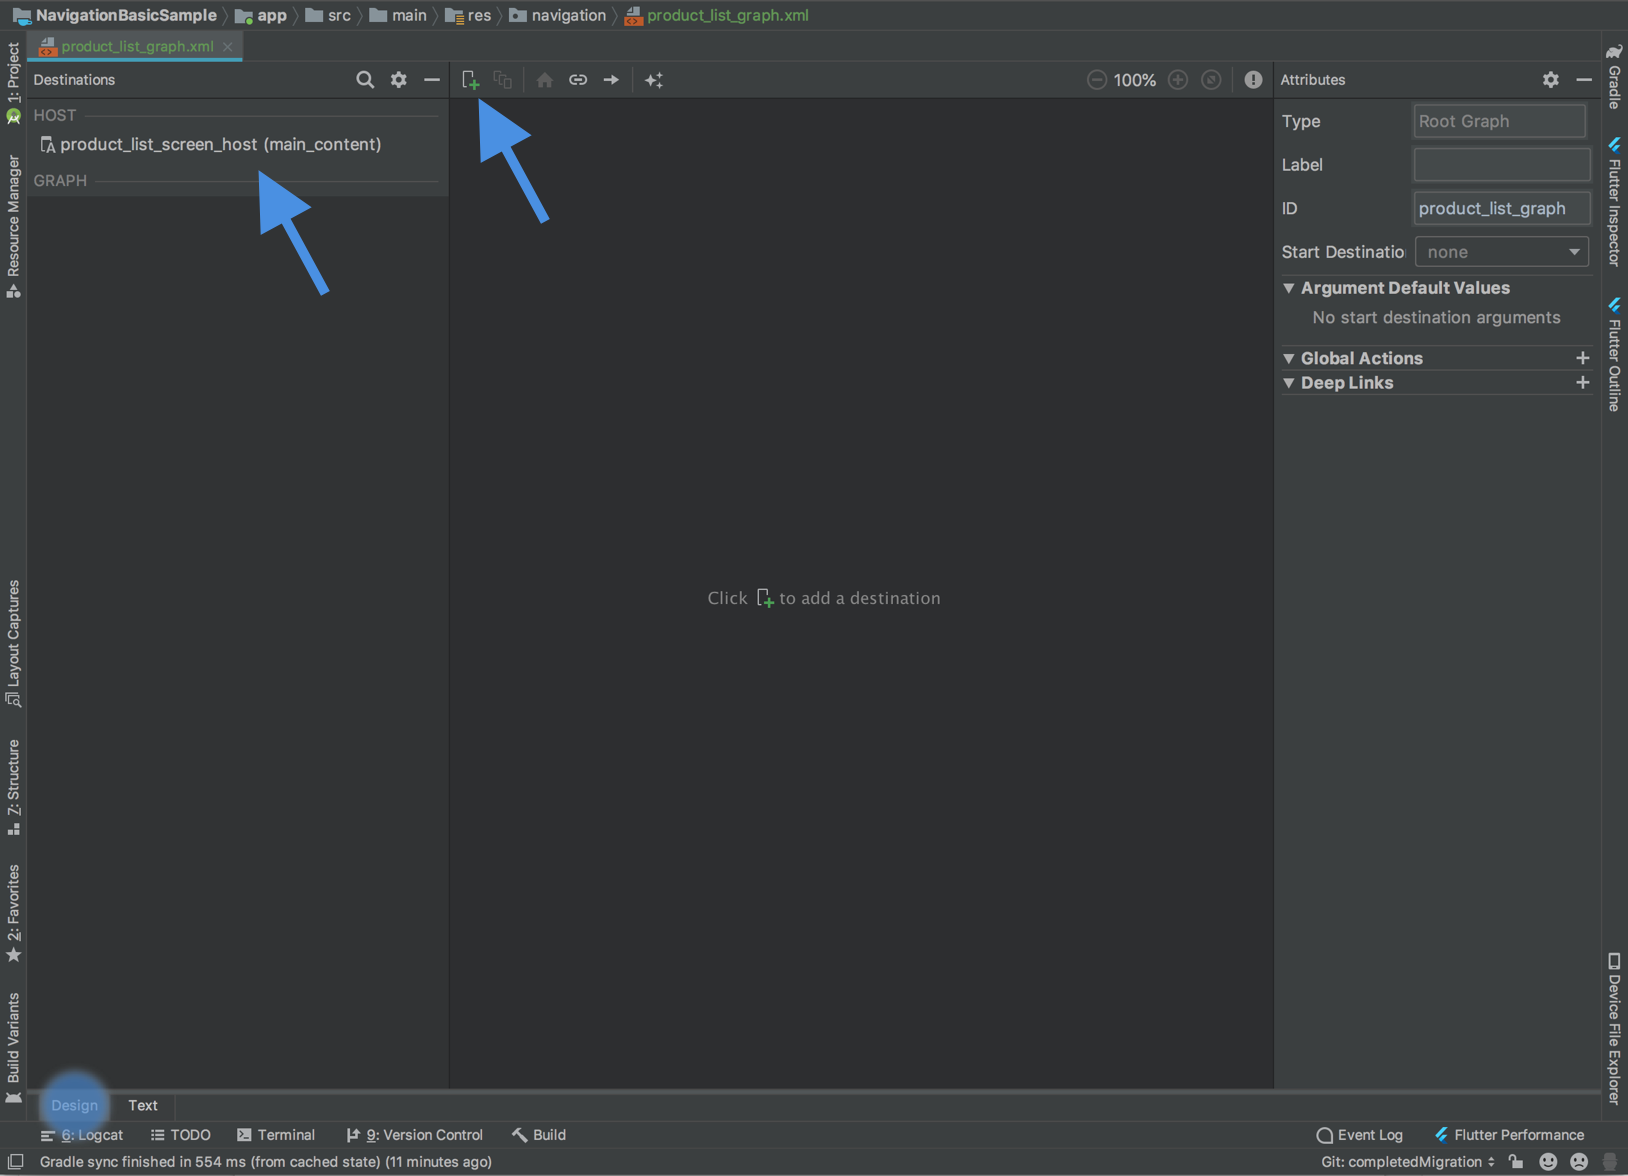
点击顶部附近的加号按钮 ![]() ,以将您的 Fragment 添加到此图中。
,以将您的 Fragment 添加到此图中。
Navigation 组件将各个屏幕称为目的地。 目的地可以是 Fragment、Activity 或自定义目的地。您可以向图中添加任意目的地类型,但请注意,Activity 目的地会被视为“终端目的地”,因为一旦您转到 Activity 目的地,就意味着您在单独的导航宿主和图中进行操作。
Navigation 组件将用户从一个目的地转到另一个目的地的方式称为操作。操作还可以描述转换动画和弹出行为。
移除 Fragment 事务
由于您使用了 Navigation 组件,如果您在同一 activity 下基于 fragment 的屏幕之间导航,可以移除 FragmentManager 互动。
如果您的应用使用同一 Activity 或顶级导航(如抽屉式导航栏布局或底部导航栏)下的多个 Fragment,那么您可能需要使用 FragmentManager 和 FragmentTransactions 在界面的主内容部分中添加或替换 Fragment。现在可使用 Navigation 组件替换和简化此过程,具体方法是先在图内提供链接目的地的操作,然后使用 NavController 导航。
下面介绍了您可能会遇到的几种情况,以及如何针对每种情况进行迁移。
管理多个 Fragment 的单个 Activity
如果您有一个管理多个 Fragment 的 Activity,则您的 Activity 代码可能如下所示:
Kotlin
class MainActivity : AppCompatActivity() {

    override fun onCreate(savedInstanceState: Bundle?) {
        super.onCreate(savedInstanceState)
        setContentView(R.layout.activity_main)

        // Logic to load the starting destination
        //  when the Activity is first created
        if (savedInstanceState == null) {
            val fragment = ProductListFragment()
            supportFragmentManager.beginTransaction()
                    .add(R.id.fragment_container, fragment, ProductListFragment.TAG)
                    .commit()
        }
    }

    // Logic to navigate the user to another destination.
    // This may include logic to initialize and set arguments on the destination
    // fragment or even transition animations between the fragments (not shown here).
    fun navigateToProductDetail(productId: String) {
        val fragment = new ProductDetailsFragment()
        val args = Bundle().apply {
            putInt(KEY_PRODUCT_ID, productId)
        }
        fragment.arguments = args

        supportFragmentManager.beginTransaction()
                .addToBackStack(ProductDetailsFragment.TAG)
                .replace(R.id.fragment_container, fragment, ProductDetailsFragment.TAG)
                .commit()
    }
}
Java
public class MainActivity extends AppCompatActivity {

    @Override
    protected void onCreate(@Nullable Bundle savedInstanceState) {
        super.onCreate(savedInstanceState);
        setContentView(R.layout.activity_main);

        // Logic to load the starting destination when the activity is first created.
        if (savedInstanceState == null) {
            val fragment = ProductListFragment()
            supportFragmentManager.beginTransaction()
                    .add(R.id.fragment_container, fragment, ProductListFragment.TAG)
                    .commit();
        }
    }

    // Logic to navigate the user to another destination.
    // This may include logic to initialize and set arguments on the destination
    // fragment or even transition animations between the fragments (not shown here).
    public void navigateToProductDetail(String productId) {
        Fragment fragment = new ProductDetailsFragment();
        Bundle args = new Bundle();
        args.putInt(KEY_PRODUCT_ID, productId);
        fragment.setArguments(args);

        getSupportFragmentManager().beginTransaction()
                .addToBackStack(ProductDetailsFragment.TAG)
                .replace(R.id.fragment_container, fragment, ProductDetailsFragment.TAG)
                .commit();
    }
}
在源目的地内部,您可能会调用导航函数来响应某个事件,如下所示:
Kotlin
class ProductListFragment : Fragment() {
    ...
    override fun onViewCreated(view: View, savedInstanceState: Bundle?) {
        // In this example a callback is passed to respond to an item clicked
        //  in a RecyclerView
        productAdapter = ProductAdapter(productClickCallback)
        binding.productsList.setAdapter(productAdapter)
    }
    ...

    // The callback makes the call to the activity to make the transition.
    private val productClickCallback = ProductClickCallback { product ->
            (requireActivity() as MainActivity).navigateToProductDetail(product.id)
    }
}
Java
public class ProductListFragment extends Fragment  {
    ...
    @Override
    public void onViewCreated(@NonNull View view,
            @Nullable Bundle savedInstanceState) {
    // In this example a callback is passed to respond to an item clicked in a RecyclerView
        productAdapter = new ProductAdapter(productClickCallback);
        binding.productsList.setAdapter(productAdapter);
    }
    ...

    // The callback makes the call to the activity to make the transition.
    private ProductClickCallback productClickCallback = product -> (
        ((MainActivity) requireActivity()).navigateToProductDetail(product.getId())
    );
}
您可以通过更新导航图来设置起始目的地和链接目的地的操作,并根据需要定义参数,从而取代此过程:
<navigation xmlns:android="http://schemas.android.com/apk/res/android"
    xmlns:app="http://schemas.android.com/apk/res-auto"
    xmlns:tools="http://schemas.android.com/tools"
    android:id="@+id/product_list_graph"
    app:startDestination="@id/product_list">

    <fragment
        android:id="@+id/product_list"
        android:name="com.example.android.persistence.ui.ProductListFragment"
        android:label="Product List"
        tools:layout="@layout/product_list">
        <action
            android:id="@+id/navigate_to_product_detail"
            app:destination="@id/product_detail" />
    </fragment>
    <fragment
        android:id="@+id/product_detail"
        android:name="com.example.android.persistence.ui.ProductDetailFragment"
        android:label="Product Detail"
        tools:layout="@layout/product_detail">
        <argument
            android:name="product_id"
            app:argType="integer" />
    </fragment>
</navigation>
然后,您可以更新自己的 Activity:
Kotlin
class MainActivity : AppCompatActivity() {

    // No need to load the start destination, handled automatically by the Navigation component
    override fun onCreate(savedInstanceState: Bundle?) {
        super.onCreate(savedInstanceState)
        setContentView(R.layout.activity_main)
    }
}
Java
public class MainActivity extends AppCompatActivity {

    // No need to load the start destination, handled automatically by the Navigation component
    @Override
    protected void onCreate(@Nullable Bundle savedInstanceState) {
        super.onCreate(savedInstanceState);
        setContentView(R.layout.activity_main);
    }
}
该 Activity 不再需要 navigateToProductDetail() 方法。在下一部分中,我们会更新 ProductListFragment 以使用 NavController 转到下一个商品详情屏幕。
安全地传递参数
Navigation 组件具有一个名为 Safe Args 的 Gradle 插件,该插件可生成简单的 object 和 builder 类,以便对为目的地和操作指定的参数进行类型安全的访问。
应用插件后,在导航图中的目的地上定义的任何参数都会使 Navigation 组件框架生成 Arguments 类,该类为目标目的地提供类型安全的参数。定义操作会使插件生成 Directions 配置类,该类用于告知 NavController 如何将用户转到目标目的地。当某项操作指向需要参数的目的地时,生成的 Directions 类包含需要这些参数的构造函数方法。
在 Fragment 内,使用 NavController 和生成的 Directions 类向目标目的地提供类型安全的参数,如下例所示:
Kotlin
class ProductListFragment : Fragment() {

    override fun onViewCreated(view: View, savedInstanceState: Bundle?) {
        // In this example a callback is passed to respond to an item clicked in a RecyclerView
        productAdapter = ProductAdapter(productClickCallback)
        binding.productsList.setAdapter(productAdapter)
    }
    ...

    // The callback makes the call to the NavController to make the transition.
    private val productClickCallback = ProductClickCallback { product ->
        val directions = ProductListDirections.navigateToProductDetail(product.id)
        findNavController().navigate(directions)
    }
}
Java
public class ProductListFragment extends Fragment  {
    ...
    @Override
    public void onViewCreated(@NonNull View view,
            @Nullable Bundle savedInstanceState) {
        // In this example a callback is passed to respond to an item clicked in a RecyclerView
        productAdapter = new ProductAdapter(productClickCallback);
        binding.productsList.setAdapter(productAdapter);
    }
    ...

    // The callback makes the call to the activity to make the transition.
    private ProductClickCallback productClickCallback = product -> {
        ProductListDirections.ViewProductDetails directions =
                ProductListDirections.navigateToProductDetail(product.getId());
        NavHostFragment.findNavController(this).navigate(directions);
    };
}
顶级导航
如果您的应用使用 DrawerLayout,那么在管理打开和关闭抽屉式导航栏以及转到其他目的地等操作的 Activity 中,可能有很多个配置逻辑。
生成的 Activity 可能如下所示:
Kotlin
class MainActivity : AppCompatActivity(),
    NavigationView.OnNavigationItemSelectedListener {

    override fun onCreate(savedInstanceState: Bundle?) {
        super.onCreate(savedInstanceState)
        setContentView(R.layout.activity_main)

        val toolbar: Toolbar = findViewById(R.id.toolbar)
        setSupportActionBar(toolbar)

        val drawerLayout: DrawerLayout = findViewById(R.id.drawer_layout)
        val navView: NavigationView = findViewById(R.id.nav_view)
        val toggle = ActionBarDrawerToggle(
                this,
                drawerLayout,
                toolbar,
                R.string.navigation_drawer_open,
                R.string.navigation_drawer_close
        )
        drawerLayout.addDrawerListener(toggle)
        toggle.syncState()

        navView.setNavigationItemSelectedListener(this)
    }

    override fun onBackPressed() {
        val drawerLayout: DrawerLayout = findViewById(R.id.drawer_layout)
        if (drawerLayout.isDrawerOpen(GravityCompat.START)) {
            drawerLayout.closeDrawer(GravityCompat.START)
        } else {
            super.onBackPressed()
        }
    }

    override fun onNavigationItemSelected(item: MenuItem): Boolean {
        // Handle navigation view item clicks here.
        when (item.itemId) {
            R.id.home -> {
                val homeFragment = HomeFragment()
                show(homeFragment)
            }
            R.id.gallery -> {
                val galleryFragment = GalleryFragment()
                show(galleryFragment)
            }
            R.id.slide_show -> {
                val slideShowFragment = SlideShowFragment()
                show(slideShowFragment)
            }
            R.id.tools -> {
                val toolsFragment = ToolsFragment()
                show(toolsFragment)
            }
        }
        val drawerLayout: DrawerLayout = findViewById(R.id.drawer_layout)
        drawerLayout.closeDrawer(GravityCompat.START)
        return true
    }
}

private fun show(fragment: Fragment) {

    val drawerLayout = drawer_layout as DrawerLayout
    val fragmentManager = supportFragmentManager

    fragmentManager
            .beginTransaction()
            .replace(R.id.main_content, fragment)
            .commit()

    drawerLayout.closeDrawer(GravityCompat.START)
}
Java
public class MainActivity extends AppCompatActivity
        implements NavigationView.OnNavigationItemSelectedListener {

    @Override
    protected void onCreate(Bundle savedInstanceState) {
        super.onCreate(savedInstanceState);
        setContentView(R.layout.activity_main);

        Toolbar toolbar = findViewById(R.id.toolbar);
        setSupportActionBar(toolbar);

        DrawerLayout drawer = findViewById(R.id.drawer_layout);
        NavigationView navigationView = findViewById(R.id.nav_view);
        ActionBarDrawerToggle toggle = new ActionBarDrawerToggle(
                this,
                drawer,
                toolbar,
                R.string.navigation_drawer_open,
                R.string.navigation_drawer_close);
        drawer.addDrawerListener(toggle);
        toggle.syncState();

        navigationView.setNavigationItemSelectedListener(this);
    }

    @Override
    public void onBackPressed() {
        DrawerLayout drawer = findViewById(R.id.drawer_layout);
        if (drawer.isDrawerOpen(GravityCompat.START)) {
            drawer.closeDrawer(GravityCompat.START);
        } else {
            super.onBackPressed();
        }
    }

    @Override
    public boolean onNavigationItemSelected(MenuItem item) {
        // Handle navigation view item clicks here.
        int id = item.getItemId();

        if (id == R.id.home) {
            Fragment homeFragment = new HomeFragment();
            show(homeFragment);
        } else if (id == R.id.gallery) {
            Fragment galleryFragment = new GalleryFragment();
            show(galleryFragment);
        } else if (id == R.id.slide_show) {
            Fragment slideShowFragment = new SlideShowFragment();
            show(slideShowFragment);
        } else if (id == R.id.tools) {
            Fragment toolsFragment = new ToolsFragment();
            show(toolsFragment);
        }

        DrawerLayout drawer = findViewById(R.id.drawer_layout);
        drawer.closeDrawer(GravityCompat.START);
        return true;
    }

    private void show(Fragment fragment) {

        DrawerLayout drawerLayout = findViewById(R.id.drawer_layout);
        FragmentManager fragmentManager = getSupportFragmentManager();

        fragmentManager
                .beginTransaction()
                .replace(R.id.main_content, fragment)
                .commit();

        drawerLayout.closeDrawer(GravityCompat.START);
    }
}
将 Navigation 组件添加到项目中并创建导航图后,添加图中的每个内容目的地(例如上述示例中的 Home、Gallery、SlideShow 以及 Tools。请确保您的菜单项 id 值与其关联的目的地 id 值相匹配,如下所示:
<!-- activity_main_drawer.xml -->
<menu xmlns:android="http://schemas.android.com/apk/res/android"
    xmlns:tools="http://schemas.android.com/tools"
    tools:showIn="navigation_view">

    <group android:checkableBehavior="single">
        <item
            android:id="@+id/home"
            android:icon="@drawable/ic_menu_camera"
            android:title="@string/menu_home" />
        <item
            android:id="@+id/gallery"
            android:icon="@drawable/ic_menu_gallery"
            android:title="@string/menu_gallery" />
        <item
            android:id="@+id/slide_show"
            android:icon="@drawable/ic_menu_slideshow"
            android:title="@string/menu_slideshow" />
        <item
            android:id="@+id/tools"
            android:icon="@drawable/ic_menu_manage"
            android:title="@string/menu_tools" />
    </group>
</menu>
<!-- activity_main_graph.xml -->
<navigation xmlns:android="http://schemas.android.com/apk/res/android"
    xmlns:app="http://schemas.android.com/apk/res-auto"
    xmlns:tools="http://schemas.android.com/tools"
    android:id="@+id/main_graph"
    app:startDestination="@id/home">

    <fragment
        android:id="@+id/home"
        android:name="com.example.HomeFragment"
        android:label="Home"
        tools:layout="@layout/home" />

    <fragment
        android:id="@+id/gallery"
        android:name="com.example.GalleryFragment"
        android:label="Gallery"
        tools:layout="@layout/gallery" />

    <fragment
        android:id="@+id/slide_show"
        android:name="com.example.SlideShowFragment"
        android:label="Slide Show"
        tools:layout="@layout/slide_show" />

    <fragment
        android:id="@+id/tools"
        android:name="com.example.ToolsFragment"
        android:label="Tools"
        tools:layout="@layout/tools" />

</navigation>
如果您匹配菜单和图中的 id 值,则可以连接此 Activity 的 NavController 以根据菜单项自动处理导航。NavController 还会处理打开和关闭 DrawerLayout,并会相应地处理向上和返回按钮的行为。
然后,您的 MainActivity 会进行更新以将 NavController 连接到 Toolbar 和 NavigationView。
有关示例,请参见以下代码段:
Kotlin
class MainActivity : AppCompatActivity()  {

    val drawerLayout by lazy { findViewById<DrawerLayout>(R.id.drawer_layout) }
    val navController by lazy {
      (supportFragmentManager.findFragmentById(R.id.main_content) as NavHostFragment).navController
    }
    val navigationView by lazy { findViewById<NavigationView>(R.id.nav_view) }

    override fun onCreate(savedInstanceState: Bundle?) {
        super.onCreate(savedInstanceState)
        setContentView(R.layout.activity_main)

        val toolbar = findViewById<Toolbar>(R.id.toolbar)
        setSupportActionBar(toolbar)

        // Show and Manage the Drawer and Back Icon
        setupActionBarWithNavController(navController, drawerLayout)

        // Handle Navigation item clicks
        // This works with no further action on your part if the menu and destination id’s match.
        navigationView.setupWithNavController(navController)

    }

    override fun onSupportNavigateUp(): Boolean {
        // Allows NavigationUI to support proper up navigation or the drawer layout
        // drawer menu, depending on the situation
        return navController.navigateUp(drawerLayout)
    }
}
Java
public class MainActivity extends AppCompatActivity {

    private DrawerLayout drawerLayout;
    private NavController navController;
    private NavigationView navigationView;

    @Override
    protected void onCreate(@Nullable Bundle savedInstanceState) {

        super.onCreate(savedInstanceState);
        setContentView(R.layout.activity_main);

        drawerLayout = findViewById(R.id.drawer_layout);
        NavHostFragment navHostFragment = (NavHostFragment)
            getSupportFragmentManager().findFragmentById(R.id.main_content);
        navController = navHostFragment.getNavController();
        navigationView = findViewById(R.id.nav_view);

        Toolbar toolbar = findViewById(R.id.toolbar);
        setSupportActionBar(toolbar);

        // Show and Manage the Drawer and Back Icon
        NavigationUI.setupActionBarWithNavController(this, navController, drawerLayout);

        // Handle Navigation item clicks
        // This works with no further action on your part if the menu and destination id’s match.
        NavigationUI.setupWithNavController(navigationView, navController);

    }

    @Override
    public boolean onSupportNavigateUp() {
        // Allows NavigationUI to support proper up navigation or the drawer layout
        // drawer menu, depending on the situation.
        return NavigationUI.navigateUp(navController, drawerLayout);

    }
}
您可以对基于 BottoreNavigationView 的导航和基于菜单的导航使用这种方法。有关更多示例,请参阅使用 NavigationUI 更新界面组件。
添加 Activity 目的地
当您应用中的每个屏幕都已连接起来以使用 Navigation 组件,并且您不再使用 FragmentTransactions 在基于 Fragment 的目的地之间转换后,下一步就是消除 startActivity 调用。
首先,确定您在应用中的哪些位置设置两个单独的导航图并使用 startActivity 在两者之间进行转换。
此示例包含两个图(A 和 B)以及从 A 转换到 B 的 startActivity() 调用。
Kotlin
fun navigateToProductDetails(productId: String) {
    val intent = Intent(this, ProductDetailsActivity::class.java)
    intent.putExtra(KEY_PRODUCT_ID, productId)
    startActivity(intent)
}
Java
private void navigateToProductDetails(String productId) {
    Intent intent = new Intent(this, ProductDetailsActivity.class);
    intent.putExtra(KEY_PRODUCT_ID, productId);
    startActivity(intent);
接着,在图 A 中,使用表示导航到图 B 的宿主 Activity 的 Activity 目的地替换上面的内容。如果您有要传递到图 B 的起始目的地的参数,您可以在 Activity 目的地定义中指定这些参数。
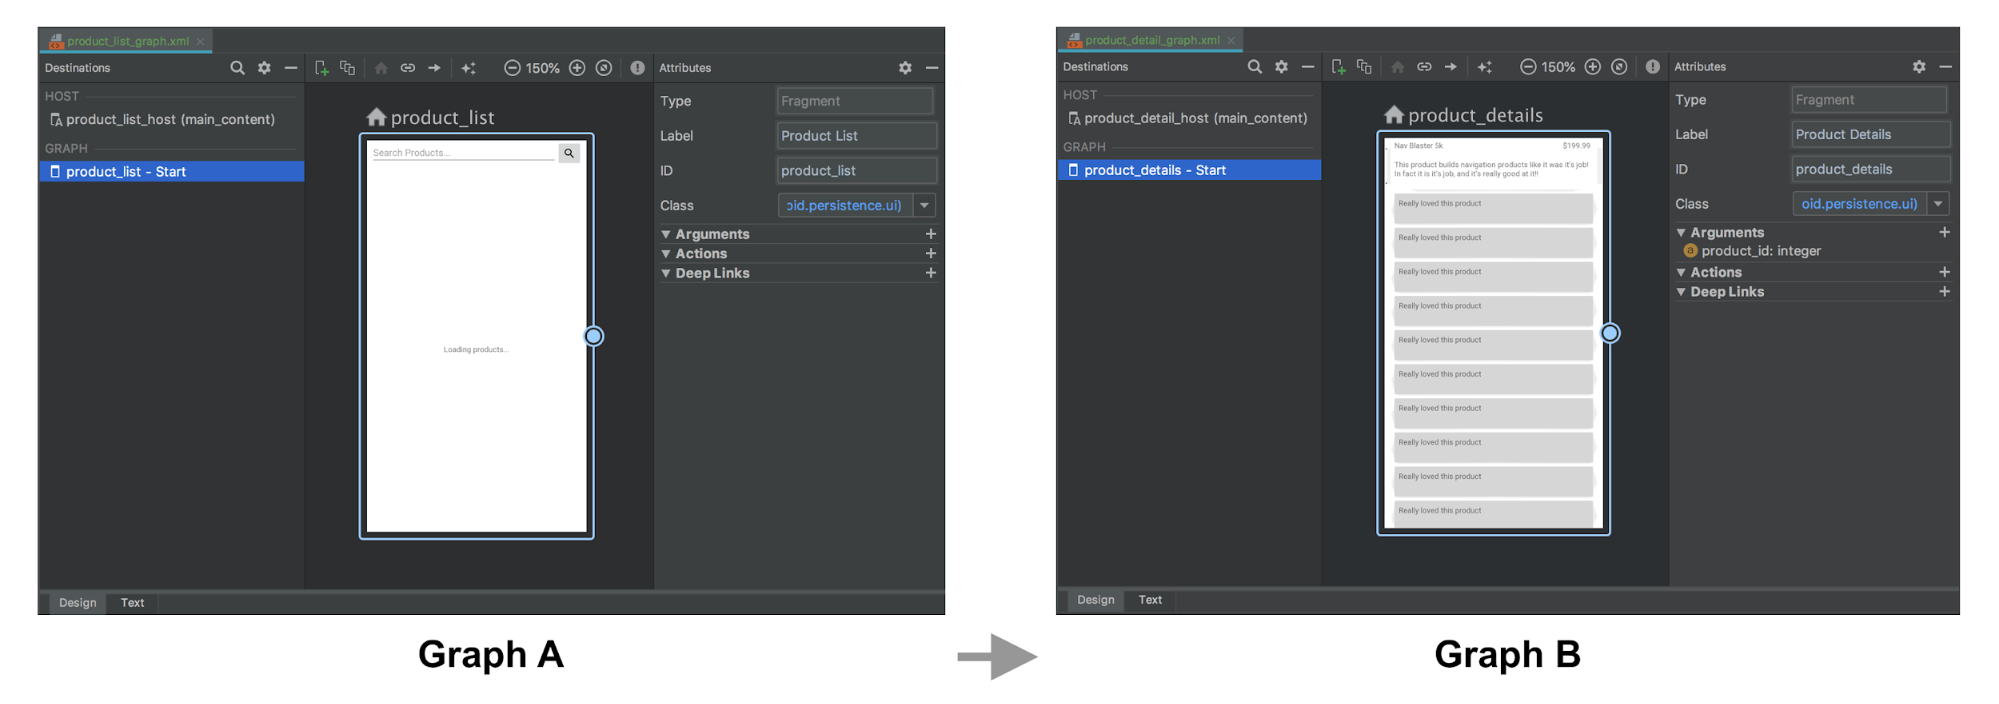
在以下示例中,图 A 定义 Activity 目的地,而后者具有 product_id 参数和操作。图 B 不包含任何更改。
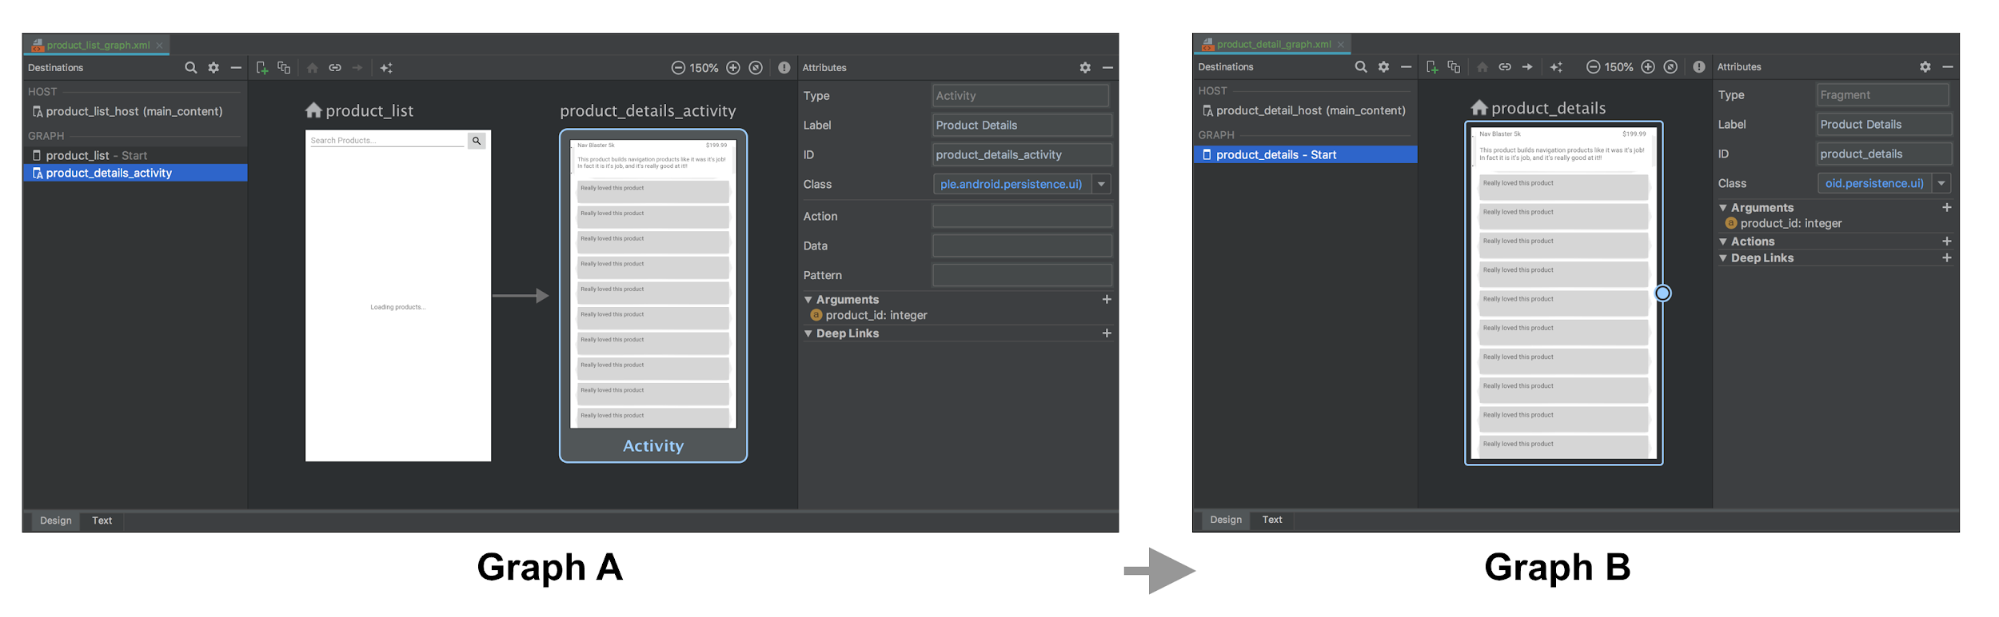
图 A 和图 B 的 XML 表示形式可能如下所示:
<!-- Graph A -->
<navigation xmlns:android="http://schemas.android.com/apk/res/android"
    xmlns:app="http://schemas.android.com/apk/res-auto"
    xmlns:tools="http://schemas.android.com/tools"
    android:id="@+id/product_list_graph"
    app:startDestination="@id/product_list">

    <fragment
        android:id="@+id/product_list"
        android:name="com.example.android.persistence.ui.ProductListFragment"
        android:label="Product List"
        tools:layout="@layout/product_list_fragment">
        <action
            android:id="@+id/navigate_to_product_detail"
            app:destination="@id/product_details_activity" />
    </fragment>

    <activity
        android:id="@+id/product_details_activity"
        android:name="com.example.android.persistence.ui.ProductDetailsActivity"
        android:label="Product Details"
        tools:layout="@layout/product_details_host">

        <argument
            android:name="product_id"
            app:argType="integer" />

    </activity>

</navigation>
<!-- Graph B -->
<navigation xmlns:android="http://schemas.android.com/apk/res/android"
    xmlns:app="http://schemas.android.com/apk/res-auto"
    xmlns:tools="http://schemas.android.com/tools"
    app:startDestination="@id/product_details">

    <fragment
        android:id="@+id/product_details"
        android:name="com.example.android.persistence.ui.ProductDetailsFragment"
        android:label="Product Details"
        tools:layout="@layout/product_details_fragment">
        <argument
            android:name="product_id"
            app:argType="integer" />
    </fragment>

</navigation>
您可以使用转到 Fragment 目的地所用的机制转到图 B 的宿主 Activity:
Kotlin
fun navigateToProductDetails(productId: String) {
    val directions = ProductListDirections.navigateToProductDetail(productId)
    findNavController().navigate(directions)
}
Java
private void navigateToProductDetails(String productId) {
    ProductListDirections.NavigateToProductDetail directions =
            ProductListDirections.navigateToProductDetail(productId);
    Navigation.findNavController(getView()).navigate(directions);
将 Activity 目的地 args 传递到起始目的地 Fragment
如果目的地 Activity 接收 extra(如上例所示),您可以将这些 extra 作为参数直接传递到起始目的地,但您需要在宿主 Activity 的 onCreate() 方法中手动设置宿主的导航图,以便可以将 Intent extra 作为参数传递到 Fragment,如下所示:
Kotlin
class ProductDetailsActivity : AppCompatActivity() {

    override fun onCreate(savedInstanceState: Bundle?) {
        super.onCreate(savedInstanceState)
        setContentView(R.layout.product_details_host)
        val navHostFragment = supportFragmentManager.findFragmentById(R.id.main_content) as NavHostFragment
        val navController = navHostFragment.navController
        navController
                .setGraph(R.navigation.product_detail_graph, intent.extras)
    }

}
Java
public class ProductDetailsActivity extends AppCompatActivity {

    @Override
    protected void onCreate(@Nullable Bundle savedInstanceState) {
        super.onCreate(savedInstanceState);

        setContentView(R.layout.product_details_host);
        NavHostFragment navHostFragment = (NavHostFragment)
            getSupportFragmentManager().findFragmentById(R.id.main_content);
        NavController navController = navHostFragment.getNavController();
        navController
                .setGraph(R.navigation.product_detail_graph, getIntent().getExtras());
    }

}
您可以使用生成的 args 类从 Fragment 参数 Bundle 中提取数据,如下例所示:
Kotlin
class ProductDetailsFragment : Fragment() {

    val args by navArgs<ProductDetailsArgs>()

    override fun onViewCreated(view: View, savedInstanceState: Bundle?) {
        val productId = args.productId
        ...
    }
    ...
Java
public class ProductDetailsFragment extends Fragment {

    ProductDetailsArgs args;

    @Override
    public void onCreate(@Nullable Bundle savedInstanceState) {
        super.onCreate(savedInstanceState);
        args = ProductDetailsArgs.fromBundle(requireArguments());
    }

    @Override
    public void onViewCreated(@NonNull View view,
            @Nullable Bundle savedInstanceState) {
       int productId = args.getProductId();
       ...
    }
    ...
合并 activity
如果出现多个 Activity 共用同一个布局(例如包含单个 Fragment 的简单 FrameLayout)的情况,您可以合并导航图。在大多数情况下,您只能合并每个导航图中的所有元素,并将任何 Activity 目的地元素更新为 Fragment 目的地。
以下示例将合并上一部分的图 A 和图 B:
合并前:
<!-- Graph A -->
<navigation xmlns:android="http://schemas.android.com/apk/res/android"
    xmlns:app="http://schemas.android.com/apk/res-auto"
    xmlns:tools="http://schemas.android.com/tools"
    android:id="@+id/product_list_graph"
    app:startDestination="@id/product_list">

    <fragment
        android:id="@+id/product_list"
        android:name="com.example.android.persistence.ui.ProductListFragment"
        android:label="Product List Fragment"
        tools:layout="@layout/product_list">
        <action
            android:id="@+id/navigate_to_product_detail"
            app:destination="@id/product_details_activity" />
    </fragment>
    <activity
        android:id="@+id/product_details_activity"
        android:name="com.example.android.persistence.ui.ProductDetailsActivity"
        android:label="Product Details Host"
        tools:layout="@layout/product_details_host">
        <argument android:name="product_id"
            app:argType="integer" />
    </activity>

</navigation>
<!-- Graph B -->
<navigation xmlns:android="http://schemas.android.com/apk/res/android"
    xmlns:app="http://schemas.android.com/apk/res-auto"
    xmlns:tools="http://schemas.android.com/tools"
    android:id="@+id/product_detail_graph"
    app:startDestination="@id/product_details">

    <fragment
        android:id="@+id/product_details"
        android:name="com.example.android.persistence.ui.ProductDetailsFragment"
        android:label="Product Details"
        tools:layout="@layout/product_details">
        <argument
            android:name="product_id"
            app:argType="integer" />
    </fragment>
</navigation>
合并后:
<!-- Combined Graph A and B -->
<navigation xmlns:android="http://schemas.android.com/apk/res/android"
    xmlns:app="http://schemas.android.com/apk/res-auto"
    xmlns:tools="http://schemas.android.com/tools"
    android:id="@+id/product_list_graph"
    app:startDestination="@id/product_list">

    <fragment
        android:id="@+id/product_list"
        android:name="com.example.android.persistence.ui.ProductListFragment"
        android:label="Product List Fragment"
        tools:layout="@layout/product_list">
        <action
            android:id="@+id/navigate_to_product_detail"
            app:destination="@id/product_details" />
    </fragment>

    <fragment
        android:id="@+id/product_details"
        android:name="com.example.android.persistence.ui.ProductDetailsFragment"
        android:label="Product Details"
        tools:layout="@layout/product_details">
        <argument
            android:name="product_id"
            app:argType="integer" />
    </fragment>

</navigation>
如果合并时保持操作名称不变,可确保该过程无缝完成,并且无需更改现有代码库。例如,navigateToProductDetail 在此处保持不变。唯一的区别在于此操作现在表示转到同一 NavHost 内的 Fragment 目的地,而非 Activity 目的地:
Kotlin
fun navigateToProductDetails(productId: String) {
    val directions = ProductListDirections.navigateToProductDetail(productId)
    findNavController().navigate(directions)
}
Java
private void navigateToProductDetails(String productId) {
    ProductListDirections.NavigateToProductDetail directions =
            ProductListDirections.navigateToProductDetail(productId);
    Navigation.findNavController(getView()).navigate(directions);
其他资源
如需详细了解 Navigation 相关信息,请参阅以下主题:
- 使用 NavigationUI 更新界面组件 - 了解如何使用顶部应用栏、抽屉式导航栏和底部导航栏管理导航
- 测试导航 - 了解如何测试应用的导航工作流程