
使用 Android Game Development Extension 时,您可以借助 Visual Studio 调试器 (LLDB) 调试项目。
运行调试器
您必须能够在 Android 上构建、部署和运行游戏,然后才能运行调试器。如需了解详情,请参阅运行示例部分。
确定在不使用调试器的情况下也能运行游戏后,您可以通过按 F5 或从调试菜单中选择开始调试项,来使用调试器。当调试器附加到游戏时,您应该会看到一个对话框。
启动调试器需要 10 秒到 1 分钟甚至更长时间,具体取决于应用的大小和启动时需加载的符号量。如果是首次附加到新设备,则所需时间会有所增加,因为调试器必须将某些 Android 库从设备下载到主机。如果您在使用新设备的头几次尝试中花费的时间超过 1 分钟,请考虑取消调试会话,然后重新启动它。
当您以这种方式运行调试器时,游戏会在“Waiting for Debugger”模式下启动,且不会执行任何游戏代码,直至调试器处于连接状态为止。这样一来,您还可以调试游戏的初始化部分。
如需详细了解 Visual Studio 调试器的特定功能,请阅读 Visual Studio 文档。
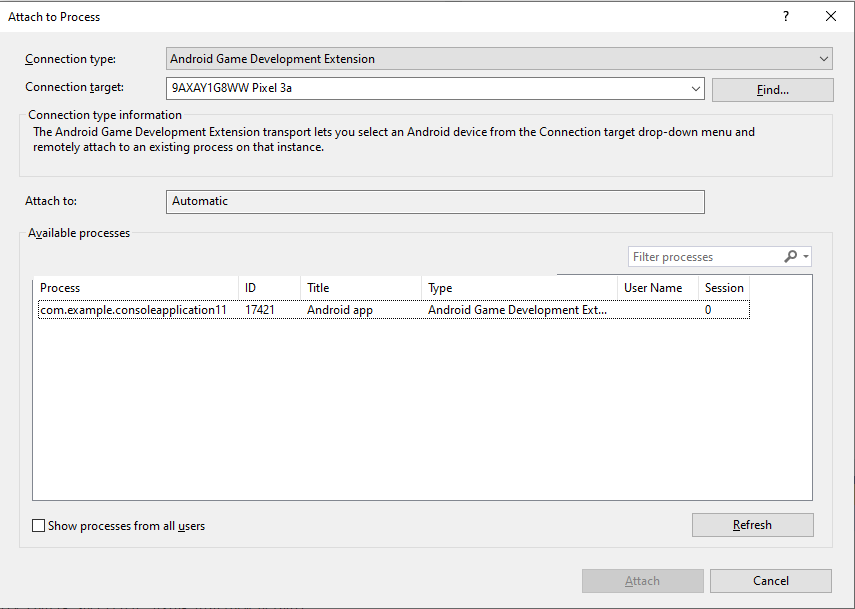
附加到进程
如果您希望调试已在实体设备或虚拟设备上运行的游戏,请将调试器附加到 Visual Studio 中的进程。
在 Visual Studio 中,确保 Android 解决方案处于开启状态,然后:
- 转到调试菜单,选择附加到进程…。
- 从传输下拉菜单中选择 Android Game Development Extension。
- 从限定符下拉菜单中,选择您的 Android 设备。
- 从可用进程列表中选择游戏进程,然后点击附加。
执行 LLDB.Shell 命令
调试会话处于活动状态后,请使用 Visual Studio 的命令窗口运行 LLDB.Shell 命令。
命令格式:
LLDB.Shell [command]
示例:
>LLDB.Shell expr myIntVariable = 9
Status:  Success
Output Message:
(int) $2 = 9
数据可视化
格式说明符
您可以在自动、局部变量、监视和变量数据提示窗口中,使用格式说明符来更改显示值所采用的格式。
格式说明符位于表达式末尾。它们以英文逗号开头,后跟一个简短的字符串。例如,_myInt,x 表达式中的 ,x 说明符会将“myInt”格式化为小写十六进制形式。
在监视窗口中,您可以直接使用格式说明符,而在自动、局部变量和数据提示窗口中,您需要将格式说明符添加到 Natvis 表达式中。如需了解详情,请参阅 Natvis。
支持的说明符列表
| 格式名称 | 说明符 | 说明 |
|---|---|---|
| 布尔值 | B | 显示为 true/false 布尔值,按照惯例 0 表示 false,其他为 true |
| 二进制 | b | 显示为位序列 |
| 二进制(无前导 0b) | bb | 显示为不带 0b 前缀的位序列 |
| 字节 | y | 显示为字节数,但同时尝试使用 ASCII 字符表示 例如 (int *) c.sp.x = 50 f8 bf 5f ff 7f 00 00 P.._.... |
| 带 ASCII 的字节 | Y | 显示为字节数,但同时尝试使用 ASCII 字符表示 例如 (int *) c.sp.x = 50 f8 bf 5f ff 7f 00 00 P.._.... |
| 字符 | c | 以 ASCII 字符的形式显示字节数 例如 (int *) c.sp.x = P\xf8\xbf_\xff\x7f\0\0 |
| 可打印字符 | C | 以可打印 ASCII 字符的形式显示字节数 例如 (int *) c.sp.x = P.._.... |
| 复杂浮点数 | F | 此值可解读为复杂浮点数的实部和虚部 例如 (int *) c.sp.x = 2.76658e+19 + 4.59163e-41i |
| 十进制 | d, i | 显示为带符号整数值(不执行类型转换,只以带符号的整数表示字节数) |
| 枚举 | E,en | 显示为枚举值,输出值的名称(如果适用)或整数值 例如 (enum enumType) val_type = eValue2 |
| 十六进制 - 小写 | x, h | 以小写十六进制表示法显示(不执行类型转换,只以十六进制表示字节数) |
| 十六进制 - 大写 | X, H | 以大写十六进制表示法显示(不执行类型转换,只以十六进制表示字节数) |
| 十六进制 - 小写,无前导 0x | xb, hb | 以不带 0x 前缀的小写十六进制表示法显示(不执行类型转换,只以十六进制表示字节数) |
| 十六进制 - 大写,无前导 0x | Xb, Hb | 以不带 0x 前缀的大写十六进制表示法显示(不执行类型转换,只以十六进制表示字节数) |
| 浮点数 | f | 显示为浮点数(不执行类型转换,只将字节数解读为 IEEE754 浮点值) |
| 八进制 | o | 以八进制表示法显示 |
| 操作系统类型 | O | 显示为 MacOS 操作系统类型 例如 (float) x = '\n\x1f\xd7\n' |
| 字符串 - C 字符串 | s | 显示为以 0 结尾的 C 字符串 例如 "hello world" |
| 字符串 - C 字符串,无引号 | sb | 显示为以 0 结尾、不带引号的 C 字符串 例如 hello world |
| 字符串 - UTF-8 | s8 | 显示为以 0 结尾的 UTF-8 字符串 例如 u8"hello world ☕" |
| 字符串 - UTF-8,无引号 | s8b | 显示为以 0 结尾、不带引号的 UTF-8 字符串 例如:hello world ☕ |
| 字符串 - UTF-16 | su | 显示为以 0 结尾的 UTF-16 字符串 例如 u"hello world ☕" |
| 字符串 - UTF-16,无引号 | sub | 显示为以 0 结尾、不带引号的 UTF-16 字符串 例如 hello world ☕ |
| 字符串 - UTF-32 | s32 | 显示为以 0 结尾的 UTF-32 字符串 例如 U"hello world ☕" |
| 字符串 - UTF-32,无引号 | s32b | 显示为以 0 结尾、不带引号的 UTF-32 字符串 例如:hello world ☕ |
| unicode16 | U | 显示为 UTF-16 字符 例如 (float) x = 0xd70a 0x411f |
| unicode32 | U32 | 显示为 UTF-32 字符 例如 (float) x = 0x411fd70a |
| 无符号十进制数 | u | 显示为无符号整数(不执行类型转换,只以无符号整数显示字节数) |
| 指针 | p | 显示为原生指针(除非这确实是一个指针,否则生成的地址可能无效) |
| 复杂整数 | I | 此值可解读为复杂整数的实部和虚部 例如 (int *) pointer = 1048960 + 1i |
| 字符数组 | a | 显示为字符数组 例如 (char) *c.sp.z = {X} |
| 原始 | ! | 原始格式,忽略任何数据类型视图自定义项 |
Natvis
借助 Natvis 框架,您可以自定义 Visual Studio 在调试器变量窗口中显示原生类型的方式。例如,使用 Natvis 自定义监视、局部变量和数据提示窗口的数据显示方式。
Natvis 功能默认处于启用状态,不过您可以通过 Visual Studio 予以停用,具体方法是依次选择工具 > 选项 > Android Game Development Extension > Natvis,将其标志设为已停用。
加载 Natvis 文件
Visual Studio 会从下列三个位置加载 Natvis 文件,并在每次启动调试会话时重新加载这些文件。文件必须遵循 Visual Studio 2017 Natvis 架构。
.natvis文件属于已加载的项目或顶级解决方案项的一部分。- 用户专属目录 (
%USERPROFILE%\Documents\Visual Studio 2017\Visualizers) - 系统级目录 (
%VSINSTALLDIR%\Common7\Packages\Debugger\Visualizers)
重新加载 Natvis 文件
在命令窗口或监视窗口中评估 .natvisreload,从而在调试会话中重新加载 Natvis 文件。
示例 Natvis 文件
以下示例 Natvis 文件包含目前受支持的所有标记和属性。
<?xml version="1.0" encoding="utf-8"?>
<AutoVisualizer xmlns="http://schemas.microsoft.com/vstudio/debugger/natvis/2010">
<Type Name="demo::Vector<*>">
<AlternativeType Name="MySimilarVectorType<*>"/>
<!-- Included to show the <SmartPointer> feature is supported. -->
<SmartPointer Optional="true" Usage="Minimal">ptr</SmartPointer>
<!-- Included to show the <DisplayString> feature is supported. -->
<DisplayString Condition="_size == 0" Optional="true">()</DisplayString>
<DisplayString Condition="_size == 1">(x={_items[0]})</DisplayString>
<DisplayString Condition="_size == 2">(x={_items[0]}, y={_items[1]})</DisplayString>
<DisplayString Condition="_size == 3">(x={_items[0]}, y={_items[1]}, z={_items[2]})</DisplayString>
<DisplayString>[Size={_size,x}] (x={_items[0]}, y={_items[1]}, z={_items[2]}, ...)</DisplayString>
<!-- Included to show the <StringView> feature is supported. -->
<StringView Condition="true" Optional="true">_stringViewText</StringView>
<Expand HideRawView="false">
<!-- Included to show the <Item> feature is supported. -->
<Item Name="X" Condition="_size < 4 && _size >= 1" Optional="true">_items[0]</Item>
<Item Name="Y" Condition="_size < 4 && _size >= 2" Optional="true">_items[1]</Item>
<Item Name="Z" Condition="_size < 4 && _size >= 3" Optional="true">_items[2]</Item>
<!-- Included to show the <ArrayItems> feature is supported. -->
<ArrayItems Condition="_size >= 4" Optional="true">
<Size Condition="true" Optional="true">_size</Size>
<ValuePointer Condition="true">_items</ValuePointer>
</ArrayItems>
<!-- Included to show the <IndexListItems> feature is supported. -->
<IndexListItems Condition="true" Optional="true">
<Size Condition="true" Optional="true">_listSize</Size>
<ValueNode Condition="true">_list[%i]</ValueNode>
</IndexListItems>
<!-- Included to show the <LinkedListItems> feature is supported. -->
<LinkedListItems Condition="true" Optional="true">
<Size Optional="true">_listSize</Size>
<HeadPointer>_head</HeadPointer>
<NextPointer>_next</NextPointer>
<ValueNode>_value</ValueNode>
</LinkedListItems>
<!-- Included to show the <ExpandedItem> feature is supported. -->
<ExpandedItem Condition="true" Optional="true">_childVar</ExpandedItem>
<!-- Included to show the <Synthetic> feature is supported. -->
<Synthetic Name="[Size]" Condition="true" Optional="true">
<DisplayString>_size</DisplayString>
<Expand HideRawView="true">
<!-- Any supported <Expand> sub-tags. -->
</Expand>
</Synthetic>
<!-- Included to show the <TreeItems> feature is supported. -->
<TreeItems Condition="true" Optional="true">
<Size>_treeSize</Size>
<HeadPointer>_head</HeadPointer>
<LeftPointer>_left</LeftPointer>
<RightPointer>_right</RightPointer>
<ValueNode>_value</ValueNode>
</TreeItems>
<!-- Included to show format specifiers are supported. -->
<Item Name="[Hex Dump at {_index,x}]">myInt[_index],x</Item>
</Expand>
</Type>
</AutoVisualizer>
编写 Natvis 文件
Visual Studio 支持您编写自己的 Natvis 文件。更多信息 如需了解如何自定义调试程序变量窗口,请参阅 MSDN。
调试 Natvis 文件
在某些情况下,错误会在自动和监视等窗口中显示为变量的值。例如:<error: use of undeclared
identifier 'missingVar'>。
您可以从 Android Game Development Extension 工具栏中打开 GoogleAndroid.log 文件,更加详细地了解相关错误。
已知限制
如果您的标记或属性未列入上述示例文件,则表明这类标记或属性目前不受支持。Visual Studio 会忽略不受支持的标记和属性,因此您可以在现有的 Natvis 文件中保留它们,只要文件遵循我们的架构,就可以正常使用。
尽管
Usage是架构必需的属性,但<SmartPointer>不支持该属性。不过,LLDB 并不限制对 C++ 中定义的运算符的访问,因此您可以改为在 C++ 中定义所需的运算符。