Na tej stronie opisujemy, jak pobrać, zaimportować i skonfigurować wtyczkę Unity dla narzędzia Android Performance Tuner.
Wymagania
Aby używać wtyczki w grze, użyj obsługiwanej wersji Unity:
- Unity w wersji 2017.4 lub nowszej i .NET w wersji 4.6
- Aby używać plików rozszerzających APK, musisz mieć Unity 2018.2.
- Aby uzyskać lepsze tempo klatek i pomiary GPU, wymagana jest wersja Unity 2019.3.14 lub nowsza.
- Aby obsługiwać sceny Addressables, musisz mieć Unity w wersji 2019.3 lub nowszej oraz pakiet Addressables w wersji 1.19.4 lub nowszej.
Pobieranie wtyczki
Pobierz wtyczkę z repozytorium GitHub. Wybierz pobieranie pliku .unitypackage.
Importowanie wtyczki
Zanim zaimportujesz wtyczkę, upewnij się, że Twój projekt korzysta z platformy .NET w wersji 4.6. Dotyczy to Unity w wersji 2018.4 i starszych (nowsze wersje Unity zawierają tylko .NET w wersji 4.6).
- Wybierz File > Build Settings (Plik > Ustawienia kompilacji). Upewnij się, że Android jest wybraną platformą.
- Kliknij przycisk Ustawienia odtwarzacza.
- W sekcji Other Settings (Inne ustawienia) odszukaj Scripting Runtime Version (Wersja środowiska wykonawczego skryptów) i wybierz .NET 4.6.
Wtyczka jest dostępna jako pakiet Unity, który możesz zaimportować do projektu.
Kliknij Zasoby > Importuj pakiet > Pakiet niestandardowy i wybierz pobrany plik.unitypackage.
Wersja wtyczki Android Performance Tuner 1.5.1 lub nowsza z Unity 2017
Używanie narzędzia Android Performance Tuner w wersji 1.5.1 lub nowszej z Unity 2017 wymaga wykonania tych dodatkowych czynności podczas importowania wtyczki:
- Otwórz folder Assets/AndroidPerformanceTuner/Editor.
- Kliknij plik Google.Android.PerformanceTuner.Editor, aby otworzyć go w inspektorze.
- Kliknij brakujące odwołanie do komponentu, a potem kliknij –, aby je usunąć.
Kliknij przycisk Zastosuj.
 Rysunek 1. Brak odwołania do komponentu.
Otwórz folder Assets/AndroidPerformanceTuner/Runtime.
Kliknij plik Google.Android.PerformanceTuner, aby otworzyć go w Inspektorze.
Powtórz krok 3, aby usunąć 2 brakujące odwołania do zestawu.
Uruchom ponownie Unity.
Kliknij Window > AndroidPerformanceTuner > Setup (Okno > AndroidPerformanceTuner > Konfiguracja) i sprawdź, czy nie wyświetlają się żadne błędy.
Ponowne importowanie wtyczki po jej usunięciu
Jeśli ponownie importujesz wtyczkę po usunięciu jej z projektu, najpierw usuń ANDROID_PERFORMANCE_TUNER_UTILITIES z sekcji Ustawienia odtwarzacza > Symbole definiowania skryptów.
Konfigurowanie wtyczki
Aby skonfigurować wtyczkę:
W przypadku Unity w wersji 2019.3.14 lub nowszej:
Włącz bibliotekę Android Frame Pacing. Narzędzie Android Performance Tuner będzie używać tej biblioteki do pomiaru wydajności gry, w tym do bardziej szczegółowych pomiarów niż te, które podaje samo Unity.
Wybierz File > Build Settings (Plik > Ustawienia kompilacji) i kliknij przycisk Player Settings (Ustawienia odtwarzacza). W sekcji Rozdzielczość i prezentacja zaznacz pole wyboru Zoptymalizowane tempo klatek.
Synchronizuj renderowanie klatek z pionowymi przerwami.
W Ustawieniach odtwarzacza wybierz kartę Jakość i znajdź menu Liczba synchronizacji pionowej. Wybierz dowolną opcję (z wyjątkiem Nie synchronizuj). Wybór opcji innych niż Nie synchronizuj umożliwia dokładniejsze pomiary w połączeniu z biblioteką Android Frame Pacing.
(W przypadku wersji Unity starszych niż 2019) Ustaw system kompilacji na Gradle. Wybierz Plik > Ustawienia kompilacji. Znajdź System kompilacji i wybierz Gradle.
Dodaj uprawnienie dostępu do internetu. W sekcji Inne ustawienia znajdź Dostęp do internetu i wybierz Wymagaj.
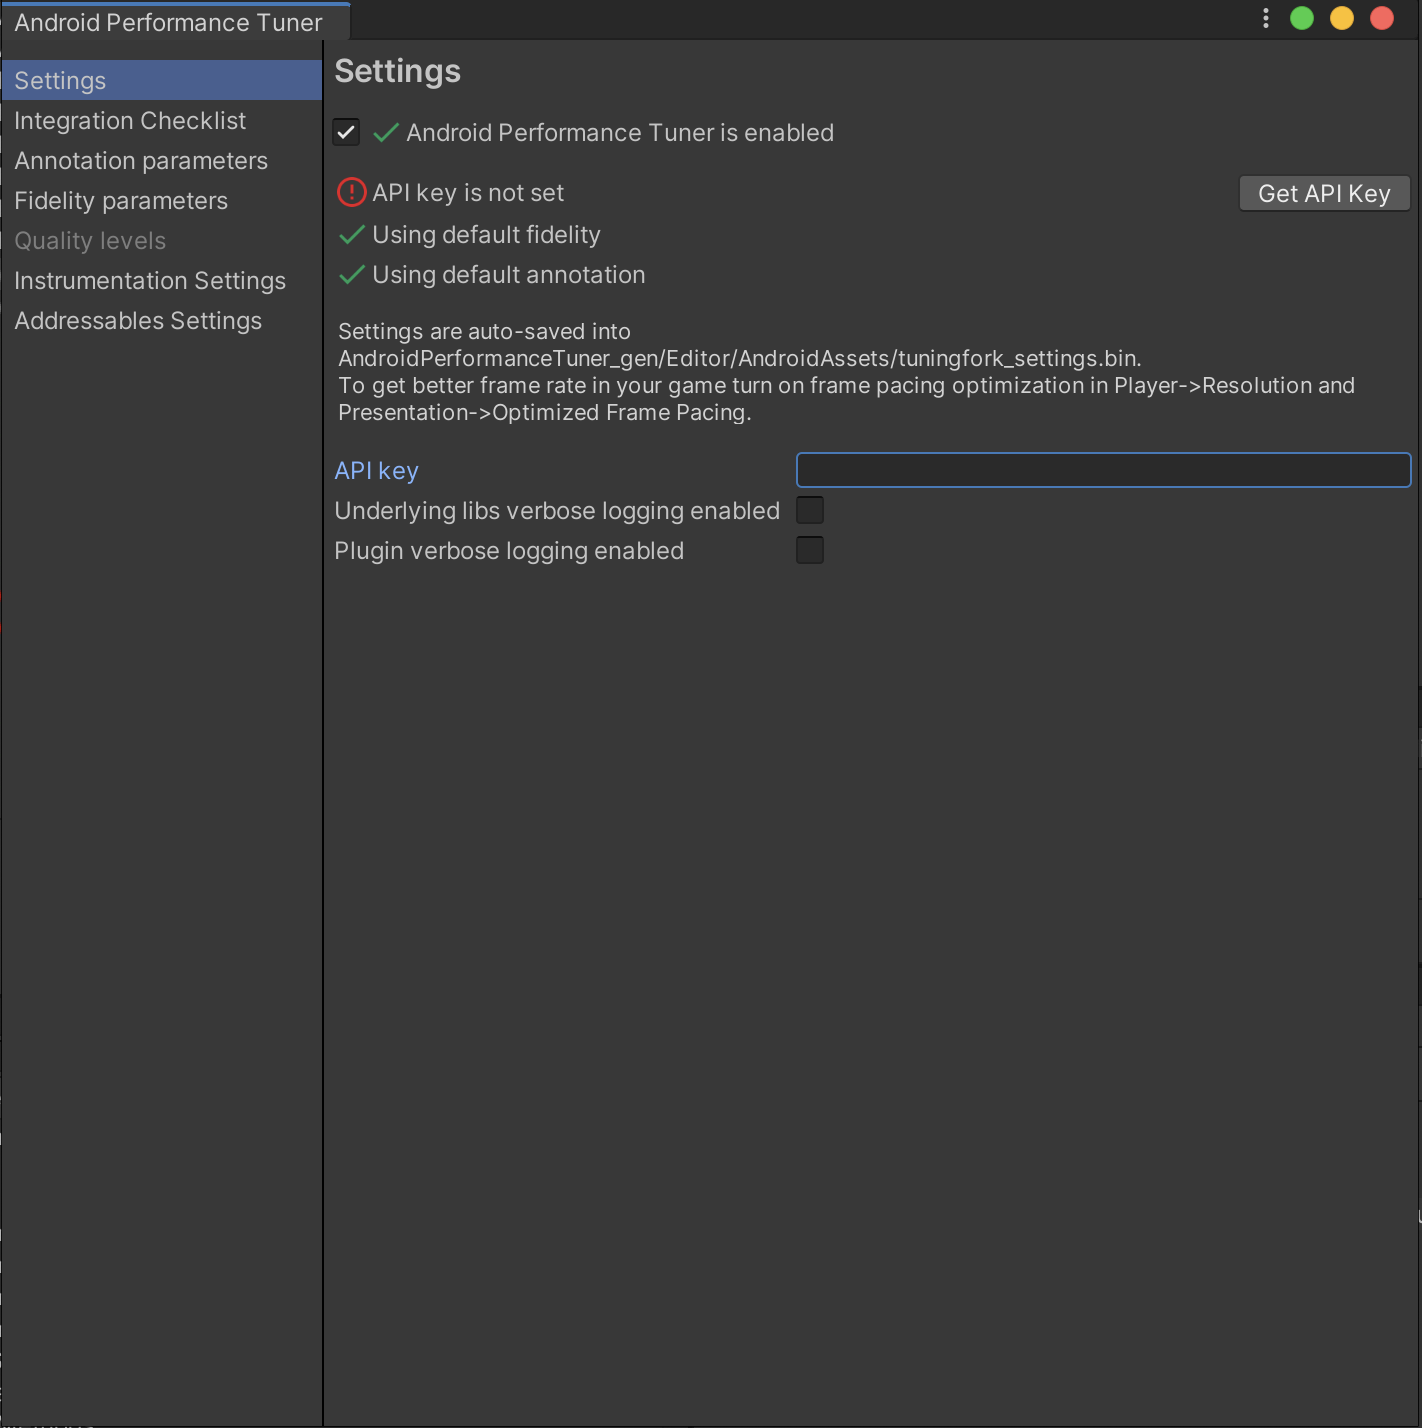
Wpisz klucz interfejsu API. Po zainstalowaniu wtyczki możesz ją otworzyć w menu Window > Android Performance Tuner > Setup (Okno > Android Performance Tuner > Konfiguracja). W tym oknie wybierz kartę Ustawienia i w polu Klucz interfejsu API wpisz klucz interfejsu API z projektu Google Cloud.
 Rysunek 2. Karta Ustawienia w wtyczce
